| Pages:
1
2 |
5Qr25Pla
Harmless

Posts: 11
Registered: 18-2-2018
Member Is Offline
Mood: No Mood
|
|
thank you for the ebook.
i am going to try to run the system again with the included adjustments. im not sure if that will be today/tomorrow or when yet but it will be soon. i
need to get my hands on some pure helium. otherwise ill have to use argon. but i am hoping the gas supply business near me has pure enough helium.
|
|
|
5Qr25Pla
Harmless
Posts: 11
Registered: 18-2-2018
Member Is Offline
Mood: No Mood
|
|
I have not abandoned this thread. i am still trying to gather materials. i need stainless steel and havnt had the opportunity to buy any yet. a quartz
reactor would be nice too. but i highly doubt ill come across one in the near future. but that's okay. the stainless should do great.
my last reactor did not handle the heat. i ran the whole process (without the lithium but with everything else) and i heated my reactor and it could
only stand a temperature of about 400C (nipples connecting to inlet and outlet hoses were too hot/melted rubber hoses)
my last reactor also relied on the seal of pressed metal. as the metal was heated/cooled, the seal expanded/contracted making tiny escape holes for
hydrogen.
i tested various peices of stainless tubing that i had and found that if i heated the lower portion of a 200-300mm tube that the higher portion seemed
to stay cool enough for my seal and hoses to remain intact. i just need to get better materials and i will try again.
|
|
|
5Qr25Pla
Harmless
Posts: 11
Registered: 18-2-2018
Member Is Offline
Mood: No Mood
|
|
Improvements
When I began this effort, I assumed I would be able to reliably produced enough hydrogen and dry it enough at the same time to use the hydrogen as it
was being produced for the reaction. This quickly has proven to be a bad idea. The Hydrogen must first be produced using any means necessary as long
as you only form hydrogen. And then it must be dried and compressed for use.
I will now detail the new method and improvements
Step One - Hydrogen Production (Aluminium/NaOH/H2O method)
a five gallon bucket with a bag of aluminium balls/foil/other sealed to the side of it was fitted with a lid that had a distill head and condenser
sealed into it.
the condenser lead to a water trap and then was lead to an (optional) vertical coil condenser that was cooled with the coolest ice water (to remove
more water. but this second condenser only catches a few drops or so.
after the final water trap there was a vacuum take-off adapter that was lead into the intake of a compressor and that compressor was set to fill at
the rate of production. (a large heavy duty balloon or bag was used with a switch to do this)
the whole system including the bag of aluminum is purged with argon or hydrogen (hydrogen greatly preffered for purity)
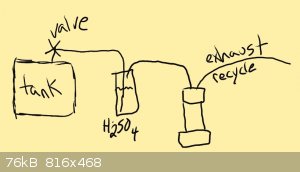
Step Two - Drying the Hydrogen (sulfuric acid method)
the first compressor with the "wet" hydrogen was srayed through a very tall 1 liter graduated cylinder that was filled full with broken glass to break
up bubbles.
these bubbles took up a lot of volume so the rate was rather slow. but the slow rate ensured that the acid could strip any moisture.
the acid used was very cold but was NOT allowed to absorb atmospheric moisture. the acid was cooled AFTER being charged into the cylinder.
the exhaust/dried hydrogen was then charged into a second compressor/tank
(there will be some contamination in the hydrogen after the first run due to the air that was already in the tanks. the first run should be used to
purge the system. the second run can be consider pure IF there were no leaks and you were careful. but the first tanks with hydrogen will NOT be pure
and WILL NOT be useful for this reaction)
this may sound like a lot of work. but i was able to run this reaction twice in one hour.
one run purged my compressors of old air and moisture. and another run gave me pure (mostly dry) hydrogen.
there will almost positively be a LITTLE moisture left in the second tank of hydrogen. that being said. it will be in anyone's best interest to dry
the hydrogen AGAIN between the tank valve and lithium reaction zone.
if you only have one compressor/tank it is completely fine to use only one (assuming you are going to dry the hydrogen after the tank and before the
lithium reaction zone)
being able to have a higher flow of hydrogen through your drying acid (or other drying agent) will be to your advantage. the lithium absorbs hydrogen
fairly quickly and you dont want to risk it absorbing more hydrogen than you can provide. this might not be a problem. but then again. it might be. i
wouldnt want to find out the hard way.
[Edited on 22-4-2018 by 5Qr25Pla]
|
|
|
5Qr25Pla
Harmless
Posts: 11
Registered: 18-2-2018
Member Is Offline
Mood: No Mood
|
|
now the hydrogen is made. it has been dried. and is stored in a tank at whatever psi you like. mine is at ~120 psi and i have a 3-5 gallon tank
(guessing by size. its an old air compressor and tank for cars)
next is to prepare a vessel for the reaction. these are the parts i used.
2 - 304/316 Stainless Steel Cap 1 inch
1 - 304/316 Stainless Steel Nipple 1 inch(d) x 8 - 12 inch long (i prefer longer for "safety")
2 - 304/316 Stainless Steel Nipple 1/4 inch x 6 inch
2 - 1/4 to 1/8 reducers
2 - 5 - 10 feet 1/8 stainless steel pipe/tubing
1 - 1/4 stainless steel threader (make sure its the right size for your nipples!!)
1 - 1/4 drillbit for drilling holes through one cap for nipples
(1x8 inch nipple and 1 stainless steel cap is all that has to be stainless. others dont have to be if you cant afford it)
(all of these items were ordered on the internet at the same website. and are easy to find anywhere and even are sold locally in most towns)
one of the caps had two holes drilled in it @ 1/4 inch diameter. these holes were tapped/threaded and fitted with the 2 - 1/4 x 6 nipples. these
nipples were screwed in super tight to create a seal and will never be removed. if you can weld. weld them in to prevent leaks.
the 2 - 1/4 x 6 nipples were fitted with the reducers and then the 5 - 10 foot tubes were fitted in the reducers
these tubes are the inlet and outlet of our reactor this is screwed onto the 1inch by 8-12 inch nipple so tight that it seals and ruins the threads.
again. weld this if you can. its so much better. but if you cant. just make sure there is ZERO leak. this is VERY difficult to do without welding. and
traditional tape/dope wont work as it gets too hot.
the bottom is now left open. you are left with one cap. the apparatus looks like this.
1/8 tubing/inlet.............1/8 tubing/outlet
............|..........................................|
===========|| ||=================
..........................|||| - 1/4 x 6 nipples
.........................[ ] - cap
..........................| |
..........................| | - 1inch x 8-12 inch nipple/tube/chamber
..........................| |
the other cap is not yet on because it hasnt been charged yet. we will put the other cap on after the lithium is placed inside and then we will
tighten that cap to seal it too.
[Edited on 22-4-2018 by 5Qr25Pla]
[Edited on 22-4-2018 by 5Qr25Pla]
|
|
|
5Qr25Pla
Harmless
Posts: 11
Registered: 18-2-2018
Member Is Offline
Mood: No Mood
|
|
The Verdict
okay. the hydrogen is ready and waiting. and our (hopefully sealed very very well because if its not thats gonna be really bad) reactor is mostly
assembled and ready to go. now on to the actual reaction.
DO NOT WORK WITH HYDROGEN WITHOUT GREAT VENTILATION
before we begin we should be sure that we are ready to either store or dispose of the product. the product lithium hydride will be in lump metallic
form. it will be stuck to the insides of the apparatus and it will be difficult to remove without a drill or mill or something. a hammer and chisel
will work. but be aware that the product is dangerous and CAN ignite if care is not taken.
the hydride is mostly safe in the air and as long as one is careful it can be removed without any inert atmosphere or special solvents.
do NOT allow moisture to come into contact with the hydride.
the reaction has three main parts
1. the hydrogen is released from its storage tank
2. the hydrogen is dried over very cold sulfuric acid or better drying agent
3. the hydrogen is reacted with the lithium in the final reactor
the lithium reactor (1inch x 8-12 inch nipple/pipe) is filled with up to 10 grams of lithium (i used 3 grams and it seemed to be a small amount that
was hard to get out as most of it coated the walls. more would likely pool up easier)
the other cap from before is placed on the end of the pipe and tighted to the extreme. (when you close up the exhaust and spray hydrogen in there
should be ZERO leaks. ZERO)
leaks can fairly safely be found with a flame. if there is a dangerous amount of leakage a flame will be present. if there is a flame. just turn off
the hydrogen. allow to cool. and tighten again.
once the reactor is sealed and the lithium is inside be sure that the drying cylinder and all connections are good. then purge the system with
hydrogen to remove air.
after purging the system and you are sure there is no more air you may begin heating the lithium reactor.
heat the reactor slowly to between 700C and750C (the book by Len1 suggested 730C)
at this temperature the lithium AND the lithium hydride are both liquids and the reaction goes pretty easy. as long as the temperature is accurately
measured and hydrogen flow is adequate about 4-8 grams per hour can be converted to the hydride.
the lithium hydride will form blobs on top of the lithium that will sink to the bottom and expose more lithium. eventually (rather quickly) all of the
lithium is converted and hydrogen absorbtion stops.
once hydrogen absorbtion stops allow the reactor to cool completely while under hydrogen still (doesnt take long. few minutes tops)
once cooled you may disassemble your device and retrieve the hydride. unscrewing the bottom cap to get to the hydride was the route i took. but this
was VERY difficult. its worthwhile. but if you want to make larger amounts i would recommend coming up with a method to quickly get the cap off. the
lithium melts and "welds" to the inside of the cap and tube making removal of the cap very difficult and i even admit that i was tempted to just cut
the end off. but i didnt. after much work i got the cap off.
lithium WILL eventually make its way through the metal and the threads on the cap. but this never happened to me. i wouldnt run this reaction for
longer than an hour or two. just to be safe. another good idea would be to put the reactor in another steel tube just in case lithium leaks. but as
long as you have good ventilation the leaking lithium shouldnt be too big of a worry. it will come out very slowly. just stop the reaction if it does.
about 4 hours of work and about 3 or 4 grams of lithium yielded about 3 grams of lithium hydride. there was more hydride stuck inside that i left
there and couldnt easily remove.
any impurities from the oxidation/nitration of the lithium were negligable and did not seem to hurt the yield to any noticable degree.
|
|
|
Ubya
International Hazard
Posts: 1232
Registered: 23-11-2017
Location: Rome-Italy
Member Is Offline
Mood: I'm a maddo scientisto!!!
|
|
nice setup, i just have a safety complain, to detect hydrogen leaks is enough some soapy water in a spray bottle, lighting any leaks could be
dangerous if the system is not compleatly purged.
nice job for your system!
regarding the stuck bottom pipe cap after the completed reaction you could try to make a custom reaction chamber and using another way to close it,,
like a pressure clamp or something else, threads can get filled with lithium hydride and as you experienced be a pain to separate
---------------------------------------------------------------------
feel free to correct my grammar, or any mistakes i make
---------------------------------------------------------------------
|
|
|
symboom
International Hazard
Posts: 1143
Registered: 11-11-2010
Location: Wrongplanet
Member Is Offline
Mood: Doing science while it is still legal since 2010
|
|
Nurdrage has a solution for that using a smoke detector
This can detect hydrogen gas
Detect Hydrogen with a Carbon Monoxide Detector
https://m.youtube.com/watch?v=rAZR_ExLE8U
A c clamp to hold the appetatus closed also
Congradulations you are the first to make lithium hydride using home chemistry improvisation
[Edited on 23-4-2018 by symboom]
|
|
|
symboom
International Hazard
Posts: 1143
Registered: 11-11-2010
Location: Wrongplanet
Member Is Offline
Mood: Doing science while it is still legal since 2010
|
|
Video of synthesis of lithium hydride
Its a good use for a ballon
https://m.youtube.com/watch?v=gChXsfCj0lw
https://m.youtube.com/watch?v=YZMd5oFKNb4
[Edited on 18-8-2018 by symboom]
[Edited on 18-8-2018 by symboom]
|
|
|
| Pages:
1
2 |


