| Pages:
1
2
3 |
Hennig Brand
International Hazard

Posts: 1284
Registered: 7-6-2009
Member Is Offline
Mood: No Mood
|
|
I just tried today to remove the cone actually, and the copper was thin at the base of the cone (close to where the plating solution meets the
aluminum form). The short piece of copper pipe was also a bit too loose which caused a problem with removal. By the time I got the cone off I had
damaged it quite badly. The aluminum form was also oxidized/eroded quite badly where the form met the surface of the plating solution. Oh well, it
had only been plating for two days, no big loss.
I think I may have a solution to the problem though. If just the cone part of the form were exposed and well submerged below the surface of the
plating solution, and the submerged sides of the form covered with an insulating material, I believe this would solve both problems. I am trying
electrical tape right now. It was carefully wrapped around the forum, leaving just the cone exposed, then well submerged in the plating solution. If
the electrical tape does not work, I am sure something else will.
|
|
|
gnitseretni
Hazard to Others
Posts: 280
Registered: 5-1-2007
Location: Medellin
Member Is Offline
Mood: No Mood
|
|
Quote: Originally posted by Hennig Brand  | | I just tried today to remove the cone actually, and the copper was thin at the base of the cone (close to where the plating solution meets the
aluminum form). |
That's due to evaporation. The level keeps dropping as water evaporates. The cone will be paper thin at the very top and gradually increase in
thickness to wherever the level is at when you stop plating.
Add water to make up for evaporation and keep it at the exact same level it was at when you started plating and you should get a thicker edge that the
piece of plumbing pipe will butt up against so you can push the cone off.
Yup, same problems I've been having. That's usually also the only place where the cone is stuck to the form. I use a sharp thin knife and carefully
pry it between the cone and the form and go round and round until it pops off. But I like your idea of using a "puller" better.
| Quote: Originally posted by Hennig Brand | | I think I may have a solution to the problem though. If just the cone part of the form were exposed and well submerged below the surface of the
plating solution, and the submerged sides of the form covered with an insulating material, I believe this would solve both problems. I am trying
electrical tape right now. It was carefully wrapped around the forum, leaving just the cone exposed, then well submerged in the plating solution. If
the electrical tape does not work, I am sure something else will. |
Let us know how it works out. I've tried Sharpie myself.. didn't work. (Worth a try  ) I thought about using tape but thought the plating solution would probably find a way to get in between the tape and the form. If the
tape doesn't work, maybe a layer of paint or varnish or something. ) I thought about using tape but thought the plating solution would probably find a way to get in between the tape and the form. If the
tape doesn't work, maybe a layer of paint or varnish or something.
|
|
|
Mr. Wizard
International Hazard
Posts: 1042
Registered: 30-3-2003
Member Is Offline
Mood: No Mood
|
|
Regarding the corrosion on the aluminum forms, be aware they might be using an alloy of zinc and aluminum for these. There is a spectrum of purity in
'white metal' alloys which are heavily recycled. Even aluminum beverage cans have a mixture of products. As the purity goes down, this admix of
copper, lead, tin, zinc, magnesium, and everything that will melt gets used to form this non demanding product.
|
|
|
Hennig Brand
International Hazard
Posts: 1284
Registered: 7-6-2009
Member Is Offline
Mood: No Mood
|
|
With all the aluminum products out there, I guess one would need to be careful that they were getting the right thing. I think that most round stock
from a machine shop would have a very definite composition though. Admittedly, I forgot to ask what the composition of the aluminum round stock I
purchased was.
Here is a basic description of my method for turning aluminum cones.
It is not very difficult to make a cone on a lathe. Just make sure the round stock is chucked as straight as possible, after that you can't really go
wrong. As long as it is well centered in the chuck and is going around in a perfect circle, you are almost guaranteed a perfect cone shape. At the
very end just take small cuts so as not to leave excessive roughness. Finally use emery cloth, progressively using finer and finer emery cloth until
the form is as smooth as glass.
For making smaller forms on the lathe you can easily just use a metal file instead of a cutter, and then emery cloth. I guess you could use a file for
the big cones too, but it would take much longer.
[Edited on 13-9-2011 by Hennig Brand]
|
|
|
watson.fawkes
International Hazard
Posts: 2793
Registered: 16-8-2008
Member Is Offline
Mood: No Mood
|
|
| Quote: Originally posted by Hennig Brand | | With all the aluminum products out there, I guess one would need to be careful that they were getting the right thing. I think that most round stock
from a machine shop would have a very definite composition though. Admittedly, I forgot to ask what the composition of the aluminum round stock I
purchased was. |
Most aluminum alloys in machine shops are alloyed with something: silicon, magnesium, zinc,
etc. There are lots of them. The 1xxx series of aluminum alloys are all minimum 99% Al content. Alloy 1199 is 99.99% pure aluminum.
|
|
|
Hennig Brand
International Hazard
Posts: 1284
Registered: 7-6-2009
Member Is Offline
Mood: No Mood
|
|
Thanks for the information. I remember seeing some lettering along the length of the round stock but I didn' t have a lot of choice at the time anyway
(I took what they had). It sounds like what I have is probably fine.
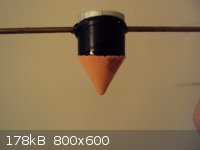
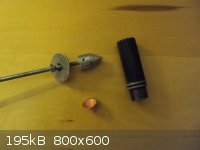
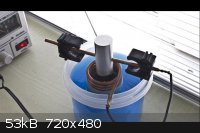
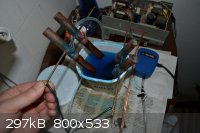
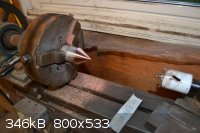
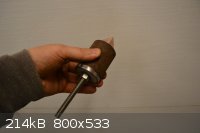
I left the 3/4" aluminum form to plate for 3 days. This time the cone popped off very easily with a little pressure from the puller. I had to get a
sleeve for the puller that fit the aluminum form better. With some help a piece of an old lamp stand was cut out to a perfect fit. Using the tape as a
stop-off to shield the part of the form where plating wasn't desired and to prevent form corrosion was a big success. This is great because it is so
easy to wrap a little electrical tape on before plating and remove it after plating is complete.
I have found that it is best to plate with very low current. Slower plating with low current produces smoother and more even plating. My plating bath
was run for 3 days at about 50mA. My cone is only 3/4" diameter. If the cone is larger, or the surface area to be plated is larger, the plating bath
will require a proportionately larger current to provide the same current density.
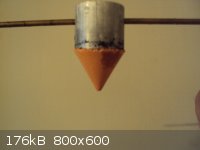
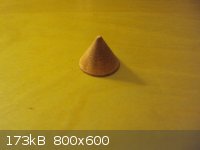
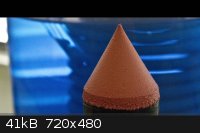
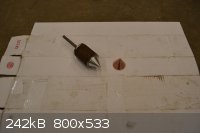
Anyway, here are some pictures. I am starting to get some decent results. The bottom of the cone was left a little rough for now. I may do a little
more sanding later. Note that the oxidation seen on the aluminum form, in the second picture, was from the previous run without the tape.
[Edited on 15-9-2011 by Hennig Brand]
|
|
|
gnitseretni
Hazard to Others
Posts: 280
Registered: 5-1-2007
Location: Medellin
Member Is Offline
Mood: No Mood
|
|
Nice cone! Can't wait to see how it performed 
Good to know the tape was a success.
|
|
|
Hennig Brand
International Hazard
Posts: 1284
Registered: 7-6-2009
Member Is Offline
Mood: No Mood
|
|
Thanks, this is a good pastime. Once everything is setup, it is about as difficult to look after as a goldfish.
This is sort of interesting. It is a lab manual designed to help teachers run a lab on copper plating, or do a lab demontration on copper plating. It
is a good introduction to the subject I would say.
Attachment: THE CHEMISTRY OF COPPER PLATING.pdf (192kB)
This file has been downloaded 3148 times
[Edited on 15-9-2011 by Hennig Brand]
|
|
|
Hennig Brand
International Hazard
Posts: 1284
Registered: 7-6-2009
Member Is Offline
Mood: No Mood
|
|
The copy/paste below is from the following link. The whole web page is worth a read. Actually the entire web site looks quite interesting.
http://www.dalmar.net/electroforming.htm
"Trouble shooting electroforming
Two of the biggest mistakes made in Electroforming are
(1) not getting a good connection from the lead wire to the work piece. If you are making a piece of jewelry, you should glue a finding on the piece
before you start. When applying the conductive coating, make sure that you cover the glue and part of the finding to make sure that you have a good
connection. If you have a work piece that is not jewelry, you should take a piece of copper wire
and bend about 1/4 inch of the wire at the end to a 45 degree angle. Glue
this end of the wire to the work piece in an inconspicuous place like the back
of the piece. Again make sure when applying the conductive coating that you
cover the end of the wire and glue to get a good connection. After you have
finished the copper stage you can clip off the wire and file it smooth. For
your next finish over the copper you can just wrap the wire around the
piece. Don't wrap the wire around the piece when you are electroforming in
copper. If you do this, more than likely you will get a bad connection and the
wire will become part of the work piece due to the thickness that you are
growing. A sure sign of a bad connection between the wire and the
work piece is the crystallizing of the copper on the copper wire with
no growth on the work piece.
(2) The biggest mistake made in electroforming is not setting the machine
to the proper amperage for the area that you are electroforming in the tank
or using a rectifier that is too powerful and won't adjust to the proper
setting. 90% of the technical calls to our company about electroforming are
due to this mistake. You must set the rectifier to 1/10 of an amp per square
inch of metal surface that you are electroforming in your tank with the
copper solution. If your setting is too low the copper will build-up with
a shrimp color on it. If the setting is right it will come out like a new
penny. If the setting is too high you will get a dark color and a
bumpy finish that looks like fried chicken. Also make sure that the size
of your anodes is equal or greater then the total of surface that you are
electroforming in the tank."
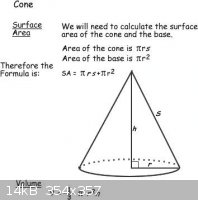
I included a picture with basic formulae for cones. The surface area formula would be useful when trying to determine the proper electrical current to
use when electroforming.
|
|
|
Hennig Brand
International Hazard
Posts: 1284
Registered: 7-6-2009
Member Is Offline
Mood: No Mood
|
|
Copper Electroforming & Troubleshooting
This is the best write-up I have seen so far. The whole thing is worth a read, but it also has quick reference tables with lots of good information.
About half way through there is an acid copper troubleshooting guide which is particularly useful.
Attachment: Copper_Plating.pdf (187kB)
This file has been downloaded 1685 times
[Edited on 4-6-2012 by Hennig Brand]
"A risk-free world is a very dull world, one from which we are apt to learn little of consequence." -Geerat Vermeij
|
|
|
SjeefOne
Harmless
Posts: 2
Registered: 21-7-2010
Member Is Offline
Mood: No Mood
|
|
Thnx for the doc, looks like a valuable read!
I've been starting some electroforming experimenting as well recently and thought I'd share some of it.
The pdf from gnitseretni is what I kind of used as a guide as of how to set my cell up.
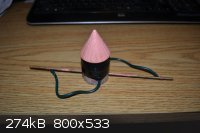
For my anode I've used copper brake line bent into a coil shape, my former is turned from aluminum, this particular one is 24mm with a cone angle of
60 degrees.
The electrolyte is a solution of about 150g of CuSO4 and 25ml of H2SO4.
I found that it is indeed important to keep the voltage low, at high(er) voltage the copper will form way to quick and becomes a brittle layer which
is easily wiped off.
At low voltage (below cone was formed at around 2V and .5Amps) the layer builds quite nice and dense. However i'm now facing problems getting the cone
of the former. I'm therefore am having some new formers made and a puller as well, which I hope will help get the cones off 
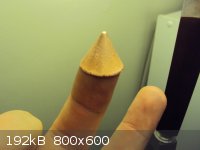
My first cone.
|
|
|
hissingnoise
International Hazard
Posts: 3940
Registered: 26-12-2002
Member Is Offline
Mood: Pulverulescent!
|
|
You could check the coefficients of expansion of both metals.
If copper has the higher rate, heating the cone with a heatgun might shift it ─ if aluminium has the higher rate, cooling it in a freezing
mixture might work . . .
|
|
|
SjeefOne
Harmless
Posts: 2
Registered: 21-7-2010
Member Is Offline
Mood: No Mood
|
|
Looks like Al has a higher coeficient then Cu..
I'll put my former in the freezer see if anything gives.
|
|
|
Hennig Brand
International Hazard
Posts: 1284
Registered: 7-6-2009
Member Is Offline
Mood: No Mood
|
|
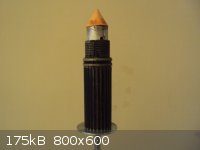
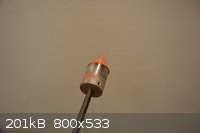
I just recently got back into electroforming and things have not gone perfectly smoothly. I realized after about a week of messing around that I had
gotten soldering flux into my plating bath which caused a lot of problems with the plating process. Copper was "burning" easily, even with low current
and would not plate in a smooth layer. I started over with fresh electrolyte, but a little flux must have been on the anodes still. The resultant cone
is the one in the pictures. It electroformed much better, but not perfectly smoothly and needed to be filed and sanded down on the lathe.
I thought I was doing a good thing by soldering the connections on my electrodes, but I actually ended up poisoning my plating bath. The flux should
have been carefully cleaned off after soldering, or soldering should not have been done at all.
I have also had problems with the older lathe that I have been using. It is not very precise anymore and has been making aluminum cone forms that are
not entirely symmetrical.
At the same time the electrolyte was changed, the sulfuric acid was changed from drain cleaner to battery electrolyte. There are a lot of impurities
in drain cleaner, and it is not always the same impurities from brand to brand and from lot to lot. I figured that battery electrolyte would need to
be fairly pure to function properly in a battery.
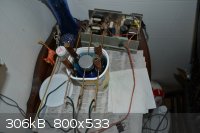
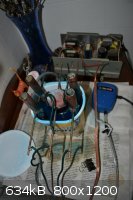
An aquarium air pump and bubbler were used for agitation. This was a bit messy, but manageable. Electrical tape was used as a stop-off to prevent the
aluminum form from being oxidized which worked very well. Careful application of the tape also controlled exactly where the form was plated, and
allowed the area on the form being plated to be submerged well below the surface of the plating bath.
I have found that a current density between 0.06A and 0.08A per square inch is optimal for my setup, any more results in burned copper. Without
brighteners and other additives the goal should be to achieve a smooth, even coat of salmon colored copper. Without brighteners salmon colored copper
is normal right out of the bath. The copper can later be polished to a new penny look after plating.
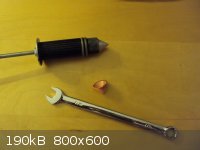
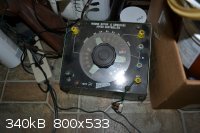
The power supply in the picture is a switching supply which was taken out of a large photocopier about 10 years ago. The box with the dial on it has a
large bank of huge 200-300 watt power resistors in it. It goes from 0 to 33 ohms in increments as the dial is turned. In order to get resistance
values between increments an external resistor must be used. The white ceramic inline resistor in the picture is rated for 5 W & 2 ohms. Measuring
the voltage drop across this resistor is a quick way of determining the current flow through the plating bath without interfering with its operation
(I = V/R).
A much overbuilt puller was made which removed the cone with ease after sanding and polishing was completed on the lathe.
BTW, the cone in the pictures is 1.5 inches in diameter.
[Edited on 7-6-2012 by Hennig Brand]
"A risk-free world is a very dull world, one from which we are apt to learn little of consequence." -Geerat Vermeij
|
|
|
froot
Hazard to Others
Posts: 347
Registered: 23-10-2003
Location: South Africa
Member Is Offline
Mood: refluxed
|
|
A chap I met recently used to make these for the millitiary. His formers were parabolic shaped 'trumpet' like cones made from stainless steel and
pretty much the same size as the ones you guys are making here. The copper liners he electroformed were about 0.5 mm thick and uniform all over.
I would imagine that stainless steel does not passivate like aluminium does ensuring good initial plating performance is less chance of it
contaminating the bath. A good source of stainless would be in the form of stainless steel bolts from the local hardware which you could turn into
cone formers.
We salute the improvement of the human genome by honoring those who remove themselves from it.
Of necessity, this honor is generally bestowed posthumously. - www.darwinawards.com |
|
|
Hennig Brand
International Hazard
Posts: 1284
Registered: 7-6-2009
Member Is Offline
Mood: No Mood
|
|
I have wanted to try stainless steel for a while. I actually purchased some 1 inch SS round stock about a week ago, but then I stuck with the aluminum
forms for the time being. The nice thing about aluminum is that it is so much easier to work. I am going to have to try stainless though, it may be
worth the extra effort.
"A risk-free world is a very dull world, one from which we are apt to learn little of consequence." -Geerat Vermeij
|
|
|
NeonPulse
Hazard to Others
Posts: 417
Registered: 29-6-2013
Location: The other end of the internet.
Member Is Offline
Mood: Isolated from Reality! For Real this time....
|
|
| Quote: Originally posted by gnitseretni | I managed to electroform two copper liners. I did a quick writeup on it (with lots of pics) that shows how I made them. Thought I'd share it in case
others would like to try it
|
what a great idea! i have one in the plating bath right now. i got the form from ebay a nice Al fence cap that was slightly flat at the tip but there
was excess n the tip so i could file it to a point. i followed gnitseretni's PDF with an alteration to the anode and slightly stronger power supply.
and it is working a treat. great idea! your process has certainly won me over! cant wait to test its performance though. i expect it it to work very
well.
|
|
|
froot
Hazard to Others
Posts: 347
Registered: 23-10-2003
Location: South Africa
Member Is Offline
Mood: refluxed
|
|
I know this is a little late but to ensure uniform density and thickness of the liner you should rotate the cathode slowly in the solution. Additives
called 'brighteners' are used to give a smooth shiny plate which indicates a good high density high strength form. I would expect any porosity to
negatively affect the performance of the liner.
We salute the improvement of the human genome by honoring those who remove themselves from it.
Of necessity, this honor is generally bestowed posthumously. - www.darwinawards.com |
|
|
packetforger
Harmless
Posts: 48
Registered: 21-2-2014
Member Is Offline
Mood: Condensing
|
|
Has anyone checked if the purity of copper metal used affects the finished product? I would imagine having the copper (anode?) made of pure copper
foil, and "around" the anode (as in, cylindrical anode, with the cathode in the center of it) would help with giving excellent results.
As would using high quality coppersalt and acid without nasty gunk contaminants (boiling drain-cleaner grade sulphuric wiith activated charcoal,
followed by filtration through glass wool works good to decolourize it of organic? contaminants).
I will have to aquire some barstock and try this out, am very curious about the mechanical properties of the formed copper piece. Could be interesting
for making small conductiveparts for RF stuff!
|
|
|
Vlad1111
Harmless
Posts: 2
Registered: 11-10-2014
Member Is Offline
Mood: No Mood
|
|
Hi
I`ve read really much about copper plating but even after several tries, the results aren`t that good
At the moment i try to copperplate a plastic cone* (3 layers of L100 conducting silver) this a 4.8V-400mA chellphone charger.
Standoff between the anode and cathode is around 1cm (~1/3 inch) at around 16°Celsius (60.8°F)
*radius ~3cm (~1inch) hight is around 5.8cm (~2,2inch)
The process is working for one day now and ive seen that the surface of the plated cone is extremely rough.
most of the cone is a extremely thin layer. the surface is exactly like sandpaper
i tried to plate under the exact conditions an smaler cone* (stainless steel [without L100] and the surface was so smooth you could barely see it was
plated in the plating solution)
*radius ~1.5cm (~1/2inch) hight is around 4cm (~1 1/3inch)
Plating solution: 500ml water - 100g CuSO4.6H2O - 25ml H2SO4 - no NaCl
so, can anyone tell me what am i doing wrong?
im getting desperate
|
|
|
Oscilllator
National Hazard
Posts: 659
Registered: 8-10-2012
Location: The aqueous layer
Member Is Offline
Mood: No Mood
|
|
| Quote: Originally posted by Vlad1111 | Hi
I`ve read really much about copper plating but even after several tries, the results aren`t that good
At the moment i try to copperplate a plastic cone* (3 layers of L100 conducting silver) this a 4.8V-400mA chellphone charger.
|
| Quote: Originally posted by SjeefOne |
I found that it is indeed important to keep the voltage low, at high(er) voltage the copper will form way to quick and becomes a brittle layer which
is easily wiped off.
At low voltage (below cone was formed at around 2V and .5Amps) the layer builds quite nice and dense.
|
Please take 30 seconds to read the thread before posting. It isn't that hard.
|
|
|
dangerous amateur
Hazard to Others
Posts: 144
Registered: 8-7-2011
Member Is Offline
Mood: No Mood
|
|
Do you guys think it is necessary to agitate the solution?
And how about the target being placed slightly asymmetric to the anode, will this cause the plating to become uneven?
It seems to me that the electrolyte is so conductive that it does not matter, but I would like some other opinion on that.
|
|
|
Fulmen
International Hazard
Posts: 1693
Registered: 24-9-2005
Member Is Offline
Mood: Bored
|
|
Current density will affect deposit rates.
We're not banging rocks together here. We know how to put a man back together.
|
|
|
Camroc37
Hazard to Others
Posts: 101
Registered: 4-8-2015
Location: USA
Member Is Offline
Mood: Must...Nitrate...EVERYTHING!
|
|
| Quote: Originally posted by Hennig Brand | I originally posted this in the unconventional shaped charge thread. It was suggested to me that this was a more suitable place to post it, so here it
is(...)
Could you explain a bit more about this setup? Is the Cathode running from the top right in the picture and the anode under the cone? Thanks.
[Edited on 11-9-2011 by Hennig Brand] |
|
|
|
XeonTheMGPony
International Hazard
Posts: 1636
Registered: 5-1-2016
Member Is Offline
Mood: No Mood
|
|
I have don tones of copper plating, I once copper plated cardboard! Why? Because I thought it would be funny! (It was!)
Trick, gently circulate your tank solution, makes for a very even coat, current control is every thing So is voltage, if you can't control both you
can end up with a head ache! Use an all copper tank, do what you have too but the better the tank is clad the better the plate.
I used a bubble to keep the solution moving during plating.
Graphite is a great starter! for the paper plating I started off very slow to get a thin even copper coat then I drove the voltages up slowly to get
the proper current flow Vs surface area.
To coat the paper I made a graphite paste and worked it in to the surface and a bit of glue to help hold the paper together in the bath.
I would wager one can modify my method by making a pulp slurry with graphite mixed in, mold the cone, then smooth the out side and spray lacquer on
the inside to insulate it, this should make a readily dissoluble mold.
|
|
|
| Pages:
1
2
3 |


