| Pages:
1
2 |
Fulmen
International Hazard

Posts: 1693
Registered: 24-9-2005
Member Is Offline
Mood: Bored
|
|
Perlite/silicate composites - No good info?
Is my Google-Fu really that weak? I can't seem to find any good engineering data on this topic. Everything is either amateurs on Youtube or science
papers with a very narrow focus. And then there's this one that I have found in a dozen different editions:
http://www.schundler.com/composites.htm
This one is actually slightly useful, but there has to be more and better info out there, right?
I tried gypsum as a setting agent, but it either set while I was still mixing it or not at all. CO2 is another option, but I don't have a practical
source right now. Besides I want to cast this in a fairly closed mould, so injection would be tricky.
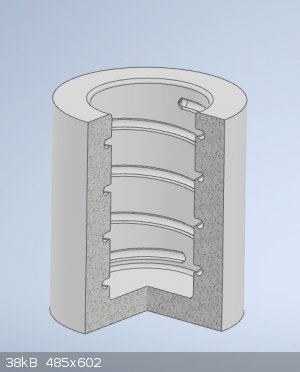
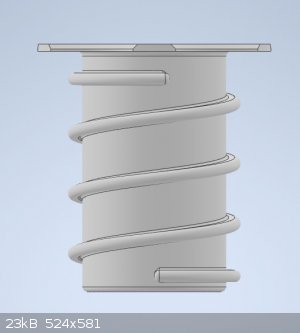
My goal for now is to make a small electric kiln with molded-in grooves for the heating element. The plan is to 3D print a former, mould the perlite
around it and then burn out the PLA.
We're not banging rocks together here. We know how to put a man back together.
|
|
|
Fulmen
International Hazard
Posts: 1693
Registered: 24-9-2005
Member Is Offline
Mood: Bored
|
|
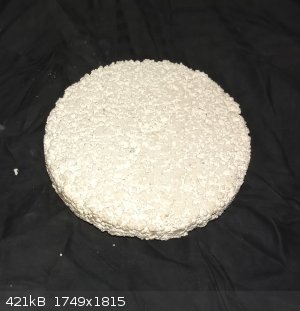
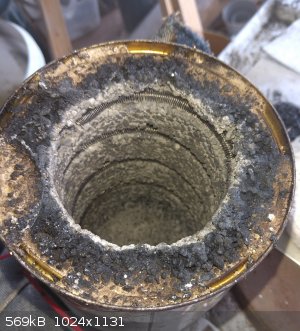
Progress so far: First a test piece dried @275°C for a couple of hours. The density is appr 0.45 and seems solid enough. It handles orange heat
without any immediate sign of glazing or melting, I doubt I need more than 400°C to burn out the PLA.
Second is the printer doing it's thing 5 hours into a 15hour print.
[Edited on 24-10-22 by Fulmen]
We're not banging rocks together here. We know how to put a man back together.
|
|
|
Rainwater
National Hazard
Posts: 800
Registered: 22-12-2021
Member Is Offline
Mood: indisposition to activity
|
|
With a wide mouth opening like that heating the pla to 200 and letting it fall out might be the best option.
Pla expands/outgasses during burnout and forms charcoal, usually only a problem with small details and narrow channels. Big opening like that it will
fall right out.
Which binder did you settle on?
Whats your target temp?
"You can't do that" - challenge accepted
|
|
|
unionised
International Hazard
Posts: 5104
Registered: 1-11-2003
Location: UK
Member Is Offline
Mood: No Mood
|
|
I discovered that you can react cement water-proofer + dust-proofer (a commercial solution of sodium silicate) Like this
https://www.sealantsandtoolsdirect.co.uk/pub/pdfs/everbuild-...
with ethyl acetate.
You can't dissolve enough acetate to drive the reaction to completion, but you do get a fairly solid gel with an emulsion.
I wondered about other esters like methyl formate.
That get will set harder if you blow CO2 through it.
I made a composite of perlite and silica gel that way for a furnace (which never really worked properly because of electrical connection problems).
I used the silicate + acetate to get an initial set then passed CO2 from yeast + sugar through the material to complete the conversion to silica gel.
Once it was set fully, I rinsed it in water to remove the sodium carbonate.
(I didn't want hot carbonate attacking my silica)..
I'd be interested to see if anyone found an ester with better solubility.
I guess the best possible option might be something like silicon tetra acetate, but I think the reaction would be impractically fast.
|
|
|
Fulmen
International Hazard
Posts: 1693
Registered: 24-9-2005
Member Is Offline
Mood: Bored
|
|
@Rainwater: The disk was made with straight sodium silicate (3:1).
I'm aiming for 400-450°C, while 275°C was enough to melt the PLA it would not burn out completely.
@Unionseed: Thanks for the tip, ethyl acetate sounds promising. And I'm sure I can rig up a kipps apparatus for CO2 if I really have to.
Edit: Could you elaborate a bit on the method? I tried adding EA to my sodium silicate, and while it did turn white it didn't really thicken
substantially.
[Edited on 25-10-22 by Fulmen]
We're not banging rocks together here. We know how to put a man back together.
|
|
|
Fulmen
International Hazard
Posts: 1693
Registered: 24-9-2005
Member Is Offline
Mood: Bored
|
|
We have some results.
The ethyl acetate worked OK, I simply mixed up the perlite/sodium silicate to the desired consistency, then added a squirt of EA. it did cut the
setting time noticeably, forming a flexible mass that held it's shape quite well.
The burnout was slow since insulators insulate. So in the end the PLA was literally burned out. That destroyed my dream of a pearly white furnace,
but so be it.
The result wasn't too shabby for a first attempt. I could probably have used a bit more SS and a finer perlite for a more accurate result, but it
seems to work.
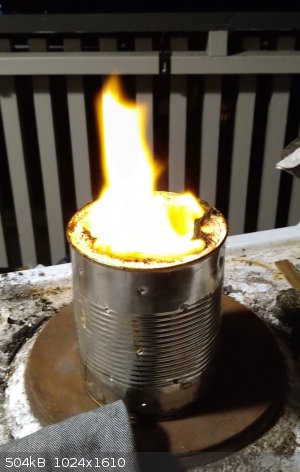
And here we have the finished kiln in use. It's a lid-type kiln for burning out lost wax/plastic moulds. This setup allows the molten resin to drain
out to the colder base, in a regular setup it drains into the warm kiln causing smoke and possibly fire
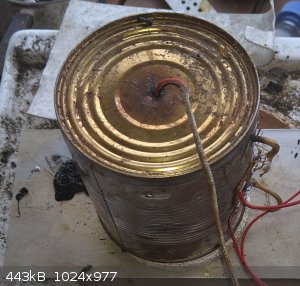
The heating element is around 250-300W (9m of 28awg kanthal A1), and has no problem of reaching 400°C.
Edit: corrected wire specs from 20 to 28awg
[Edited on 26-10-22 by Fulmen]
We're not banging rocks together here. We know how to put a man back together.
|
|
|
Rainwater
National Hazard
Posts: 800
Registered: 22-12-2021
Member Is Offline
Mood: indisposition to activity
|
|
Sweet and simple. If you cook a shotglass of oxidizer, something like potassium chlorate, it will help whiten the interior
"You can't do that" - challenge accepted
|
|
|
Fulmen
International Hazard
Posts: 1693
Registered: 24-9-2005
Member Is Offline
Mood: Bored
|
|
Damn, the coil blew on the second run. Apparently it crept out of the groove and shorted against the metal flask. I might be able to salvage the coil,
I can go as low as 150ohms without having excessive surface load. But I suspect the groove is too shallow and rounded for proper retention, and I'm
not really sure how to solve that without starting from scratch.
We're not banging rocks together here. We know how to put a man back together.
|
|
|
Rainwater
National Hazard
Posts: 800
Registered: 22-12-2021
Member Is Offline
Mood: indisposition to activity
|
|
Sand and sodium silicate, preferably on a straight piece of heating element. To glue it into place.
A little bit of brazing rod to repair the element. Or if you feel brave, clean the break with hcl, then energize and touch together
With a little luck it will weld together. Dont die
"You can't do that" - challenge accepted
|
|
|
Fulmen
International Hazard
Posts: 1693
Registered: 24-9-2005
Member Is Offline
Mood: Bored
|
|
It's not so bad after all, I most likely pushed the leads in when I wrapped the kiln in fiberglass. I only lost 10 ohms or so on the coil, so a quick
rebuild should suffice. I just need to secure the leads better.
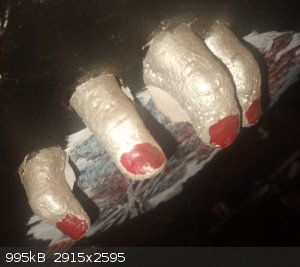
Good news, it's up and running again. And here is my growing army of minions:
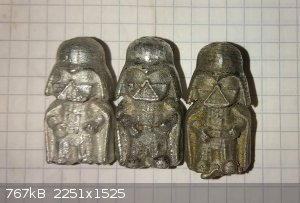
The PLA works fine-ish, I can see traces of carbon a few places but the level of detail is quite good. Next I want to try PVB as it can be solvent
smoothed. Polymaker also has it's own PolyCast which I suspect is mainly PVB.
Wax filament is another option, but it might require some hardware modifications.
[Edited on 27-10-22 by Fulmen]
We're not banging rocks together here. We know how to put a man back together.
|
|
|
Fulmen
International Hazard
Posts: 1693
Registered: 24-9-2005
Member Is Offline
Mood: Bored
|
|
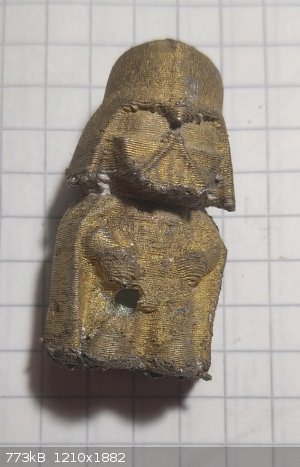
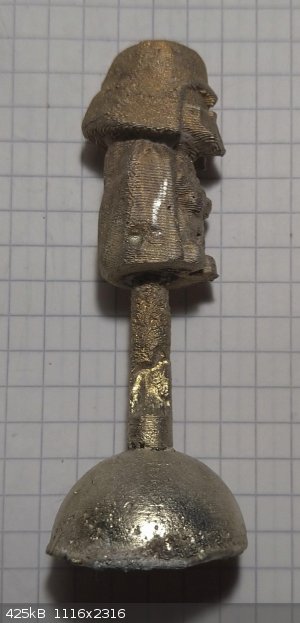
Forgot to mention that they are cast in pewter.
Here's the latest resuly. Pretty good except for that giant hole. No idea what happened there.
We're not banging rocks together here. We know how to put a man back together.
|
|
|
Rainwater
National Hazard
Posts: 800
Registered: 22-12-2021
Member Is Offline
Mood: indisposition to activity
|
|
Google metal degassing process.
When casting aluminum i toss in some sodium carbonate,It forms a dross that has to be skimmed off before the pour and co2 gas that removes the n2 from
the mix.
Molten metals absorb gasses from the atmosphere very well.
"You can't do that" - challenge accepted
|
|
|
Fulmen
International Hazard
Posts: 1693
Registered: 24-9-2005
Member Is Offline
Mood: Bored
|
|
I doubt it's dissolved gas, not with pewter at less than 400°C. Besides, the location is wrong. The gas is driven out during solidification, so it
should be concentrated at the core.
I know aluminum is known for it's affinity for hydrogen, but I don't buy the carbonate trick. Degassing is inherently slow. Youtube shows professional
casters degassing with dry N2 for 5-10 minutes, they wouldn't do it if they could get away with a pinch of soda.
It could be remnants of water from the mould, I've put them through a fairly quick burnout (last one at 400°C). The investment is two parts sand to
one part plaster (by weight), so there is a lot of water present. I might embed the thermocouple in the next flask to follow the process more closely.
We're not banging rocks together here. We know how to put a man back together.
|
|
|
Fulmen
International Hazard
Posts: 1693
Registered: 24-9-2005
Member Is Offline
Mood: Bored
|
|
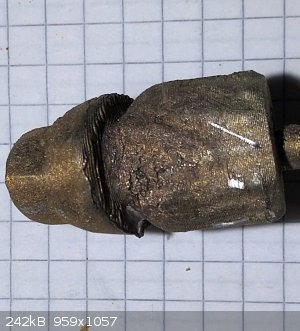
Another failure. The hole is most likely trapped air, guess there is a reason why sentrifugal casting was invented. I really don't have the space for
that, but perhaps vacuum could work?
We're not banging rocks together here. We know how to put a man back together.
|
|
|
arkoma
Redneck Overlord
Posts: 1761
Registered: 3-2-2014
Location: On a Big Blue Marble hurtling through space
Member Is Offline
Mood: украї́нська
|
|
I don't see a vent, do I? Used plaster/sand with molten aluminum and fair sized object with decent results.
"We believe the knowledge and cultural heritage of mankind should be accessible to all people around the world, regardless of their wealth, social
status, nationality, citizenship, etc" z-lib
|
|
|
Fulmen
International Hazard
Posts: 1693
Registered: 24-9-2005
Member Is Offline
Mood: Bored
|
|
You're right, there's no venting. But then again the pro's don't seem to use it either. I have played with the idea of a bottom fill, top vent
sprue/gating system, but it does complicate things a fair bit.
Scale is probably part of the issue, the figurine is only 30mm tall. The surface roughness could also increase the risk of a small bubble getting
stuck.
We're not banging rocks together here. We know how to put a man back together.
|
|
|
Rainwater
National Hazard
Posts: 800
Registered: 22-12-2021
Member Is Offline
Mood: indisposition to activity
|
|
Crayons work great for forming vents with small castings you can also use a drill bit after the investment has hardened, by cross drilling then
plugging the exterior horizontal entries. You can easily add vents at the cost of finishing work
"You can't do that" - challenge accepted
|
|
|
Fulmen
International Hazard
Posts: 1693
Registered: 24-9-2005
Member Is Offline
Mood: Bored
|
|
That's not a bad idea, but I don't think it will be enough. Just look at the defect in the sprue. I think it's an issue with the scale I'm working on
as much as improper ventilation.
I have a decent water aspirator, so I think vacuum is my best bet. My flasks aren't really optimal for that, but if I can get hold of some silicone
sheet I think I can make it work without too much effort.
We're not banging rocks together here. We know how to put a man back together.
|
|
|
arkoma
Redneck Overlord
Posts: 1761
Registered: 3-2-2014
Location: On a Big Blue Marble hurtling through space
Member Is Offline
Mood: украї́нська
|
|
I've cast a few sets of custom fit "aluminum knuckles" for lady friends, and I didn't get rid of voids until I vented well, poured fast and kept the
mold preheated. I would be willing to bet that the pewter starts solidifying FAST just as aluminum does.
Disclaimer: COMPLETELY self taught on the technique of lost wax casting. It is hella fun and quite rewarding. One of my favorite ones, my friend
C*****t's right hand in aluminum.
"We believe the knowledge and cultural heritage of mankind should be accessible to all people around the world, regardless of their wealth, social
status, nationality, citizenship, etc" z-lib
|
|
|
Fulmen
International Hazard
Posts: 1693
Registered: 24-9-2005
Member Is Offline
Mood: Bored
|
|
Nice work. I have to admit that making a brass knuckle is part of the motivation for doing this :-)
I forgot to mention that the last runs have been with a hot mold (250-300°C), so rapid solidification shouldn't be a problem. I did have some issues
when I tried with a cold mold though. But except for these isolated holes (appr 1-3 diameters deep) and spots of ash the surface detail is pretty much
perfect. I think there is a reason why jewelers seem to favor spin and vacuum casting.
I do agree that ventilation is important, and with a bigger flask I might have tried a u-shaped sprue to allow filling from the bottom and a better
pour basin. But on this scale it's just not very practical.
I do plan on casting aluminum further down the road, but mainly for machining projects.
Just look at this level of detail. This was printed with a 0.2mm layer height
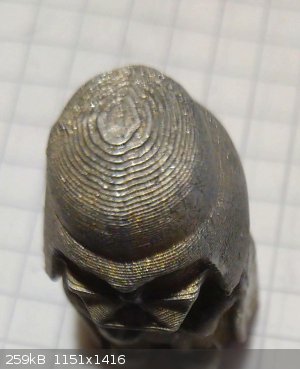
[Edited on 29-10-22 by Fulmen]
We're not banging rocks together here. We know how to put a man back together.
|
|
|
Rainwater
National Hazard
Posts: 800
Registered: 22-12-2021
Member Is Offline
Mood: indisposition to activity
|
|
Trying a wider sprue might improve your results
Try to keep the primary channel 50% of the cross section your wanting to fill
Ramble:
Casting is all about technique. You are on the right track.
I've never done pewter but it should be the same process to figure it out as other metals
Record the mold investment composition, drying time, burnout time, casting temp
Record the molten metal composition, temp, melt time, and pour time.
With brass and copper, +/- 40c pour temp is the difference between perfect and bubbles.
But, as with any experiment, vary one variable at a time until your goal is reached.
Molds are another art form, for a single cast part, imagination is key, picture/predict how the liquid will flow, and visualize where your heat is
going.
hot wells, vents, and spruce are your only tools
Hotwells serve 4 purposes.
They heat the mold by holding excess metal. Very useful near thin parts and high detail
Catch dross and trash
Regulate the flow of fluid
Provides extra liquid as the part solidifies.
Vents are very important for small details, if the final piece has undercuts, they are almost always required. If the same mold gives me the same
error, a vent on the error usually fixes it.
"You can't do that" - challenge accepted
|
|
|
Fulmen
International Hazard
Posts: 1693
Registered: 24-9-2005
Member Is Offline
Mood: Bored
|
|
Pewter is a great place to start for a number of reasons. It has wonderful casting properties and the low melting point speeds up the process quite a
bit. Having to fire up a 1200°C furnace for a single figurine would take a lot more time. And while working on such a small scale is quite different
from larger castings it uses very little raw materials, working by trial and error on a large scale can quickly become expensive and labor intensive.
Next on my schedule is sand casting. I just need to make some better flasks, my first attempts was with 3d-printed ones but they were not rigid
enough.
But the original question remains, why is it so hard to find good info on the perlite/silicate system? It seems like a good choice for low to medium
temperatures, but I really don't know how far I can push it. And I shouldn't have to figure this out on my own. While experiments are fun I don't see
the need to reinvent the wheel every time I do something.
We're not banging rocks together here. We know how to put a man back together.
|
|
|
Rainwater
National Hazard
Posts: 800
Registered: 22-12-2021
Member Is Offline
Mood: indisposition to activity
|
|
http://www.ijstm.com/images/short_pdf/1460020555_434V.pdf
| Quote: |
The chemical composition of Perlite are: 70–75% Silicon Oxide:SiO2,12–15%
Aluminium Oxide:Al2O3,3–4%Sodiumoxide:Na2O,3–5%Potashium Oxide: K2O,0.5-2% Ironoxide:Fe2O3,0.2–
0.7% Magnesium oxide:MgO,0.5–1.5% Calcium oxide CaO 3–5% loss on ignition (chemical / combined
water).
|
Attachment: STUDY OF CHEMICAL AND PHYSICAL PROPERTIES OF PERLITE AND ITS APPLICATION.pdf (536kB)
This file has been downloaded 189 times
"You can't do that" - challenge accepted
|
|
|
Fulmen
International Hazard
Posts: 1693
Registered: 24-9-2005
Member Is Offline
Mood: Bored
|
|
Thank you so much, this is useful.
And vacuum worked like a charm, I'm up to 98.3% perfect now :-)
I still have some problems with small (<1mm) air bubbles on the surface. Painting the model with a slurry of gypsum and talcum worked initially,
but they came back with the use of vacuum. I assume the bubbles were still there, stuck to the slurry coat and that the vacuum caused the shell to
collapse.
The obvious fix would be to vacuum the casting, but that doesn't work well with the hollow 3D-printed models. I have tried to vibrate the casting, but
the short pot life makes that hard. So now I'm looking at retarders, and there seems to be quite a few possible candidates out there. So far I've
found references to cement, sugar, molasses, cream of tartar, salicylic acid, sodium phosphate and citric acid.
We're not banging rocks together here. We know how to put a man back together.
|
|
|
Rainwater
National Hazard
Posts: 800
Registered: 22-12-2021
Member Is Offline
Mood: indisposition to activity
|
|
Chilling ingredients before mixing is the easiest way to add a few minutes to the working time.
Extra water (5ml per 100g of plaster) will add a few minutes at the cost of strength.
0.1~0.5% by mass Calcium hydroxide will increase work time. Adds 3~5minutes and a lot of heat during setting.
Edit. Lost the decimals
[Edited on 31-10-2022 by Rainwater]
"You can't do that" - challenge accepted
|
|
|
| Pages:
1
2 |


