| Pages:
1
2 |
Cyrus
Hazard to Others

Posts: 397
Registered: 24-4-2004
Location: Ancient Persia
Member Is Offline
Mood: No Mood
|
|
Metal melting Charcoal furnace
You all knew it was coming, first the metal melting propane furnace, then the metal melting electric furnace, well, what's left.
So here it is, the place for discussion about coal and charcoal powered furnaces...
First, I am tired of not being able to do a reaction because it requires white heat. I am sure many of you are too.
Second, charcoal is cheaper than propane, and it gets hotter too.
Third, this is fun stuff.
So here is my plan.
Hmm, I need to post pictures, sorry for my stupidity, but I can't figure out how to do that. HELP!
[Edited on 30-6-2004 by Cyrus]
|
|
|
Quantum
Hazard to Others
Posts: 300
Registered: 2-12-2003
Location: Nowhereville
Member Is Offline
Mood: Interested
|
|
http://backyardmetalcasting.com/
He has many ideas for LP and C furnaces. I made a small C furnace with just a thin steel pipe about 10inches di propped on 3 bricks with a mesh screen
on the bottom and a hair dryer to provide air under it. I melted lots of Al in a steel can.
To post pics use the button above the text input area that has an > arrow with a hill and sun. Place the URL to the place you have uploaded your
pic to in the box and hit ok.
WHAT!? You can't heat anything so you build a furnace? For lower temp things you could pour a bit of acetone into a metal bottle top and light
it if you have nothing else. Get a hotplate so you can heat things that might
form FAEs or where you need steadly controlled heat for a long time. if you have nothing else. Get a hotplate so you can heat things that might
form FAEs or where you need steadly controlled heat for a long time.
[Edited on 30-6-2004 by Quantum]
What if, what is isn\'t true?
|
|
|
Cyrus
Hazard to Others
Posts: 397
Registered: 24-4-2004
Location: Ancient Persia
Member Is Offline
Mood: No Mood
|
|
Ok, now I get the picture thing, but I need to upload them somewhere, some should be coming soon to a post near you.
OR NOT! 
Quantum, I have several propane burners, plenty of candles, a couple of lighters, matches, a hotplate, an oven and a range, and some alcohol. But
none of these get things WHITE hot. I may have been unclear, but I am after >1300 deg. C.
Sorry for the delay folks, here is the design. It may look like an x, but that's the... Argg! My pictures are not coming

Well, if you really want to see it, go to
http://www.geocities.com/cyrusthemadscientist/mypage.html
Even then, the words are too small to read.
Other info I can say without the picture
1 I was planning on using Axehandle's refractory mix- the 5 L sand, 7 L perlite, 7L cement, 1.5kg bentonite one.
2 There would be a hole in the side of the lid for pipes from the reaction vessel in
the inside to the outside.
3 The air inlet would be on the side, at the very bottom of the furnace, I am not sure what to make it from, will plain iron pipes work? I am worried
that it might melt if it directly contacts a coal.
4 This furnace will be used to make sodium using the original methods, and phosphorus.
[Edited on 1-7-2004 by Cyrus]
[Edited on 1-7-2004 by Cyrus]
|
|
|
Cyrus
Hazard to Others
Posts: 397
Registered: 24-4-2004
Location: Ancient Persia
Member Is Offline
Mood: No Mood
|
|
By now I have gotten the cement, sand, perlite, bentonite, and I managed to scrounge up a little water.
The furnace body is an old Thompson's water sealer bucket, 34 cm high, and 27 cm wide, about the forms on the inside are coffee cans, 15 cm wide,
not counting the cardboard layer wrapped around them. The refractory will be plenty thick, IMHO. There will be a 2 cm drain hole at the bottom and the
air inlet will be a chromium plated steel pipe 3 cm wide.
I have noticed that everyone has the air/propane inlet make the air spiral counterclockwise, so I am tempted to make the air go the reverse direction.
I wonder if this has something to do with which hemisphere a person lives on...
The lid is a $1 low form SS salad bowl, which has a 4 cm vent, the rest being filled with refractory. To hold the refractory cement in the lid in
place, a few bolts going through the cement and some wires running through it ought to suffice.
All the nuts and bolts will be de-zinced.
The furnace will have some nifty features, such as a platform built into the outside to support distillation equipment, a clamp on the lid to hold the
distilling equipment, and several slots in the inside of the furnace to hold iron bars, which will support crucibles, etc.
I will attempt to make a crucible out of the refractory cement. Maybe with an
iron mesh embedded into it to minimize/maximize cracking... Maybe with an
iron mesh embedded into it to minimize/maximize cracking...
More info and pictures coming. Thanks Tacho for the help, I have located the attach button.
So far the project has cost $6 
|
|
|
Cyrus
Hazard to Others
Posts: 397
Registered: 24-4-2004
Location: Ancient Persia
Member Is Offline
Mood: No Mood
|
|
Here is a revised sketch.
And does anyone know in how long the refractory - axehandle's mix, ought to cure, I am thinking about 3-4 days?
Edit 1- I cannot make a new post, I am saving the 100th for when the furnace is done, I will have to keep on editing this one until then.
New progress-
the lid is ready for refractory, everything bolted and de-zinced, two long SS bolts were stuck in it for handles, the wire design was changed
somewhat- the wires are there so that if the refractory in the lid cracks, it will still stay in "one" piece. I am hoping that the heat
does not make the wires expand enough to crack the refractory. The vent width
was changed to 7 cm. The vent width
was changed to 7 cm.
The bucket for the main part of the furnace was painted and rusty, so I sanded that for an hour or so, not the most fun thing to do. The inner mold of coffee cans and cardboard is finished, and the drain hole at the
bottom and its mold are finished.
All I have to do is cut the air input pipe and cast the refractory, then it's BURN time.
Also, I am building this furnace so that it can be powered either by charcoal or by propane.
Edit 2-
I needed something insulating on the bolt handles on the lid so I wouldn't burn my hands, Santa Emma and Concha y Toro wine bottle corks fit
well...
I want to make the air inlet out of copper plumbing pipe instead of chrome-plated iron. Has anyone had experience using copper? My two concerns are
that it may melt in the furnace, or that as it expands and heats, it will crack the refractory.
Why don't air/propane inlet tubes crack the refractory when they are heated?
I tried making a pattern to cut the inlet pipe to fit the inside of a furnace, my geometry skills are about as rusty as my compass. , the pattern did not work. , the pattern did not work.
Magpie, a charcoal furnace is what you need!
Tacho, I had thought about the pipes fusing together before, but I do not know of a solution. I'll try graphite.
If I had any molybdenum sulfide I would try that too.
[Edited on 6-7-2004 by Cyrus]
[Edited on 6-7-2004 by Cyrus]
[Edited on 6-7-2004 by Cyrus]

|
|
|
Magpie
lab constructor
Posts: 5939
Registered: 1-11-2003
Location: USA
Member Is Offline
Mood: Chemistry: the subtle science.
|
|
furnace needs
I also need a furnace. My requirements are to be able to heat to at least 1200 deg C. I also would like to be able to control the atmosphere to
either an oxidizing or a reducing condition - for mineral assays. I think this means that I will be using a fuel rather than electricity to heat it.
I'll probably use natural gas as I have it piped to my house.
The charcoal furnace does sound like fun though. A local blacksmith built his own open furnace using a hand bellows for air supply. He uses homemade
charcoal saying that it's much better than the commercial barbeque type charcoal.
The single most important condition for a successful synthesis is good mixing - Nicodem
|
|
|
Tacho
National Hazard
Posts: 582
Registered: 5-12-2003
Member Is Offline
Mood: No Mood
|
|
Congratulations Cyrus, I didn’t think this coal furnace would go far, but I see now that I was wrong.
My opinion is that you may be the first one to get decent amounts of metallic sodium.
One thought: Use something in those threaded joints or you will never disassemble this thing after it has gone red hot. What to use? I have no idea!
Graphite?
|
|
|
chloric1
International Hazard
Posts: 1070
Registered: 8-10-2003
Location: GroupVII of the periodic table
Member Is Offline
Mood: Stoichiometrically Balanced
|
|
Threaded joints
Will Molybdenum Sulfide lubricant hold up to the task?
Fellow molecular manipulator
|
|
|
Cyrus
Hazard to Others
Posts: 397
Registered: 24-4-2004
Location: Ancient Persia
Member Is Offline
Mood: No Mood
|
|
100!
Now you all better watch out. I'm really dangerous...
Well, I tried to edit my previous post, but it wouldn't let me.
Yesterday I cut the tuyere (air inlet pipe) to size by eyeballing it, mounted that, and poured a little of the refractory cement into the base to test
it out.
Today, I then poured the lid cement, and some more cement in the base. I am using small batches because they are much easier to work with, and there
is no easy way to calculate the volume of the finished refractory batch, so I didn't waste any by using huge batches. On the first pour, I mixed
the ingredients dry and then poured the water in- I used a little more water than the formula called for. On all of the next ones, I mixed the
bentonite with water, and then added the other ingredients. I had lots of problems with the kitty-litter bentonite sticking in clumps. Now I HATE
the smell of clean kitty-litter (and dirty). Starting with the second batch, I used a power-stirring device. I made four batches, and then ran out
of perlite, the refractory came to about 1 cm below the top of the furnace I
made another batch without perlite for the last bit, I hope that it works. The extra cement from the last batch went to making 2
"crucibles," I doubt they will hold up very well.
Two changes to the design- I decided not to put side brackets on the bucket for a built in shelf, for aesthetic reasons, and because I was extremely
tired. Also, I used the chromium plated iron tuyere, but in the process of cutting it I discovered that it was actually chrome plated brass. Hope
that works...
My main concern now is that the furnace will crack or explode when heated because of air bubbles. To stop this, I pushed down on the refractory with
a large rod- the mix was very mushy still.
Also, I put the lid and bucket on a vibrator for a few minutes every hour or so. Will this be sufficient? The vibrator uses a good blower motor that
will be used with the furnace, so I cannot ruin the motor with too much offset weights or vibrating.
Everything is cast, the surfaces are very smooth, and I just have to wait for a few days...
Will keeping the curing refractory wet help at all? Sorry, I do not know very much about cement.
Edit- 1.7 days later, the mix is curing, the forms have been removed, the color is changing from a dark grey to a lighter gray, almost white around
the edges. I sprayed water on the mix for the first day, now I am letting it dry out. The refractory is pretty hard by now. However, the curing of
concrete is activated by water, right. So if the mix is dry, the concrete will stop curing?
The furnace is not only for chemical reactions though, I need some parts cast (out of Al) for my Vandegraaff generator...
[Edited on 9-7-2004 by Cyrus]
|
|
|
Cyrus
Hazard to Others
Posts: 397
Registered: 24-4-2004
Location: Ancient Persia
Member Is Offline
Mood: No Mood
|
|
The furnace still is drying, I think that 5-6 days ought to be enough, that means tomorrow this thing gets dehydrated.
The refractory mix was rather thin, about the same consistancy as normal cement. This, according to a DIY guru I asked will make the concrete much
weaker than if the concrete had less water. However, I am not after tons of strength, just enough to hold together reasonably.
Also, I believe that since the mix was so thin, air pockets will not be a problem, and ramming will not be needed. When the molds were removed,
several air pockets were visible, but they were only about as large as a piece of perlite.
I hope this thing doesn't explode when heated. Come back in 1-2 days to
find out what happens...
|
|
|
trilobite
Hazard to Others
Posts: 152
Registered: 25-2-2004
Location: The Palaeozoic Ocean
Member Is Offline
Mood: lonely
|
|
A book I have suggested to use pieces of broken pottery in place of that iron grate.
|
|
|
Cyrus
Hazard to Others
Posts: 397
Registered: 24-4-2004
Location: Ancient Persia
Member Is Offline
Mood: No Mood
|
|
After 6 days of curing, the furnace was dehydrated.
By then the refractory was too hard to scrape with my fingernails- Axehandle, how hard was your refractory, I followed the mix almost exactly?
I started a fire inside with newspaper and cardboard, and thought that I would burn all of my scrap cardboard. Bad Idea. Burning ashes flying
everywhere is not a great idea where I live, and there was a neighbor out next door. Thankfully I hid the furnace behind a piece of sheetrock!
I use sheetrock for EVERYTHING! 
Instead of cardboard, I decided to burn some of my scrap wood, chopping it into bite-sized pieces (for a furnace) and feeding it to the furnace. The
blower I used was very adequate, as the flames went 39 cm into the air above the lid with a roaring sound!
I started thinking that the furnace was alive, and was harboring bad feelings against me, especially if I failed to feed it.
I fed the beast for about 4 hours, if any water survived this it deserves to survive.
The inside of the furnace got yellow, but not white hot, I was not using coal. Aluminum melted just from the exhaust above the furnace, though, and
the pieces of wood I put in would put carbon trails on the sides, which would then disappear. All of the wooden forms I used are completely gone.
Unfortunately, there were many small cracks in the furnace and lid.
|
|
|
axehandle
Free Radical
Posts: 1065
Registered: 30-12-2003
Location: Sweden
Member Is Offline
Mood: horny
|
|
| Quote: |
By then the refractory was too hard to scrape with my fingernails- Axehandle, how hard was your refractory, I followed the mix almost exactly?
|
Very hard, harder than dried clay.
| Quote: |
Unfortunately, there were many small cracks in the furnace and lid.
|
In mine too. If I knew where to find fireclay pipe, I'd build my next furnace as outer shell --> refractory --> fireclay pipe.
My PGP key, Fingerprint 5D96 E09E 365D 1867 2DF5 C2FE 4269 9C19 E079 CD35
\"Verbing nouns weirds the language!\"
|
|
|
Cyrus
Hazard to Others
Posts: 397
Registered: 24-4-2004
Location: Ancient Persia
Member Is Offline
Mood: No Mood
|
|
I need to get some castings done SOON for non-chemistry reasons, so the furnace will stay cracked for now, in a week or so I might coat the inside
with fireplace cement, that ought to hold it together somewhat. Now that the furnace has been dried, the refractory is even softer than before- about
as soft as wallboard gypsum in places. If anyone duplicates this, wait for more than 6 days till firing, and use much less water- just my theory
though. I think that the high water content caused the concrete to shrink more when dehydrated, which cracked it.
Even with all of its problems, the refractory still does its job, and 7 hours after the firing was over, the outside of the furnace was too hot to
pick up!
Maybe I'll even coat the inside of this thing with ITC-100, the stuff thats supposed to reflect back 98% of thermal energy.
If I were to do this project over again, I might just coat a coffee can on the inside with a thin layer of fireclay or refractory and then a thin
layer of ITC-100.
More to come, right now I am making casting flasks and forms, I could have bent some scrap steel into crucible tongs while I was dehydrating the
furnace, but I didn't think ahead, so now I'll have to make the tongs as I melt the Al.
|
|
|
Cyrus
Hazard to Others
Posts: 397
Registered: 24-4-2004
Location: Ancient Persia
Member Is Offline
Mood: No Mood
|
|
I coated the inside of the furnace with a thin layer of stove and fireplace mortar, made by Dap, in order to put a hard outer layer on the crumbling
refractory, one of the ingredients was sodium silicate.
The refractory is so weak that when I was smearing on the coating with my fingers, chunks of the refractory would come off with the coating,
especially at the bottom.
The coating is for stoves and fireplaces, I must have done something wrong, because when I slowly heated up the furnace with a wood fire, the coating
started bubbling, and then hardened into bubbles in many areas.
I put a plinth of cement/sand/perlite in about a 3/2/1 ratio at the bottom of the furnace, it held together, but by the end of the run the fireplace
mortar had fused to it, and when I tried to remove the plinth, covered with nails and fused mortar, a chunk of the bottom came with it!
I did accomplish something though, while the furnace was hot, I bent 2 iron rods to hold a tin can crucible, and tried to form a spoon for scooping
out slag on the end of one of the rods.
My blacksmithing skills need work.
I then put the iron can crucible in the furnace with a few Al pop cans, they melted, but there was so much slag at the top, I thought the whole melt
was slag. So I just dumped the "slag" out, and noticed that there was Al too. My first, albeit formless, casting! I shall treasure it
always!
I think I'll use the furnace as it is for a while, but the refractory ought to be replaced soon.
Edit- the furnace was powered by coal, it used up the coal pretty slowly, about a chunk or 2 every few minutes.
I think there are chimney pipes at the local Home Depot. That might be the best solution.
I had an epiphany! Place a chimney pipe in the center, firebricks on the bottom and top, and simply fill the area between the pipe and the outside of
the furnace with perlite. No mixing/pouring/ramming the refractory. No explosions from steam. No dehydrating/waiting for the refractory to cure.
Everything is disassembleable. And best of all, pure perlite would insulate very
well. If you can't find a chimney pipe, I bet a few firebricks cut in half lengthways, placed in a circle, and held together with brick strap
would work fine.
[Edited on 28-7-2004 by Cyrus]
|
|
|
Hang-Man
Hazard to Self
Posts: 70
Registered: 16-1-2004
Location: Canada
Member Is Offline
Mood: Wasted
|
|
I made a quick and dirty charcoal furnace this weekend for the purpose of making MagAlum. It consisted of a large flower pot filled with charcoal and
a steel pipe with end-cap placed vertically down the center. The bottom of the flower pot had a hole in it so I fixed a pipe to it and hooked it up to
a foot pump for air.
The charcoal was taking a long time to get going so I decided to put a little KNO3 on it. This accelerated the charcoals burn rate by a lot and caused
the pot two large cracks, but it stayed together.
The Al in the pipe (about 60 grams) quickly melted and I added the Mg blocks which melted quickly also. When it was a red hot liquid I poured it into
a big bucket of water which wasn't a good idea. While all the MagAlum formed thin foil/powder, which was good, it also turned black and
wasn't very effective.
The pot was cracked and I didn’t think it could take another heating so I dumped it and go another one. Unfortunately I didn't have any small
blocks of Mg left, only big bricks so I had to use a large stainless steel tin instead of the small steel pipe with end-cap. The tin was about 5"
wide by 8" high, and was really too big for the pot which was only a few inches wider and about as high. I crammed some BBQ briquettes between
the tin and the pot and was able to get dull red heat in the tin but it wasn’t enough to melt the Al, so I poured a generous amount of KNO3 down the
sides and it went ape-shit. The pot cracked all over the place but the KNO3 kept it together. The tin, sitting in a bubbling mass of KNO3 and BBQ
briquettes quickly became hot enough to melt the Al (I had about 500 grams in the tin) So I added the Mg blocks which melted in about 3 minutes. The
firestorm around the tin was so intense I was afraid that the stainless steel would breech sending molten Mg into molten KNO3, resulting in my
immediate demise so I quickly removed the BBQ briquettes from the KNO3 slurry and it died down.
Once the metal hardened I removed the tin and banged it upside down. I disk of rancid, caustic smelling ash like substance fell out, I assume some
compound of MgO, as some did burn during the melting. It smells the same as when you put Mg in Mg(NO3)2, I don’t know what it is but it’s the
worst smell ever. Once that was disposed of I hit the bottom of the tin with a hammer shattering the brittle MagAlum in the bottom making it easy to
remove. The MagAlum weighed in at about 900g, 100 grams less than the net weight of the Mg and Al I added (500 grams each) I figure the lost weight is
burnt Mg, so I think my alloy is a bit Al heavy. It doesn’t ignite as easily as pure Mg but once its going it looks the same.
In closing a flower pot can make an easy one-time-use furnace, and if charcoal isn’t giving you the temps you need add KNO3 copiously.
|
|
|
Mr. Wizard
International Hazard
Posts: 1042
Registered: 30-3-2003
Member Is Offline
Mood: No Mood
|
|
What a waste of KNO3 to melt Aluminum. A hair dryer with the heat off , directed through a sheet metal pipe, even at the top of a flower pot full of
charcoal, would melt Aluminum, even a vacuum cleaner in reverse directed into a hole dug in your backyard would do the job, and without cracking the
pot or almost immolating yourself. But it's your nitrate, life, pot, and skin. Thanks for sharing. You did make the alloy you wanted, so who
can argue with success?
|
|
|
uber luminal
Hazard to Others
Posts: 124
Registered: 25-8-2004
Member Is Offline
Mood: No Mood
|
|
I agree that it would be a waste of KNO3.
my 1st furnace didnt have any insulation, but the metal walls of the bucket. and two, 3 inch computer fans directed air into the bottom of the bucket.
This melted aluminum.
The 2nd time I used a suicide flowerpot and a hairdryer. you dont need anything but carbon and oxygen.
|
|
|
Hang-Man
Hazard to Self
Posts: 70
Registered: 16-1-2004
Location: Canada
Member Is Offline
Mood: Wasted
|
|
I buy KNO3 in 25kg down the street for peanuts. The stuff is practicly free.
Air would have (and did) work for the first furnace, which had the tall steel pipe, but the tin I used in the second one was so large there was very
little room for charcoal around it in the flower pot, so I had to improvise.
All the mag-alum is powdered now, which was way easier than powdering pure Mg. Magnesium is so soft the ball mill just pounds it into flakes, but
mag-alum shatters like glass.
[Edited on 26-10-2004 by Hang-Man]
|
|
|
chemoleo
Biochemicus Energeticus
Posts: 3005
Registered: 23-7-2003
Location: England Germany
Member Is Offline
Mood: crystalline
|
|
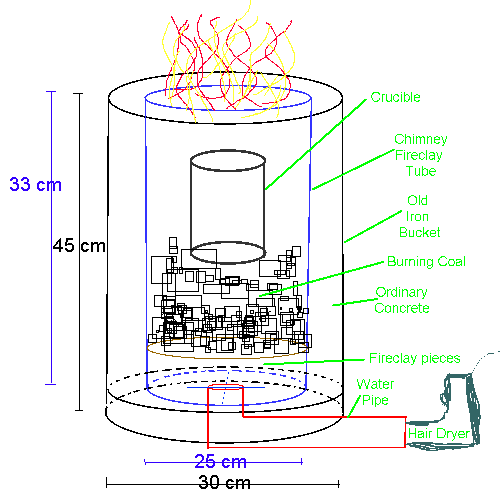
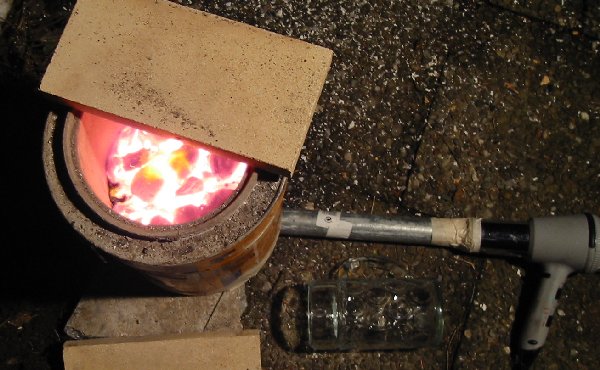
My own charcoal furnace
Design as follows:
An iron bucket, in which formerly carpet glue (25kg) was stored, was the main container.
It is about 45 cm in height, 30 cm in diameter, made of thin can material. It had lots of glue left on the inner walls.
The inner surface of the foundry (containing the glowing coals) was a chimney pipe/tube, made of fire clay (the german word is Schamott, in case
anyone's got a better translation), which is highly heat resistant and available from any builder supply. Its outer diameter is 25 cm, about 33
cm high. It cost 18 euros.
The bottom of the metal bucket was lined with fireclay pieces (obtained by breaking fireclay bricks carefully), and the gaps were filled with fireclay
powder (Schamott powder, also obtained from above store.)
In the center, a water pipe fed through (4 cm diameter), to direct the air (pushed through by a strong hairdryer) straight into the coals. Also from
the next hardware store, both pipe pieces (the 45 cm straight one, and the 90 deg bent connector piece feeding into the furnace).
On top of the fireclay, inside the chimney tube/pipe, I had to prevent ashes from falling into the air pipe - so as to ensure proper air flow. For
this purpose, the inside of the chimney pipe was filled about 8 cm with fireclay pieces (broken with a hammer), in a loose fashion.
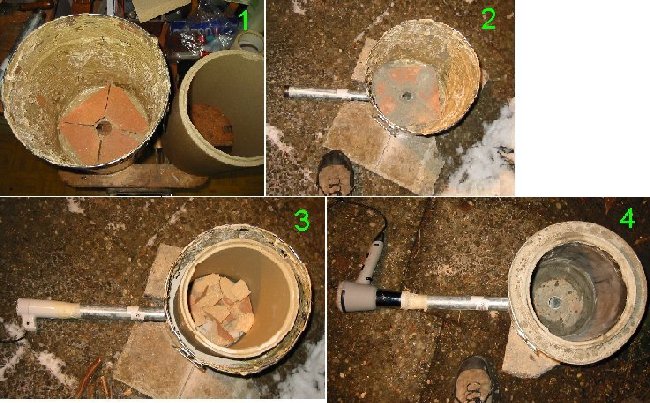
The picture below demonstrates the basic setup.
Picture 1 below shows the metal container on the left, and the fireclay chimney tube/pipe on the right. 2) shows the water pipe attached, and the
fireclay pieces fixed with powdered fireclay at the bottom (which only hardens during firing). 3) shows this setup, but the chimney pipe in the
middle, and the firebricks in the centre to prevent ashes from falling into the pipe through which the air is pushed by the hairdryer. 4) Final setup,
the space between the chimney pipe and the metal bucket is filled with concrete. Once bricks are added to protect the air tube (center), this boy is
ready to fire!
For scale, see my shoe in 2) and 4)
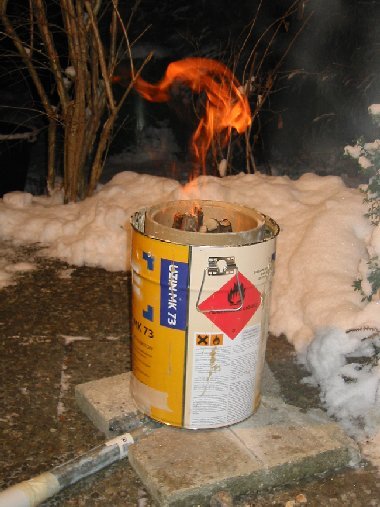
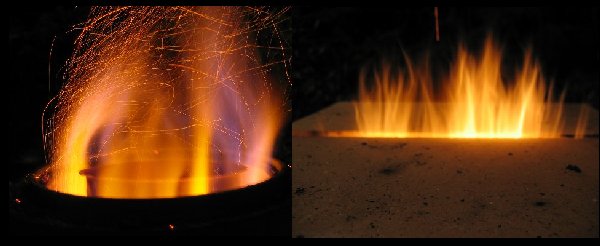
This is just some wood burning inside, to dry the furnace. The hair dryer is turned off. Note how petty the flames are (they would go out after a
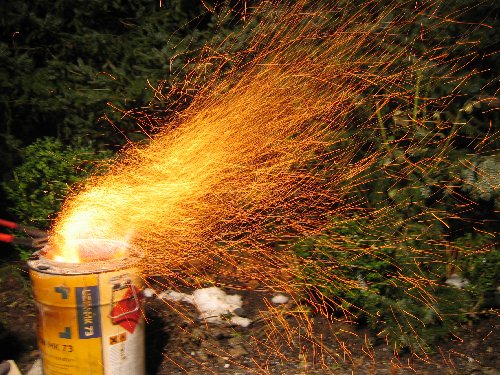
minute or two once the air flow was off)
This is firing the boy up. Very pretty, very pyrotechnic. The sparks are caused by the charcoal, charcoal bricks (compressed) wouldn't have this
effect.
Next was to get the furnace ready to melt 1.4 kg of glas, see the 'Masskrug' that was to be sacrificed in the picture below.
In proper heat:
This is glass about to melt, the right shows the stainless steel cooking pot glowing in heat, with the liquid glass inside, and the right shows a
picture of a glass piece (looking like some amphibian) about to melt.
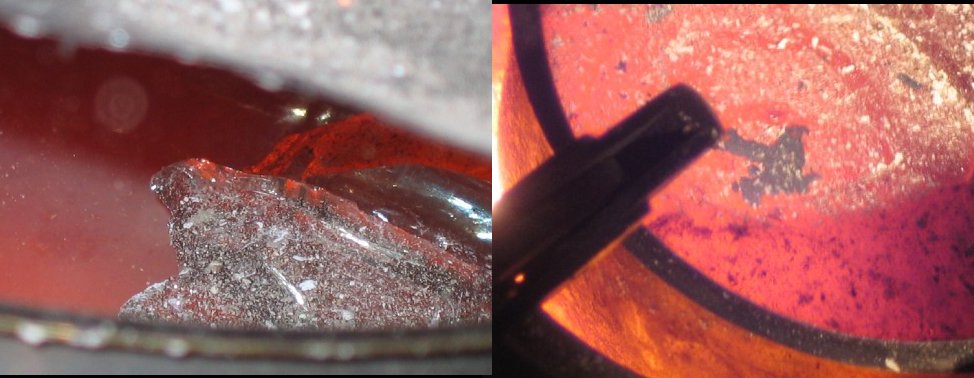
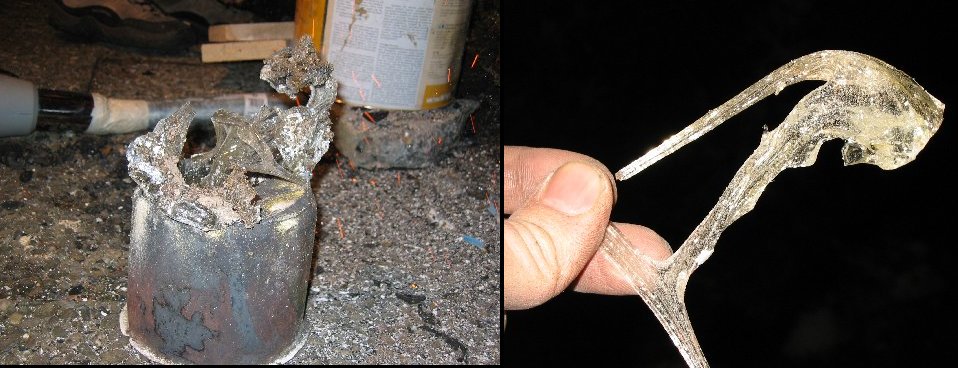
After 30 minutes or so of heavy burning (adding charcoal now and then), the glass seemed ready to pour, but sadly the stainless steel pot (which I
bought on that very day) melted at the bottom, releasing part of the liquid glass into the glowing coals! Thus I managed to only obtain fragments, and
long glass threads that I pulled out of the furnace!
Nonetheless, this was quite literally a roaring success, having melted such a large amounts of glass!
Lessons learnt
1) Stainless steel as a crucible is not good enough, it melts!
2) The crucible ought to be smaller, with the dimensions of the furnace employed, I think it would work better to use i.e. a 400 ml (rather than 2.5
litres) crucible that is surrounded on all sides by glowing coal, facilitating faster melting.
3) Keeping the fire bricks as a lid on top of the furnace with a small gap for the gasses to flow through brings the inside of the chamber very
rapidly to high temperatures
4) It is definitely necessary to keep a lid on the crucible, for all the particulates that contaminate the inside of the crucible.
Here a metal lid was used, that was nearly disintegrated due to the heat by the end of the the run.
5) Charcoal bricks (compressed ordinary charcoal) are better, as they produce less sparks and have a greater energy density. Ordinary charcoal is
somewhat dangerous due to the sparks flying EVERYWHERE. Wear old clothing. Seriously!
6)Hairdryer: Don't use one that doesn't allow you to blow COLD air, hot air dryers soon pack up because the thermal sensors register
overheating.
PS Most of the pictures are actually below 50 kb, so it seemed acceptable
[Edited on 16-1-2005 by chemoleo]
Never Stop to Begin, and Never Begin to Stop...
Tolerance is good. But not with the intolerant! (Wilhelm Busch)
|
|
|
Cyrus
Hazard to Others
Posts: 397
Registered: 24-4-2004
Location: Ancient Persia
Member Is Offline
Mood: No Mood
|
|
Nice work!
Where did you get the square charcoal? (as seen in the diagram) I think it would burn at a higher rate, giving you higher temperatures!
How many minutes does it take to get the outside of the furnace warm to the touch? It sounds like the furnace wouldn't be too insulating. (did
you get it from backyardmetalcasting.com?)
Schamotte? Ah, now I understand why clay based refractories are sometimes called chamotte.
Too bad the glass melted. What were you planning to do with it?
|
|
|
chemoleo
Biochemicus Energeticus
Posts: 3005
Registered: 23-7-2003
Location: England Germany
Member Is Offline
Mood: crystalline
|
|
Lol, square charcoal. Yes, the diagram gives the illusion of perfect squareness, but in reality the charcoal bricks were somewhat more rounded, coming
straight out of a press.
This charcoal was better in that it burned longer, so refilling wasn't necessary.
I also used brown coal, you know the coal digged straight out of the ground. It burns with much more flame, but the heat it generates is also
ferocious. The 6th picture down, right side, shows the flame courtain coming out using brown coal.
THe disadvantage of using brown coal is that is leaves a glassy brown residue which is hard as stone, but it is easily removed afterwards nonetheless.
To get the outside too hot to touch, at full heat (lid closed, only small gap for gas escape) it took about 45 min - rather long. I was surprised too.
Continuous firing for 3.5 hours used up 6kg of charcoal, and a bit of brown coal. After 2 hours or so, the heat on the outside was enough to
discolour/burn part of the varnish/printing on the outside of the bucket (indicating temps above 300 deg C or so?), but you can see on the last
picture (left) that after the full run, most of the varnish is still intact. Hence the temperature on the outside, even after several hours of running
at full heat, did not reach a very high temp. I guess, next time I will measure the amount of time it takes until the outside gets too hot to touch.
I should also note that as soon as the fireclay bricks were put on the top (serving as a lid), it would take less than a minute to bring the inside
chamott to glow nice and orange. With all the hot gasses streaming by fast, the heat transfer must be good.
No, I MEANT to melt the glass! THis was basically a test, to see what sort of heat could be produced. Then, the plan was to play with it - i.e. mould
it, make dripping shapes and such. The unfortunate thing was that the stainless steel bucket melted instead!
But ultimately, I plan to melt a few metals, dehydrate certain inorganic compounds and such. Just reactions that are easily done with a furnace.
Oh, and further lessons learnt
7) Next time I may insulate the outerside further with glass wool mats, just to keep the heat in even more
8) One should use a smaller crucible - so that there is SPACE on the sides that can be filled with charcoal, facilitating faster melting of the
crucible contents.
9) Using a hot air gun, or even a working hair dryer that blows HOT air into the crucible should make a distinct differnece regarding the final
temperature of the furnace, i.e. a lot of heat is lost by the cold air streaming in and being heated during combustion.
As a crucible, I will try chamotte powder next time - i.e. it is wettet with water, and then fired to make it hard.
Does anyone know how long one is supposed to fire it? I am thinking of using two metal cans, one larger, which is filled with chamotte/water, then an
inner can is pushed in, giving a nice crucible once the metal has burned away!
Otherwise - as to crucible compositions - I know there are threads on this, but are there tried and tested successful compositions?
[Edited on 16-1-2005 by chemoleo]
Never Stop to Begin, and Never Begin to Stop...
Tolerance is good. But not with the intolerant! (Wilhelm Busch)
|
|
|
neutrino
International Hazard
Posts: 1583
Registered: 20-8-2004
Location: USA
Member Is Offline
Mood: oscillating
|
|
Be careful with molded glass. If not properly annealed, it can explode. Big pieces can be very dangerous.
|
|
|
Cyrus
Hazard to Others
Posts: 397
Registered: 24-4-2004
Location: Ancient Persia
Member Is Offline
Mood: No Mood
|
|
Doh! The glass melted. I meant to say, "too bad the crucible melted"
Hmm, tried and tested crucible compositions.
The best way to make multiple accurately sized crucibles is IMO to use slip-casting-
deflocculate the clay/schamotte whatever with sodium silicate or some other chemical (about 0.5-2% by weight) and then add water-- only a bit more
than necessary is needed. ie I used 500 grams wet clay (about 444 g if it were dry) 160 mL H2O, and 2.5 mL sodium silicate solution- I didn't
check the viscosity or specific gravity, so these numbers aren't the best, I'm sure.
Then pour the slip into a plaster mold, but I'm sure you can research this elsewhere.
The best clays are large particle size clays, such as kaolin(ite). Sometimes talc is added . Speaking of talc, do a bit of reseach on cordierite!
(made from clay, talc, and alumina) I forget the exact formula. It has such good resistance that it can be heated from 60 deg C. to 1800 deg. C in 80
seconds w/o a problem. I think this was from globalspec.com or some similarly styled site. But then again other sources say it melts at 1350 deg. C.
So I'd just try slipcasting some clay for a first try crucible.
Or use BromicAcid's idea- the alumina powder with a bit of sodium silicate as a binder. Did any of your previous ceramic experiments work (I
think you were talking about mixing SiO2 and Al2O3 powders?)
Neutrino, thanks for the warning, do you know how to prevent this? I'm guessing cool it down slowly.
|
|
|
chemoleo
Biochemicus Energeticus
Posts: 3005
Registered: 23-7-2003
Location: England Germany
Member Is Offline
Mood: crystalline
|
|
Yah, I think the easiest for now will be to use small crucibles made of hardened schamott (fireclay powder). Hopefully this works.
Re. Na-silicate as a deflocculant - what do you mean by this?
Re Al2O3/SiO2/CaO/ZrO2/Fe2O3 compositions - well, in the other thread (castable refractory materials) I posted some links that listed various
compositions. But I am not sure how these are prepared, i.e. are they normally just mixed (the powders) in the right proportions, some water added,
and heated to 800 deg C in the furnace?
It's tricky.
Maybe it's worth making i.e. 10 g batches, with various amounts of SiO2/Al2o3, adding other things as needed, and judging the durability of the
fired pieces afterwards (i.e. how hard they are, cracking due to rapid cooling, etc).
But that sort of discussion probably belongs into the other thread.
PS the melted glass didnt explode or anythign, it just was very fragile and could be broken by tapping it against stone, quite unlike the original
glass.
[Edited on 18-1-2005 by chemoleo]
Never Stop to Begin, and Never Begin to Stop...
Tolerance is good. But not with the intolerant! (Wilhelm Busch)
|
|
|
| Pages:
1
2 |
|


