| Pages:
1
2 |
ScienceHideout
Hazard to Others

Posts: 391
Registered: 12-3-2011
Location: In the Source
Member Is Offline
Mood: High Spin
|
|
Dye Sensitized Solar Cell- TiO2 not sticking to glass
Hello!
My friend and I have been making DYSC's for a while now, and so far, none of them held together when we put them into the dye. The TiO2 coating
cracked and fell off for all of them. NurdRage says that the soap that you add makes it adhere to the glass, but weather we add one drop or ten, the
same thing happens.
My friend says that we should try something different other than soap. She thinks that because albumin is a binder, that might help it all stick
together.
I think that there are several things that might help- but I don't know which to try first. Maybe you guys could help me troubleshoot? Maybe you have
some insight?
This is what I was thinking about trying:
Adding albumin
Make TiO2 thicker
Soap is slippery- maybe add glycerol?
Soap is a surfactant- maybe add oleic acid?
Maybe a zwitterion such as an amino acid?
What about adding another oxide to the titanium dioxide?
Any ideas on what I can possibly do?
Thanks!
-SciHide
hey, if you are reading this, I can't U2U, but you are always welcome to send me an email!
|
|
|
blogfast25
International Hazard
Posts: 10562
Registered: 3-2-2008
Location: Neverland
Member Is Offline
Mood: No Mood
|
|
What kind of soaps have you been using?
[Edited on 1-12-2013 by blogfast25]
|
|
|
ScienceHideout
Hazard to Others
Posts: 391
Registered: 12-3-2011
Location: In the Source
Member Is Offline
Mood: High Spin
|
|
I have tried Palmolive- would you suggest trying another one?
On another note, I am seeing a video where someone adds triton x100 to the suspension.
Looking at almighty Wikipedia- this is a polymer similar to polyethylene oxide. Perhaps I should toss some PEO in?
Thanks!
hey, if you are reading this, I can't U2U, but you are always welcome to send me an email!
|
|
|
blogfast25
International Hazard
Posts: 10562
Registered: 3-2-2008
Location: Neverland
Member Is Offline
Mood: No Mood
|
|
Are you sure your Palmolive was an actual soap? There's a lot of surfactants nowadays posing as soap. 'Soap' as in: 'a salt of a fatty acid'. And
commercial soaps are heavily compounded in many cases.
How about considering some not-too-long chain fatty acids?
Triton x-100 appears to be a non-ionic surfactant.
Or (thinking completely outside the box), how about some of these strange animals:
http://www.4kenrich.com/Content/home-page/technical-informat...
[Edited on 1-12-2013 by blogfast25]
[Edited on 1-12-2013 by blogfast25]
|
|
|
Zephyr
Hazard to Others
Posts: 341
Registered: 30-8-2013
Location: Seattle, WA
Member Is Offline
|
|
what conductive glass are you using? Indium Tin oxide coated?
I've been looking at making some experimental solar cells but the price of ITO glass is staggering.
apparently you can coat microscope slides in tin oxide using stannous chloride....
anyways what type of glass did you use and where did you get it?
|
|
|
WGTR
National Hazard
Posts: 971
Registered: 29-9-2013
Location: Online
Member Is Offline
Mood: Outline
|
|
1. What kind of preparation did you do to the glass before coating it? How did you clean it?
2. What was the exact process that you used to anneal the film after it dried on the glass? Did
you observe a color change in the film during this process?
|
|
|
barley81
Hazard to Others
Posts: 481
Registered: 9-5-2011
Member Is Offline
Mood: No Mood
|
|
Nurdrage's process involves first coating a glass slide with a mixture of TiO2, detergent (pink dish soap), and vinegar, then heating it to >300C
to decompose the detergent and allow the TiO2 to fuse to the glass. I think your problem has less to do with the detergent and more to do with the
heat treatment. Try heating it more. Maybe it'll work.
[Edited on 2-12-2013 by barley81]
|
|
|
ScienceHideout
Hazard to Others
Posts: 391
Registered: 12-3-2011
Location: In the Source
Member Is Offline
Mood: High Spin
|
|
1. What kind of preparation did you do to the glass before coating it? How did you clean it?- I cleaned it thoroughly with CCl4 and then isopropanol
(anhydrous)
2. What was the exact process that you used to anneal the film after it dried on the glass? Did you observe a color change in the film during this
process? I put it on a hot plate and cranked up the temp. I used an infrared thermometer, and it let me know that the hot plate was 300 C, where it
remained for ten minutes before I took it off to cool. There was a slight color change.
hey, if you are reading this, I can't U2U, but you are always welcome to send me an email!
|
|
|
WGTR
National Hazard
Posts: 971
Registered: 29-9-2013
Location: Online
Member Is Offline
Mood: Outline
|
|
It may need a bit higher temperature. If the surface of the hot plate is 300°C, then the top surface
of the glass is probably cooler if this is done in the open air.
I've made a small "oven" before, using a firebrick on top of a hot plate. You have to be careful
not to overheat (crack) the surface of the plate, but if a cavity is carved out of the brick, this will
contain a small piece of glass. An added bonus will be the elimination of air drafts; and slow,
uniform cooling of the glass.
I'm going to try coating some microscope slides with titania to see what kind of results I can get.
I have a small electric furnace that can hit any temperature from 25°C to 1200°C.
|
|
|
WGTR
National Hazard
Posts: 971
Registered: 29-9-2013
Location: Online
Member Is Offline
Mood: Outline
|
|
OK, I reacted 95%/5% tin/antimony solder with chlorine in Dichloromethane to produce some tin(IV) chloride
and antimony(III) chloride dissolved in DCM. Squirting some of this fuming liquid across a very hot
300-400°C microscope slide surprisingly produced conductive glass. It's not very conductive, but it's
good enough for the test.
After mixing some titanium dioxide (pottery grade) with 5% acetic acid and a very small amount of
green Palmolive dish soap, this paint was spread thinly over an opening in the mask over the
conductive glass.
After drying, the mask was removed, and then the slide was put into the kiln, maintaining 350-380°C
for at least 10 minutes. At this point the power was shut off, and the kiln was allowed to cool down
to 200°C. At this point the cover was removed, and the slide removed after a few minutes. The slide
was allowed to reach room temperature on a shop towel.
On one edge there was a small area of the titania that looked like it was lifting off. Upon placing this
slide face down in blackberry juice, the film began breaking up and lifting off.
After soaking the slide for 15 minutes, it was carefully lifted up and rinsed in DI water. Next the slide
was rinsed in ethyl alcohol. About 30% of the titania film had washed away, leaving a mostly
transparent residue of titania on the defective areas of the glass.
So apparently I'm having similar problems that you are, and I used the Palmolive just like you did.
This is interesting. Maybe some other surfactant should be tried.
[Edited on 3-12-2013 by WGTR]
|
|
|
watson.fawkes
International Hazard
Posts: 2793
Registered: 16-8-2008
Member Is Offline
Mood: No Mood
|
|
It occurs to me that etching the surface of the microscope slide might promote adhesion. A quick dunk in a hot solution of alkaline sodium silicate
should do the trick. An alkaline solution simply has more dissolved NaOH (effectively) than the neutral version. If I recall what I've read about
glass surface chemistry correctly, this promotes surface hydroxyl groups which are more reactive than the oxides themselves. Alkaline sodium silicate
solution is roughly the composition of soda-lime glass, though with more sodium.
I can't speak to process parameters, since I've never tried it. It's a surface treatment, not a mechanical etch with lots of mass removal. If it fogs
the surface, though, that's likely good enough, though I'm doubt that fogging is necessary.
<hr>bfesser moderator expellendus est
|
|
|
WGTR
National Hazard
Posts: 971
Registered: 29-9-2013
Location: Online
Member Is Offline
Mood: Outline
|
|
I do have some basic sodium silicate that I could try; however, the conductive film itself is adhering quite firmly. I'm used to
working with silver mirrors, where it is very easy to scratch off part of the film if you're not careful. With this SnO2 film,
you can't remove it without scratching the glass itself. Before I made the surface conductive, I de-greased the slide, and then
rubbed it quite vigorously with zirconium silicate powder (zircopax). After washing all of the powder off under DI water, the
wetting of the slide was perfect. No problems there. But that does introduce another interesting question. The quality
of the conductive coating is not consistent, due to the way that I was applying it. In other words, in some areas the resistance
is very high (a few mega ohms). It's possible that sodium silicate might promote adhesion in those areas.
At the same time, looking at the various videos floating around on the internet, it's obvious that several people have been
successful at doing this. While the TiO2 coating is described as being fragile, it doesn't look like people are having adhesion
problems. That's why I wonder if there is something in this particular brand of soap (Palmolive) that is not burning off in the kiln,
and also not allowing adhesion upon rehydration of the film.
Edit: After a bit of looking around, I found this interesting page on ceramic binders and surfactants:
http://digitalfire.com/4sight/education/binders_for_ceramic_...
Sodium silicate is an inorganic one. I've used this before as a high-temperature "glue" when making paper tubes. It would
probably need to be used in very small amounts, to keep from interfering with the operation of the solar cell.
Polyvinyl alcohol is an organic one, and it should burn off before 300C.
I have most of the materials mentioned on that page, so this should provide hours of fun in the lab.
[Edited on 3-12-2013 by WGTR]
|
|
|
vulture
Forum Gatekeeper
Posts: 3330
Registered: 25-5-2002
Location: France
Member Is Offline
Mood: No Mood
|
|
You can try making the glass more hydrophilic by treatment with ammonia and peroxide (3:1) or piranha (more dangerous).
Glass comes in different forms, especially the surface, it can be acidic, basic or neutral. Try finding out the hydrolytic class of your glass.
Sometimes butyrate or propyl gallate is used to stabilize TiO2.
Furthermore, TiO2 comes in different crystalline forms, which show different reactivity.
[Edited on 3-12-2013 by vulture]
One shouldn't accept or resort to the mutilation of science to appease the mentally impaired.
|
|
|
WGTR
National Hazard
Posts: 971
Registered: 29-9-2013
Location: Online
Member Is Offline
Mood: Outline
|
|
Thanks for the advice, vulture. It was an education. It will probably keep me busy for a while.
I'm not sure what form of TiO2 I have, but it is most likely the wrong one. It's not even absorbing
dye very well. I'm going to attempt this procedure here:
http://epubs.surrey.ac.uk/738087/2/Synthesis%20of%20high%20t...
The idea is to obtain anatase nano-crystalline powder instead of what I have (probably too coarse, and
rutile form).
|
|
|
watson.fawkes
International Hazard
Posts: 2793
Registered: 16-8-2008
Member Is Offline
Mood: No Mood
|
|
Facile preparation of controllable size monodisperse anatase titania nanoparticles
Changseok Han, Rafael Luque and Dionysios D. Dionysiou
Chem. Commun., 2012, 48, 1860-1862
DOI: 10.1039/C1CC16050H
| Quote: | Abstract
Monodisperse anatase titania nanoparticles with controllable sizes (typically 10–300 nm) can be synthesized using an efficient and straightforward
protocol via fine tuning of the ionic strength in the devised sol–gel methodology. |
<hr/>bfesser moderator expellendus est
|
|
|
WGTR
National Hazard
Posts: 971
Registered: 29-9-2013
Location: Online
Member Is Offline
Mood: Outline
|
|
I haven’t forgotten about this thread. I’ve just been busy obtaining and synthesizing the different materials that I need to
proceed.
Vulture’s and watson.fawke’s advice helped get me going in the right direction with this. It turned out that I
was not only using the wrong crystalline form of TiO2, but it was also non-porous. The problem is that this rutile form of
TiO2 is what’s commonly available from pottery supply stores, at least in my area, and I didn’t want to try tracking down an
available source of nano-crystalline anatase. To that end I decided to find a way to use the common everyday TiO2 as a
starting material, since it is both cheap and available.
I appreciate several old posts by plante1999 and blogfast25; these helped me figure out how to synthesize a
soluble form of Ti(IV)+.
These following two references were indispensable in guiding my efforts for the present experiment:
http://link.springer.com/content/pdf/10.1163%2F1568567077792...
http://pubs.acs.org/doi/pdf/10.1021/jp962702%2B
Previously I had attempted to form an adherent titania layer on a glass slide using pottery grade titania. This was mixed with a
small amount of 10% polyvinyl alcohol, and 5% acetic acid. After firing the material between 400-500°C for an hour, and
soaking the resulting titania layer in blackberry juice for an hour, this is what resulted:
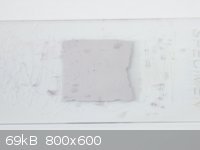
If you squint your eyes just right, and use your imagination, you can see a slight pink color from the dye. There was almost no
absorbtion of the dye, and parts of the film came off as soon as it became wet.
The nano-crystalline anatase form of TiO2 is needed, because that is the form that is photo-reactive. Briefly, in order to
obtain this material from coarse rutile TiO2, several steps are needed. First, the TiO2 will need to be dissolved into
something in which it is soluble. Next, an amorphous TiO2 will need to be precipitated back out. Finally, the amorphous
powder needs to be calcined at the proper temperature to allow it to form anatase nano-crystals.
27.5g of NaHSO4.H2O was ground to a fine powder in a mortar, and then shaken together with 6.75g of pottery-grade TiO2 in a
glass jar. After the mixture was thoroughly shaken, it was ground together in a mortar to encourage good mixing. Finally,
the resulting powder was returned to the glass jar. 2.0g of this mixture was then added to a test tube, and heated with an
additional 1.6g of NaHSO4.H2O. As heating was commenced water vapor was boiled away; the mixture turned yellow, and
then orange. Finally the mixture became molten, turning completely transparent as the TiO2 dissolved into the orange
melt. About this point dense clouds of acidic gasses were emitted: be sure to do this in a fume hood. Once the molten
bath becomes tranparent the TiO2 is fully dissolved, and everything can be allowed to cool down. I chose to cool the
tube on its side, to allow easier removal of the solidified salts afterward. Once cooled, the resulting salts were then stirred at
25°C for 45 minutes in 36mL of DI water. Practically everything dissolved. A pH of 1-2 was noted when the solution
was tested with pH paper.
18mL of the resulting solution was then placed into a flask, and boiled on reflux at atmospheric pressure for 2 hours. White,
fine, amorphous powder was suspended as the TiOSO4 hydrolyzed. This powder was then washed several times and
centrifugated, until it was free of sulfate ion. The resulting wet, washed powder was then added to 0.1mL of 5% Na2CO3
and 0.2mL of 5% CH3COOH, and mixed thoroughly with a spatula.
The consistency of the titania at this point reminds me very much of skin lotion. It’s almost thixotrophic, and it has that
white, thick, shiny look of skin lotion. A thin layer of this was spread evenly out across a glass slide (Fisher 12-550-43) that
had been masked with tape. This glass slide had previously been rendered conductive with SnO2, as described in an earlier
post. After drying briefly in warm air, it was noted that this thin film of titania had become practically transparent; it was
very thin when it dried. The masking tape was removed, and then the TiO2 layer was annealed in a kiln from 450-500°C for 1
hour. At this point the kiln was shut down, and the kiln was allowed to cool down to 200°C. At this point the glass slide was
removed from the kiln, and cooled in ambient room air. While noticeably more opaque, the annealed film still retained most of
its transparency. When the film was allowed to soak in fresh blackberry juice, however, a change occurred. The liquid was
rocked back and forth across the TiO2 film, much like you would when making a silver mirror. For the first few minutes
not much change was observed. After this, however, the film started becoming very dark as it soaked up the anthocyanins
from the juice. The film was soaked in the blackberry juice for ten minutes, rinsed off in water and ethyl alcohol, and dried.
This was the result, using the same settings and white balance as the picture of the previous slide:
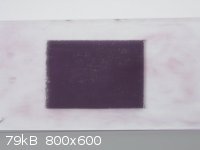
That is a really big difference from the previous attempt, for sure. Looking up close under a microscope, it was noted that
the film had shrunk upon being annealed, causing thousands of small micro-cracks. This may be obvious in some areas of the
film, as some of these little pieces popped off of the glass. In spite of this, the integrity of the film is much better than the
previous one, and it absorbs the dye very well.
Next I’ll try completing the solar cell, and seeing if it is responsive to light. I don’t expect it to work very well, as my
conductive SnO2 coating is rather poor, and has high resistance. I mainly want to make sure that the TiO2 film is
photo-reactive.
Edit:
Here is a picture of the completed cell:
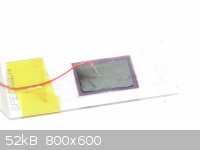
The glass is the "negative side", and the small piece of graphite paper is the "positive" terminal. A very, very, small bit of KI +
I2 + glycol electrolyte is wicked in between the two electrodes. The cell stays together mostly by capillary action,
even when it is positioned vertically, and the small amount of pressure applied from the piece of copper wire. In front of a 15
watt fluorescent bulb it can deliver about 50mV. That's not impressive at all, but it's about what I expected. Short-circuit
current is about 0.1uA (yes, you read that correctly) due to the extremely high resistance in the cell. The effective shunt
resistance inside the cell is probably many times less than that presented by my electrodes. Also, the small cracks in the TiO2
film that I mentioned earlier probably allow a significant amount of the charges to recombine internally.
Basically, I need to do a better job of making the glass conductive, and I need a better collector than a piece of
graphite with a faint trace of soot on it. I don't think this graphite electrode is very catalytically active. The TiO2 layer is
sensitive to light, however, which indicates that the amorphous titania crystallized at least partly to the anatase form
under anealment. This is mostly what I was looking for.
One other thing that I noticed is that the cell voltage responds slowly to changes in light. It takes maybe ten seconds or so
for it to stabilize when the light intensity changes.
[Edited on 10-12-2013 by WGTR]
|
|
|
Zephyr
Hazard to Others
Posts: 341
Registered: 30-8-2013
Location: Seattle, WA
Member Is Offline
|
|
wow, good job
I'll be attempting to repeat this procedure in a few days, good luck on the photo reactivaty tests!
|
|
|
blogfast25
International Hazard
Posts: 10562
Registered: 3-2-2008
Location: Neverland
Member Is Offline
Mood: No Mood
|
|
Quote: Originally posted by WGTR  |
18mL of the resulting solution was then placed into a flask, and boiled on reflux at atmospheric pressure for 2 hours. White,
fine, amorphous powder was suspended as the TiOSO4 hydrolyzed. This powder was then washed several times and
centrifugated, until it was free of sulfate ion. The resulting wet, washed powder was then added to 0.1mL of 5% Na2CO3
and 0.2mL of 5% CH3COOH, and mixed thoroughly with a spatula.
|
Good work (apart from the rest of it). It would help the hydrolysis enormously if you diluted the original NaHSO4/TiOSO4 solution strongly, like by a
factor 100 or so. If it doesn't already precipitate TiO2, then boiling should do it.
Precipitating from a more dilute solution should also give you a purer product.
Specifically what grade of TiO2 was your starting point?
Ooopsie. Pottery, I see.
[Edited on 10-12-2013 by blogfast25]
|
|
|
WGTR
National Hazard
Posts: 971
Registered: 29-9-2013
Location: Online
Member Is Offline
Mood: Outline
|
|
In this case, boiling very dilute solutions of TiOSO4 and H2SO4 give precipitates of powder that crystallize with less catalytic
activity after hydrothermal treatment. I don't claim to fully understand why, and I'm not even doing hydrothermal treatment
anyway. But this is in one of the references listed in my previous post. They actually recommended hydrolyzing a solution with
10% TiOSO4 and 1M H2SO4. The concentrations that I used are more a compromise of catalyst activity vs. ease of accomplishing
the experiment. The acidity is provided by excess NaHSO4 in this case, and Na+ is present in the solution. This could certainly
be improved upon.
I mentioned washing the powder to free the precipitate of sulfate ion; what I should have said is to free it from soluble
sulfate ion. Apparently some of it gets occluded in the precipitate, and this small amount actually encourages the amorphous
powder to give an active anatase form during hydrothermal treatment. I'm not sure what effect it has if the powder is being
annealed in a kiln.
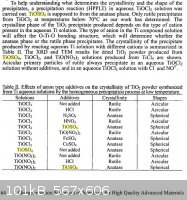
The exact method of preparation of the initial precipitate has a large effect on the resulting product, as shown below:
I should also point out that I did not dehydrate the precipitate before applying it to the slide. Maybe doing this would help minimize
some of the cracking in the film.
Edit: I was not fully awake when I wrote the previous paragraph. Generally the precipitate is washed thoroughly, and then
dried in an oven at 120°C. Then afterwards, a hydrothermal treatment, or a deposition onto a glass slide with the amorphous powder.
That's what I've understood in the literature so far. What I meant is that I skipped this drying step after washing, and kept the
precipitate wet from its synthesis up until after it was applied to the slide. One thing that I can try differently is to dry the powder
and do a bulk annealment in the kiln, then mix up the crystallized powder with the acetic acid and Na2CO3 and then apply this to
the glass slide. It will still probably crack as it shrinks (artifact of the crystallization), but maybe it won't be as extensive.
[Edited on 10-12-2013 by WGTR]
|
|
|
blogfast25
International Hazard
Posts: 10562
Registered: 3-2-2008
Location: Neverland
Member Is Offline
Mood: No Mood
|
|
| Quote: Originally posted by WGTR | I should also point out that I did not dehydrate the precipitate before applying it to the slide. Maybe doing this would help minimize
some of the cracking in the film.
[Edited on 10-12-2013 by WGTR] |
Yes, the cracking is what you see when mud dries, of course.
Very nice job altogether. Might try this one day. Good write up!
|
|
|
WGTR
National Hazard
Posts: 971
Registered: 29-9-2013
Location: Online
Member Is Offline
Mood: Outline
|
|
After reading through this paper:
http://essay.utwente.nl/62126/1/BSc_J_Sch%C3%A4ffer.pdf
I figured out a way to prevent cracking in the TiO2 film. This is the latest result, using the same slides as before (Fisher). This
time there is no conductive coating on the glass:

This picture was taken after the TiO2 layer had been dyed with blackberry juice for ten minutes. The pen markings that you
see are actually on the paper beneath the slide, showing how transparent the TiO2 coating is.
The leftover TiO2 gel that was used in the previous experiment was added to 11mL of DI water and 11mL of isopropyl alcohol.
3.5mL of glacial acetic acid was then added. This was then sonicated for about 30 minutes, after which 4.5g of 50%
polyvinyl alcohol was then added and stirred in. After the PVA dissolved fully, the solution was sonicated for another 30
minutes.
A small amount of this solution was applied to a glass slide that had been degreased and polished with zirconium silicate, and
this film was dried gently on a hot plate. Unfortunately, the film is a bit thicker around the edges, due to the masking tape
gathering up some of the solution.
The film was annealed at 500°C for 1 hour, and then cooled down to 200°C in the kiln. Then, the slide was removed and
left to cool in ambient air.
Anyway, the small imperfections in the film where there when the slide came out of the kiln. Some bits of brick dust fell on
the slide while it was in the kiln, and some of the thicker coating around the edges developed some cracks. Other than
that, the film is continuous and did not show the "mud cracking" that the previous experiment did. According to the
aforementioned literature, the high PVA concentration is vital to separate the individual particles of TiO2 from each other
while the firing process begins. This keeps them spaced out evenly on the glass slide, and helps prevent the particles from
agglomerating during annealment.
When the film was soaked in blackberry juice, rinsed in both water and ethyl alcohol, and dried with compressed air; it was
noted that none of the film had loosened or come off.
While the results look good with this, I need to make some changes. For one, I'm going to start with a fresh batch of
TiO2, as the batch of TiO2 that I was using this time had some of the Na2CO3 that I had added in the previous experiment.
Second, I need to duplicate this experiment on conductive glass. Thirdly, I may spin-coat the slide, in an attempt to get a
more even coating. Fourthly, I need to fire the TiO2 film for a longer period of time (4 hours) at 500°C, and then check it for
activity in the solar cell.
|
|
|
WGTR
National Hazard
Posts: 971
Registered: 29-9-2013
Location: Online
Member Is Offline
Mood: Outline
|
|
Here is the latest on my efforts making nanocrystalline TiO2 precursor.
In this post here I described how TiOSO4 was synthesized, by reacting TiO2 powder with molten NaHSO4.
The sample batch in that post will be referred to as "Sample A". The latest sample is one that will be referred
to as "Sample B". A few observations will be noted about how the results of the syntheses differed from each
other.
Sample A:
0.39g of TiO2 was reacted with 3.2g of molten NaHSO4.H2O (total) until a clear orange melt was observed.
Upon cooling, the solid salt was stirred into 36mL of DI water. The salt fully dissolved within 45 minutes.
18mL of the resulting solution was boiled on reflux for 2 hours, hydrolyzing the TiOSO4 to amorphous TiO2.
The solution was centrifuged at 2000 rpm for 5 minutes and washed, repeating this process three more times.
It was noted that it only took about 5 minutes of centrifugation at 2000 rpm to effect a clean separation of the
TiO2 during each washing. The exception of this would be the last washing, where an extra 5 minutes was
needed to get complete separation.
The concentration of the TiOSO4 in solution before hydrolysis was 2%, with a NaHSO4 concentration of 0.17M.
Sample B:
0.78g of TiO2 was reacted with 6.0g of NaHSO4.H2O (total) until a clear orange melt was observed. Upon
cooling, the solid salt was stirred into 14mL of DI water. The salt was not fully dissolved until after four hours.
The resulting solution was boiled on reflux for 3 hours, 15 minutes, hydrolyzing the TiOSO4 to amorphous TiO2.
Difficulty was encountered upon centrifugation with this sample. 2000 rpm at 5 minutes only served to partially
separate out some of the heavier parts, leaving an opaque milky supernatant. Centrifuging the sample at 2600
rpm for 20 minutes managed to deliver a well-separated sample, with a clear supernatant. The supernatant was
decanted; and the precipitate was washed with DI water, mixed vigorously by shaking, and centrifuged again.
This time, even 30 minutes at 3000 rpm (1450 xg) was not sufficient to separate out more than a small fraction
of the precipitate. The solution appeared to be homogenously milky.
The concentration of the TiOSO4 in solution before hydrolysis was 10%, with a NaHSO4 concentration of 0.8M.
It seems like the precipitate in sample B possibly has a lower density. I don't quite understand why it becomes
more difficult to separate out the precipitate with successive washings. I'm going to give some more thought to
how I'm going to finish washing sample B. It definitely needs to be washed, as the pH is still about 1. Before
cranking the centrifuge up higher, I need to verify that the culture tubes can handle it without collapsing.
So why am I not more satisfied with the easier-to-wash sample A? According to a previously mentioned reference
here, the 10% TiOSO4 and 1M H2SO4 starting solutions deliver a finer, more active catalyst upon further
hydrothermal treatment (which I am about to try).
Edit 12/20/13: After leaving sample B to sit overnight in the culture tube, it was noted that no settling of the
precipitate had occurred. Rather than trying higher and higher speeds in the centrifuge to separate it out, I
decided to try dialyzing the 45mL of TiO2/water solution against 4000mL of DI water. After stirring the dialysis
tube around in the beaker for an hour, no visible change had occurred in the appearance of the suspended TiO2.
The pH of the rinse water had dropped slightly, from 6 to about 5.5. I then decided to turn on the heat, with the
idea that heat would speed up the dialysis process. Room temperature was 23°C, and the water was slowly
heated up to 35°C. After stirring at this temperature for about an hour, I noticed that the precipitate began to
settle out, even though it was still being sloshed around in the dialysis tube. The pH of the rinse water was then
down to about 5. I was not expecting it to settle out like this, after being so difficult to separate in the centrifuge.
Perhaps later today I'll run it through the centrifuge again and wash it a second time, to see if the temperature is
really having that much of an effect on whether the precipitate settles out or not.
[Edited on 20-12-2013 by WGTR]
|
|
|
WGTR
National Hazard
Posts: 971
Registered: 29-9-2013
Location: Online
Member Is Offline
Mood: Outline
|
|
OK, after dialyzing sample B for a few hours, the pH of the sample was measured at 3, using cheap pH paper. At this
point I tried centrifuging the sample, and had no trouble getting the precipitate to settle out. Even washing and
centrifuging the sample for five times total, using room temperature DI water each time, 2000 rpm at 6 minutes was
sufficient to settle the precipitate. Overall, the washing provided about a 5000:1 dilution ratio. I'll have to retry this
whole thing again later to see if the initial problem with the precipitate not settling out was related to temperature or pH (or
both).
After washing the sample, it was diluted out to about 25mL. About 5mL of this was pipetted into a small glass vial, which
was then inserted carefully into this high-priced and handsomely constructed autoclave:
It was constructed of 1" x 3" galvanized pipe, with caps on either end. White PTFE tape was used to seal the threads.
Clamping one cap into a bench vise, I tightened the assembly together using a 15" crescent wrench. It took all the weight I
could put into it to get it to tighten together sufficiently.
A few mL of DI water had been added inside the metal tube, but outside of the sample vial, to help provide heat transfer. After
autoclaving the sample at 125°C for 4 hours in an oven, the oven was turned off and allowed to cool slowly. If it cools too
fast, the water inside the sample vial will boil out into the main tube assembly. Here's what the sample looked like after being
removed from the tube:

While being autoclaved, the cap was NOT on the vial. It would have melted; and besides, you need to allow the pressure to
equalize while it's being heated or cooled.
I measured the pH of this solution again after it was given the hydrothermal treatment, and it was about 1. This is a pretty
significant increase in acidity; but according to this reference this is to be expected. Due to the rather low pH here, I'll
probably go through some more washing and centrifuge cycles. Then, the sample can be hydrothermally treated for several
more hours if needed.
It was interesting (and encouraging) to note that after the hydrothermal treatment in the autoclave, the precipitate now
settles to the bottom on its own within about 10 minutes, even if it has been vigorously shaken up, leaving a water-clear
solution on top. The main reason that the TiO2 is treated hydrothermally, is to cause the amorphous powder to crystallize
into anatase form TiO2, and to help remove defects in the crystalline powder. If the amorphous powder is instead
crystallized the normal way, i.e. by dry calcination in a kiln for several hours, the powder becomes denser and has less surface
area (and lower activity). So the idea here is to minimize the amount of time that the powder needs to spend at high kiln
temperatures.
[Edited on 21-12-2013 by WGTR]
|
|
|
blogfast25
International Hazard
Posts: 10562
Registered: 3-2-2008
Location: Neverland
Member Is Offline
Mood: No Mood
|
|
I like your 'autoclave'. I wonder how much pressure it could take.
Very nice write ups.
[Edited on 21-12-2013 by blogfast25]
|
|
|
WGTR
National Hazard
Posts: 971
Registered: 29-9-2013
Location: Online
Member Is Offline
Mood: Outline
|
|
Thanks, blogfast25.
I don't yet know what kind of pressure it can handle. To be honest, I'm not sure that I want to find out through personal experience!
But where's my sense of adventure, right? The standard ratings on some of the galvanized pipe that I've looked at varied from
100 to 150 psi, assuming that water was being used. I could (and probably will) raise the temperature up to 150*C next time, which
should give me around 75-100psi in the tube. I don't plan on heating it at a higher temperature than that. Another issue is that
with increased pressure and temperature comes the increased likelihood of leaks. The pipe itself could probably handle several
hundred psi behind it, but the threads would probably leak long before that. It wouldn't be a lot of fun to come back after
12 hours to find that all of the water had boiled away from the tube. 
|
|
|
| Pages:
1
2 |
|


