| Pages:
1
2 |
aga
Forum Drunkard

Posts: 7030
Registered: 25-3-2014
Member Is Offline
|
|
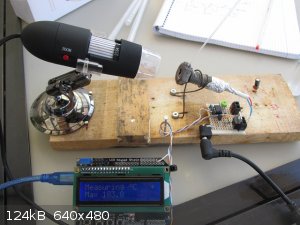
Melting Point Apparatus - SMelty v1
Some time ago i made the arrogant comment that 'making a melting point apparatus should be trivial'.
Amazingly a 'proper' one can cost $2000+ !
So here's a proof-of-concept design that can be built for a few $, and can reach 250 C with the heater i bought.
Features :-
Really Cheap
Re-useable parts (Arduino)
One-button temperature capture
Measurement, and 2 Calibration modes
4 heating rates from around 2.5C/min (easily changed - see code)
Auto power off at end of recording
2 debugging modes
Independant 1st and second calibrations
Out-of-bounds reading indicator
Heater-on indicator
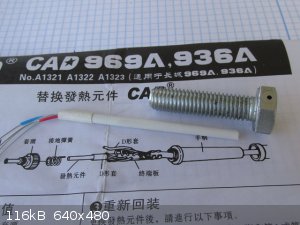
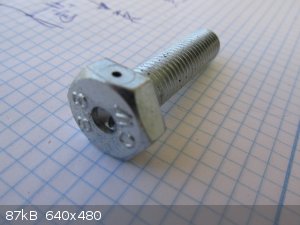
The core of the design is a metal die into which is inserted the capilliary tube, and a heating element from a soldering iron.
The heater is controlled by an Arduino Uno via a simple Hexfet driver circuit, which is powered by a laptop PSU, as the heater takes around 2A when
running.
The heater has a thermocouple built in, but gives out very little voltage, so an op-amp was used to amplify the signal to a suitable level.
While considering what to use for the metal die, a 12mm Hex head bolt came to hand.
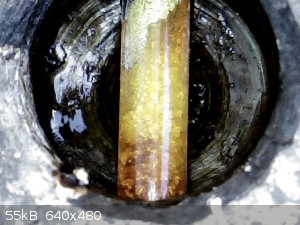
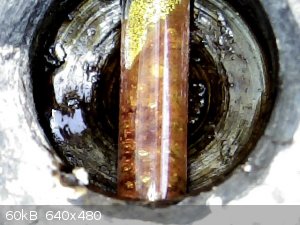
A 1.5mm hole was drilled half way down into the side of the head, and a 3.5mm hole drilled into the top of the head, intersecting the 1.5mm hole.
This forms a hole so you can see the tube. I used a USB microscope to watch the melting process, but a magnifying glass also works.
Then a 3.5mm was drilled into the threaded end of the bolt to allow insertion of the heating element, and some heatsink paste was used.
Next the Arduino needed an LCD screen with some buttons, so an 'LCD Shield' was used.
First is Calibration. It uses a two-point calibration technique, where the heater is powered up, allowed to settle and then an actual measured
temperature is input and recorded.
This is repeated on a higher setting to calibrate the second, higher point.
The program then calculates the m and c values from the two y = mx + c equations, using the recorded calibration values.
Usage:-
Press SELECT to cycle throught the heating modes
Press LEFT to cycle between the Modes (Measuring, Calibrate)
Press UP and DOWN in Calibration modes to change actual measured temperature
Pressing LEFT in calibration mode will prompt wether to save the value. Press RIGHT for YES, LEFT for no.
Pressing DOWN in Measuring mode will capture the temperature, and move to the next.
When both temperatures are captured, the heater will be stopped.
Pressing RIGHT in Measuring mode will clear the values and start from measurement 1 again.
For debug purposes, holding SELECT at power-up will display the calibration and calculated m and c values.
Holding LEFT at power-on will turn the heater on to Max and display the ADC reading.
This is so that you can adjust the potentiometer R2 so that the ADC reads just under 1023 at max temperature.
Improvements :-
A more powerful heater will increase max temperature
Adding a low-mass thermocouple to the face of the bolt head will improve accuracy
Adding insulation and protection will increase max temperature and safety
EDIT: arduino code attached
References :-
Arduino £ 4.99
http://www.ebay.co.uk/itm/121307195834?ssPageName=STRK:MEWNX...
LCD + Keypad Shield £ 2.99
http://www.ebay.co.uk/itm/291116815467?ssPageName=STRK:MEWNX...
Laptop PSU £ 5.89
http://www.ebay.co.uk/itm/280480995628?ssPageName=STRK:MEWNX...
986C Soldering Iron Heating element with integral thermocouple £ 2.20
http://www.ebay.co.uk/itm/5x-50w-Ceramic-Core-Heating-Elemen...
Heatsink Compound £0.99
http://www.ebay.co.uk/itm/300674665170?ssPageName=STRK:MEWNX...
USB Microscope £13.29
http://www.ebay.co.uk/itm/181403261945?ssPageName=STRK:MEWNX...
MelTemp prices
http://library.westprime.com/store/index.cfm?do=Browseproduc...
OP Amp Basics
zebu.uoregon.edu/~rayfrey/431/notes9.pdf
Two-point calibration
www.omega.com/manuals/manualpdf/M4347.pdf
Attachment: smelty.ino (20kB)
This file has been downloaded 710 times
[Edited on 26-7-2014 by aga]
|
|
|
HeYBrO
Hazard to Others
Posts: 289
Registered: 6-12-2013
Location: 'straya
Member Is Offline
Mood: 
|
|
Excellent work! This design is really quite clever and i really like the the mount for the sample. How accurate is it? have you tested it with some
pure substances and against another mel-temp apparatus of some sort? keep it up!
|
|
|
aga
Forum Drunkard
Posts: 7030
Registered: 25-3-2014
Member Is Offline
|
|
Personally i don't have the means to calibrate it accurately, and have never even seen a mel-temp face-to-face, never mind actually possess one.
Theoretically it can achieve about 0.25 C, although the Reality may well be different.
Certainly the accuracy of the Calibration steps will determine it's usefulness.
|
|
|
Chemosynthesis
International Hazard
Posts: 1071
Registered: 26-9-2013
Member Is Offline
Mood: No Mood
|
|
Awesome!
|
|
|
blogfast25
International Hazard
Posts: 10562
Registered: 3-2-2008
Location: Neverland
Member Is Offline
Mood: No Mood
|
|
So this is what's been keeping you busy!
But what's an *.ino file?
And what's the material being tested there?
[Edited on 26-7-2014 by blogfast25]
|
|
|
gdflp
Super Moderator
Posts: 1320
Registered: 14-2-2014
Location: NY, USA
Member Is Offline
Mood: Staring at code
|
|
*.ino files are Arduino programs, so I'm guessing it's the software which aga wrote and the apparatus uses. By the way, nice job aga, it looks really
neat.
[Edited on 26-7-2014 by gdflp]
|
|
|
aga
Forum Drunkard
Posts: 7030
Registered: 25-3-2014
Member Is Offline
|
|
Took a couple of days 
Would have been done earlier, but i broke the first Arduino had to
wait for a new one to arrive.
The .ino file is the 'sketch' or program for the Arduino as gdflp says.
You open it in the Arduino software and compile/upload it to the Arduino board (just press ctrl-U).
The material is just some Sulphur.
I melted some other stuff, but the Sulphur looked best.
[Edited on 26-7-2014 by aga]
|
|
|
arkoma
Redneck Overlord
Posts: 1761
Registered: 3-2-2014
Location: On a Big Blue Marble hurtling through space
Member Is Offline
Mood: украї́нська
|
|
Oh wow.
Hmmm, arky has some piperine, some ethylvanillin....
"We believe the knowledge and cultural heritage of mankind should be accessible to all people around the world, regardless of their wealth, social
status, nationality, citizenship, etc" z-lib
|
|
|
aga
Forum Drunkard
Posts: 7030
Registered: 25-3-2014
Member Is Offline
|
|
If anyone needs any bits to build one of these, U2U me and i'll send 'em.
I got Bolts (which i can drill)
Op-amps, Hexfets, 2N3904s and resistors a'plenty.
Seeing as the code's only been downloaded 6 times, i can probably cope with demand !
Edit: first two lucky winners get a heating element too (only got 2 left).
[Edited on 26-7-2014 by aga]
|
|
|
arkoma
Redneck Overlord
Posts: 1761
Registered: 3-2-2014
Location: On a Big Blue Marble hurtling through space
Member Is Offline
Mood: украї́нська
|
|
aga, you are "the shizznit"
"We believe the knowledge and cultural heritage of mankind should be accessible to all people around the world, regardless of their wealth, social
status, nationality, citizenship, etc" z-lib
|
|
|
blogfast25
International Hazard
Posts: 10562
Registered: 3-2-2008
Location: Neverland
Member Is Offline
Mood: No Mood
|
|
Aga:
Where did you get the capillaries from?
Tip on filling them: use less material (I think...)
|
|
|
aga
Forum Drunkard
Posts: 7030
Registered: 25-3-2014
Member Is Offline
|
|
Ebay of course
http://www.ebay.co.uk/itm/1-5mm-x-100mm-Glass-Melting-Point-...
These thew me for a moment, as BOTH ends are sealed !
Have to snap one end off to fill 'em.
The trick is to use totally dry material, and just stick the open end of the capilliary into the dust, then turn it the right way up and bounce it off
the table top.
I have seen things where you drop it through another tube onto a hard surface a few times.
It seems to me that you only want to fill it so far as to be able to see the top through the aperture.
Having said that, i have never done a Melting Point thing before building the SMelty, so i am by no means an expert.
|
|
|
Zyklon-A
International Hazard
Posts: 1547
Registered: 26-11-2013
Member Is Offline
Mood: Fluorine radical
|
|
My source:
 
[Edited on 27-7-2014 by Zyklon-A]
|
|
|
Metacelsus
International Hazard
Posts: 2531
Registered: 26-12-2012
Location: Boston, MA
Member Is Offline
Mood: Double, double, toil and trouble
|
|
In my organic lab class, one of my least favorite things was getting compounds into melting point capillaries, especially when they were waxy and
stuck to the sides. Seriously, it was SO annoying!
|
|
|
UnintentionalChaos
International Hazard
Posts: 1454
Registered: 9-12-2006
Location: Mars
Member Is Offline
Mood: Nucleophilic
|
|
Quote: Originally posted by Cheddite Cheese  | | In my organic lab class, one of my least favorite things was getting compounds into melting point capillaries, especially when they were waxy and
stuck to the sides. Seriously, it was SO annoying! |
Can't be worse than using a goddamn thiele tube... this project is extremely interesting...
Department of Redundancy Department - Now with paperwork!
'In organic synthesis, we call decomposition products "crap", however this is not a IUPAC approved nomenclature.' -Nicodem
|
|
|
cal
Hazard to Self
Posts: 88
Registered: 7-2-2012
Member Is Offline
Mood: No Mood
|
|
Melting Point App
If you watch eBay you can pick up one for around two hundred dollars. I bought a Fisher and Fisher for $225.00
Thought is an action, which when acted upon becomes work and sometimes art!
|
|
|
aga
Forum Drunkard
Posts: 7030
Registered: 25-3-2014
Member Is Offline
|
|
Cool. A Melting point apparatus owner.
Build one of these and compare it to the bought one.
Tell us the results !
|
|
|
Dr.Bob
International Hazard
Posts: 2658
Registered: 26-1-2011
Location: USA - NC
Member Is Offline
Mood: No Mood
|
|
That is a great project, very reasonable to do. I have used a few brands of those, from simple heat blocks to Melt-temps, to computerized ones which
cost a bundle. The hardest part is actually determining when the material melts, as few materials have a really clear melting point, except for very
pure crystalline ones. In real life, many compounds I have worked with are amorphic or hydroscopic solids, which tend to loose water or solvent
first, causing a slight change in form, then slowly start melting until they become a goo, which often is over a several degree C range. So while
more polar compounds sometimes have nice clear MPs, like benzoic acid, many amines and non polar compounds have wider ranges of softening and then
melting, which are much harder to clearly define.
If anyone wants MP tubes, I have a few vials/tubes of them left (100 in each tube), with one end open, which would be much easier to fill. I have
never even seen ones with both ends sealed, can't imagine what they were designed for.
|
|
|
aga
Forum Drunkard
Posts: 7030
Registered: 25-3-2014
Member Is Offline
|
|
Both ends are sealed to confuse and befuddle a middle-aged novice chemist with sub 20:20 eyesight.
Worked really well.
Perhaps it is to inspire someone to invent a teleporter to get the material into the tubes.
|
|
|
aga
Forum Drunkard
Posts: 7030
Registered: 25-3-2014
Member Is Offline
|
|
@Dr Bob - how much for the tubes and postage ?
|
|
|
Burner
Hazard to Others
Posts: 100
Registered: 28-3-2014
Member Is Offline
Mood: No Mood
|
|
| Quote: Originally posted by cal | | If you watch eBay you can pick up one for around two hundred dollars. I bought a Fisher and Fisher for $225.00 |
Patience can be a virtue. I got a digital MP system for $75 from eBay. I am
tempted to rework aga's software to add auto-detection to my system.
“There is a cult of ignorance in the United States, and there has always been. The strain of anti-intellectualism has been a constant thread winding
its way through our political and cultural life, nurtured by the false notion that democracy means that 'my ignorance is just as good as your
knowledge.”
- Isaac Asimov
|
|
|
aga
Forum Drunkard
Posts: 7030
Registered: 25-3-2014
Member Is Offline
|
|
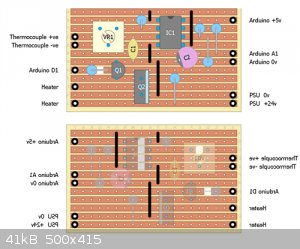
A few people have asked for a layout for the Smelty components, so here is a simple Veroboard layout.
The Top image shows where the components go, the bottom one is the Underside, showing where the 6 holes need to be made to cut in the copper tracks.
Just use a metal drill bit and twist it into the hole. You'll see when it has cut the track.
The resistors from left to right are :-
R8, R1, R7, R4, R3, R5
The Heater wires are the red and blue wires from the soldering iron element. It doesn't matter which way round they go.
The two plain transparent/white wires from the soldering iron element are the thermocouple wires.
It Does matter which way round they go, but they are both the same colour (odd, but that's how it is).
If you don't get a temperature reading, swap those two wires round.
|
|
|
Lambda-Eyde
National Hazard
Posts: 857
Registered: 20-11-2008
Location: Norway
Member Is Offline
Mood: Cleaved
|
|
Have you considered using a thermistor or RTD such as Pt100 instead of a thermocouple, for higher accuracy and repeatability? Thermocouples are fairly
inaccurate and are best suited for applications where long ranges and high temperatures are to be measured without the need for extreme accuracy (like
furnaces and cryogenic applications). I find a melting point apparatus to be useless if it's off by 0.1 degrees C. How different would the wiring be?
I've been thinking of building something similar myself, but I planned to just use a PID as I am a complete novice at electronics. Your solution looks
much better, so I will probably steal your plans (and program). Great project,
thanks a lot for sharing!
[Edited on 4-9-2014 by Lambda-Eyde]
This just in: 95,5 % of the world population lives outside the USA
You should really listen to ABBAPlease drop by our IRC channel: #sciencemadness @ irc.efnet.org
|
|
|
aga
Forum Drunkard
Posts: 7030
Registered: 25-3-2014
Member Is Offline
|
|
Yes, a thermistor or integrated/calibrated device would improve accuracy.
Wiring would actually be Simpler if it were an integrated device, but would need more Code to talk to the device.
For a Thermistor instead of a Thermocouple you could lose the op-am entirely, add a resistor from the top of the thermistor to +5v and connect the top
of the thermistor to A1 of the Arduino.
More might be required for stability, and a Wien bridge may be required for sensitivity/resolution.
The design is a proof-of-concept, and should be changed/improved to make a better device.
As it's all Open, including the Code, you can steal as much as you like !
|
|
|
aga
Forum Drunkard
Posts: 7030
Registered: 25-3-2014
Member Is Offline
|
|
Since 3D printing parts became cheaply available, the 'hot end' assembly leaps out as a much cheaper & easier way to make a diy melting point
apparatus.
It is an aluminium block with a 12v heater + temperature sensor for about $3 off ebay !
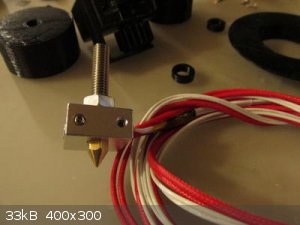 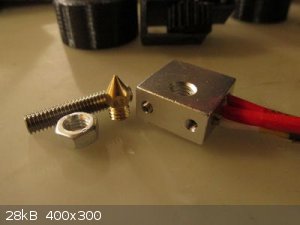
Aluminium is much easier to drill than steel.
Think i'll have another go at making a SMelty.
|
|
|
| Pages:
1
2 |


