| Pages:
1
..
8
9
10
11
12
..
18 |
RogueRose
International Hazard

Posts: 1585
Registered: 16-6-2014
Member Is Offline
|
|
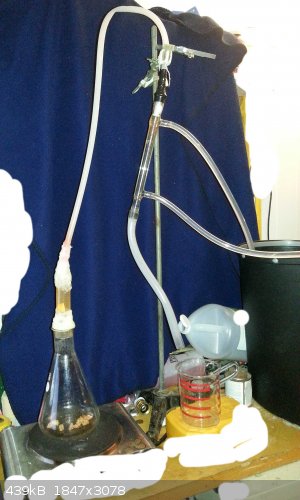
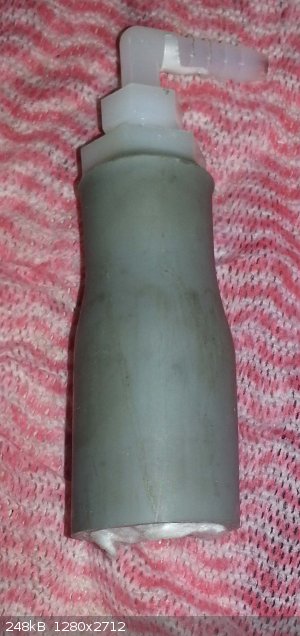
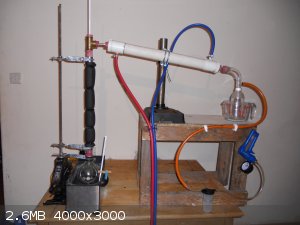
SIMPLE Distillation setup with parts on-hand
All that was available was a 1L Erlynmyer flask and a 12" Liebig condenser. An aquarium pump was aquired to cool the condenser and used an old metal
stand (like a music stand) to hold up the apparatus.
So, how to get a distillation unit out of this? Take the outer case of a 35ml syringe (the hard plastic case that the syringe comes in). The wide
part of the neck, near the end of the plunger fit PERFECTLY inside the neck of the flask!!!
1/2" OD, 3/8" ID vinyl tubing (food grade) was used to connect the syringe case to the condenser. To ensure it stuck together RTV silicone was added
as a "bung/stopper" at the flare of the syringe case to make a seal and keep it from falling down if it could even happen.
A hole was drilled in the needle end (no needle here though) of the syringe case to put the tubing through. A bulb of RTV silicone was applied to the
end of the 1/2" tubing (heated with hot air gun to speed sealing outer layer) then pulled up through the syringe case from the inside and then filled
the rest with RTV to keep it from moving. Used long screwdriver to ensure tubing was clear of silicone.
On the outside of the syringe case, 3 layers of RTV to stick/glue the tubing to the syringe casing ensuing there is no leaking from the vapors.
After each use of RTV a 1500 watt heat gun was used to seal the outer layer so it wasn't sticky. This takes about 30 seconds. Be careful to
continually rotate/move so it doesn't melt the syringe case.
The vinyl tubing terminated inside the condenser with a perfect fit and used double wide electrical tape first wrapped around the tubing and then
around the condenser (2 wraps) and then back to the tubing for a number of wraps. This has held for a LONG time with NO leaks of failure.
Normal vinyl tubing was used to cool the condenser - no big thing here. MAKE SURE YOU CHECK THE CONNECTION often as they can slide off, especially
when the water gets warmer. small pipe clamps will be very helpful.
a 15" lenght of vinyl tubing finished the run from the end of the condenser. Many benefits to this as it can provide extra cooling and can be moved
to different containers when possible.
Total expenditure: $2.62 for the tubing & RTV usage - all else was on hand.
Hypothetically. This is able to take alcohol wash of 5% to about 40-50% after one run and after a second run 92-93% was measured!!!
Pleas no rude comments about the adapter to the erlynmyere flask. I know it looks like one of those "male enhancement" vacuum attachments that is
leaking from the end 
[Edited on 7-6-2016 by RogueRose]
[Edited on 7-6-2016 by RogueRose]
[Edited on 7-6-2016 by RogueRose]
|
|
|
Firmware21
Harmless
Posts: 33
Registered: 22-1-2015
Member Is Offline
Mood: Ņ͈̣̭̺̈ͬ͊̔i̓̿͑ͯ̂ͪ҉̸̺̀t͉̣͕͙̟̪̅͐͂̏͌ͭ͗̑͝ṙ̶̛̙̥̝̻̟̓ͬ̾ͧ͒͘ͅa͒͊ͯ̾̑̏̌̓̕҉͚͚͓͔͙͚̥t͆̌͑ͩ̐͗
͖̻̲̪̲̙͘ͅe͙͕͙̙̤̤̫̒ͩͣ̅̊̍̉͒ͬ́͟ͅs͈̬̮̥̻͂ͥͨ̂ͮͨ͒́͠ !!!
|
|
Well at least you've got a condenser  . My first "distillation apparatus" was
roughly the same, except there was no condenser or stative to hold the whole thing. . My first "distillation apparatus" was
roughly the same, except there was no condenser or stative to hold the whole thing.
I hope there is good ventilation where you work with it, as it looks like a big fire hazard to me. Honestly, I'd be afraid to work with it in my lab.
I might just be a scaredy cat though...
You might want to get the adapter someday, they make your life easier IMO  . .
|
|
|
RogueRose
International Hazard
Posts: 1585
Registered: 16-6-2014
Member Is Offline
|
|
Quote: Originally posted by Firmware21  | Well at least you've got a condenser . My first "distillation apparatus" was
roughly the same, except there was no condenser or stative to hold the whole thing.
I hope there is good ventilation where you work with it, as it looks like a big fire hazard to me. Honestly, I'd be afraid to work with it in my lab.
I might just be a scaredy cat though...
You might want to get the adapter someday, they make your life easier IMO .
|
Well a lit flame next to the erlynmyer junction and at the end of the condenser hose posed no fire risk. Keeping the condenser at 55F or so and
running slow, so very little vapor this way.
What I coulnd't get over was the fact that I could get almost 95% with this cheap setup while my $500 essential oil still can't get past about 50%
This is what makes me so mad when people say that they have the best b/c it is most expensive.
Kind of like a $2,000 space pen (writes in zero G) vs a pencil, lol  
[Edited on 7-6-2016 by RogueRose]
|
|
|
The Volatile Chemist
International Hazard
Posts: 1981
Registered: 22-3-2014
Location: 'Stil' in the lab...
Member Is Offline
Mood: Copious
|
|
I was just using a still apparatus with a 500mL sep funnel replacing the thermometer through the top rubber stopper, to make Acetic acid from sodium
acetate and sulfuric acid. Didn't work too well, lots of fumes and very little condinsation in my tiny 100mm liebig...
|
|
|
mayko
International Hazard
Posts: 1218
Registered: 17-1-2013
Location: Carrboro, NC
Member Is Offline
Mood: anomalous (Euclid class)
|
|
I built this little DIY centrifuge out of an empty spool, some microfuge tubes, nuts and bolts, hot glue, and a rubber band. It's powered by an
electric drill - my cordless didn't quite have the muscle to do what I wanted in a timely manner, but my neighbor lent me a higher power drill, which
worked
 
al-khemie is not a terrorist organization
"Chemicals, chemicals... I need chemicals!" - George Hayduke
"Wubbalubba dub-dub!" - Rick Sanchez
|
|
|
RogueRose
International Hazard
Posts: 1585
Registered: 16-6-2014
Member Is Offline
|
|
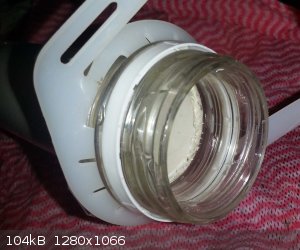
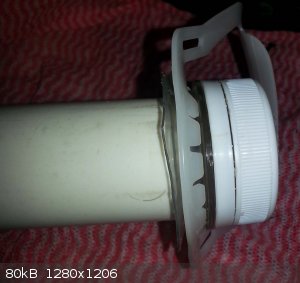
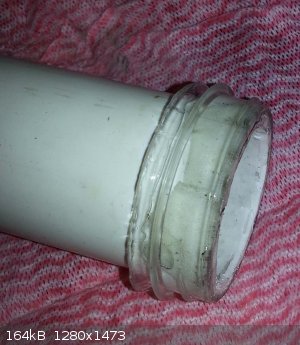
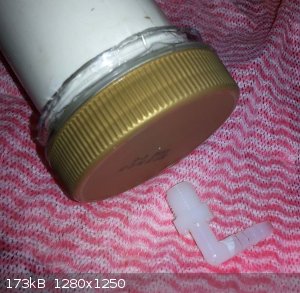
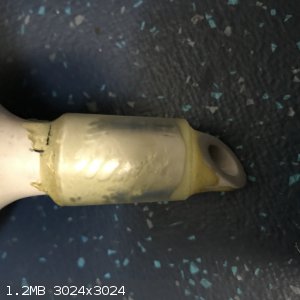
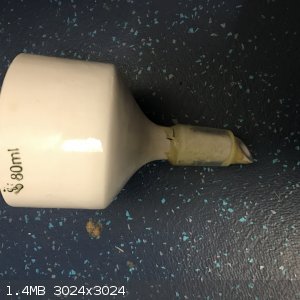
Making filters from PVC pipe & removable lids on pipes
I needed a way to change the material in my filters made of PVC pipe and the PVC screw-on end pieces were really expensive (comparatively for what I
needed), were a little awkward in size and needed Teflon or plumbers tape to ensure seal each time it was opened.
What I did was find some plastic jars and gallon juice containers that had the size mouths (large/wide mouths) that would allow the pipe to fit
inside. I then cut the plastic containers threaded neck off and then used an epoxy/resin to glue it to the PVC. I then put whatever attachment/barb
onto the container lid & glue/epoxy/JB weld it to the lid. Now I have a water tight removable lid and it can be made if your local hardware store
doesn't have the size PVC threaded cap you need (at my store, one 3" cap costs almost as much as 10' of SCH40 pipe!)
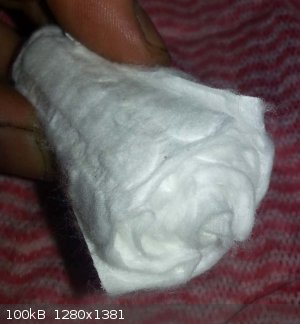
As for filters, I like using square cotton swabs over-layed out one on top of the next and so on. Then roll it up in a tight bundle (very tight if
you want high filtration) and squish it into the PVC pipe. If you try this you MUST "charge" the cotton with water (or some liquid) before attaching
to the holding vessel with the solution to be filtered. It may not be possible to have the liquid penetrate the cotton if you pack it tight enough,
but if you soak the cotton (once in the PVC) on both sides of the filter it will help IMMENSELY!
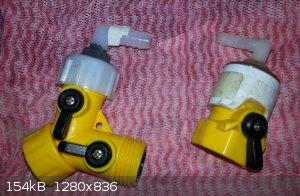
Also, I have needed to attach small diameter tubing to garden hose and it was difficult to find anything that would allow this. This can be great for
running a condenser.
Also, if you need an inexpensive ball valve for vinyl tubing I found using one of the garden hose shut-off valves works great all you need to do is
get the hose ball valve (the yellow ones below) and either buy the garden hose cap or a 3/4" pvc pipe cap and cut it to fir the valve - then attach
the proper hose barb.
*Note all the threaded "necks" are glued with an epoxy and have one on both sides of the pipe
**the picture of the grey PVC filter, it is open-ended and that is fine if you just hang it over the receiving container. If you do this the cotton
needs to packed tightly enough to not allow the pressure to push it out (I hang the holding tank 5-12' above receiving vessel. Placing a drywall
screw at the bottom - near outlet - works well to keep them all in there.
|
|
|
arkoma
Redneck Overlord
Posts: 1761
Registered: 3-2-2014
Location: On a Big Blue Marble hurtling through space
Member Is Offline
Mood: украї́нська
|
|
| Quote: Originally posted by RogueRose | All that was available was a 1L Erlynmyer flask and a 12" Liebig condenser. An aquarium pump was aquired to cool the condenser and used an old metal
stand (like a music stand) to hold up the apparatus.
So, how to get a distillation unit out of this? Take the outer case of a 35ml syringe (the hard plastic case that the syringe comes in). The wide
part of the neck, near the end of the plunger fit PERFECTLY inside the neck of the flask!!!
1/2" OD, 3/8" ID vinyl tubing (food grade) was used to connect the syringe case to the condenser. To ensure it stuck together RTV silicone was added
as a "bung/stopper" at the flare of the syringe case to make a seal and keep it from falling down if it could even happen.
A hole was drilled in the needle end (no needle here though) of the syringe case to put the tubing through. A bulb of RTV silicone was applied to the
end of the 1/2" tubing (heated with hot air gun to speed sealing outer layer) then pulled up through the syringe case from the inside and then filled
the rest with RTV to keep it from moving. Used long screwdriver to ensure tubing was clear of silicone.
On the outside of the syringe case, 3 layers of RTV to stick/glue the tubing to the syringe casing ensuing there is no leaking from the vapors.
After each use of RTV a 1500 watt heat gun was used to seal the outer layer so it wasn't sticky. This takes about 30 seconds. Be careful to
continually rotate/move so it doesn't melt the syringe case.
The vinyl tubing terminated inside the condenser with a perfect fit and used double wide electrical tape first wrapped around the tubing and then
around the condenser (2 wraps) and then back to the tubing for a number of wraps. This has held for a LONG time with NO leaks of failure.
Normal vinyl tubing was used to cool the condenser - no big thing here. MAKE SURE YOU CHECK THE CONNECTION often as they can slide off, especially
when the water gets warmer. small pipe clamps will be very helpful.
a 15" lenght of vinyl tubing finished the run from the end of the condenser. Many benefits to this as it can provide extra cooling and can be moved
to different containers when possible.
Total expenditure: $2.62 for the tubing & RTV usage - all else was on hand.
Hypothetically. This is able to take alcohol wash of 5% to about 40-50% after one run and after a second run 92-93% was measured!!!
Pleas no rude comments about the adapter to the erlynmyere flask. I know it looks like one of those "male enhancement" vacuum attachments that is
leaking from the end
[Edited on 7-6-2016 by RogueRose]
[Edited on 7-6-2016 by RogueRose]
[Edited on 7-6-2016 by RogueRose] |
Good Job!!
"We believe the knowledge and cultural heritage of mankind should be accessible to all people around the world, regardless of their wealth, social
status, nationality, citizenship, etc" z-lib
|
|
|
CharlieA
National Hazard
Posts: 645
Registered: 11-8-2015
Location: Missouri, USA
Member Is Offline
Mood: No Mood
|
|
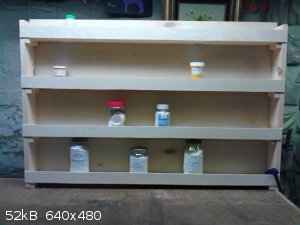
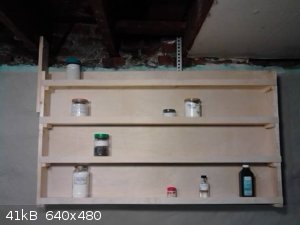
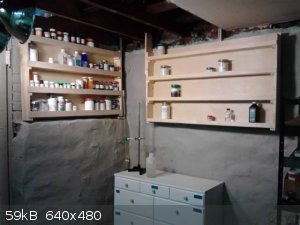
My woodworking skills fall somewhere below "carpenter's apprentice", but I managed to finish and mount the shelves shown in the attached pictures. The
short shelf on the left is 42 inches wide, and the one on the right is 48 inches wide. The shelves and ends are made from "1x4" pine.
Now to stock them with chemicals!
|
|
|
The Volatile Chemist
International Hazard
Posts: 1981
Registered: 22-3-2014
Location: 'Stil' in the lab...
Member Is Offline
Mood: Copious
|
|
Look nice! Especially with all the bottles on them.
|
|
|
RogueRose
International Hazard
Posts: 1585
Registered: 16-6-2014
Member Is Offline
|
|
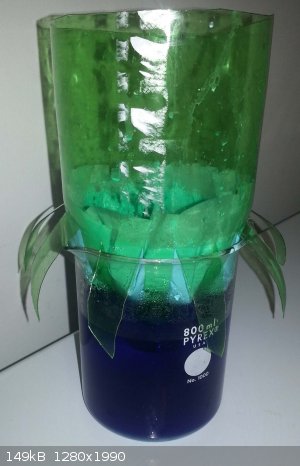
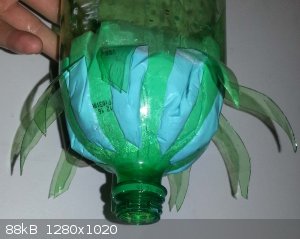
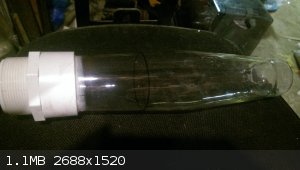
Filter funnel from a 2L bottle
I used to use the spout of a cut off 2L bottle for holding filter paper (coffee filters) but found that the surface contact of the paper on the
plastic restricted the flow significantly basically only allowing the small bottom opening as the sole area which liquid could flow out of.
So, I made some cuts to open up the sides and was going to cut the "vents" off when I realized that they could be used to hold the filter over the
receiving vessel.
|
|
|
CharlieA
National Hazard
Posts: 645
Registered: 11-8-2015
Location: Missouri, USA
Member Is Offline
Mood: No Mood
|
|
Isn't serendipity wonderful!
I forgot to add, that's clever, but I'm not sure the contact of filter paper with the "funnel" slows things down, at least for solvents that "wet" the
"funnel". I need to try this.
[Edited on 8-17-2016 by CharlieA]
|
|
|
Corrosive Joeseph
National Hazard
Posts: 915
Registered: 17-5-2015
Location: The Other Place
Member Is Offline
Mood: Cyclic
|
|
Fractional distillation under (slowly fluctuating) vacuum with 2 pieces of glass. Homemade aspirator station next on the list.
Works a treat though...................
Comments and criticisms welcome.
If anyone wants a list of parts l will gladly post it.................
/CJ
[Edited on 17-1-2017 by Corrosive Joeseph]
Being well adjusted to a sick society is no measure of one's mental health
|
|
|
NeonPulse
Hazard to Others
Posts: 417
Registered: 29-6-2013
Location: The other end of the internet.
Member Is Offline
Mood: Isolated from Reality! For Real this time....
|
|
All I did was take a bit of 24 glass, it was a thermometer adapter I got far a couple of dollars but I took a file around the join and snapped it off.
Next I put a Büchner funnel down the hole full of clear epoxy and there. No more need for a rubber gooch. Just a little vacuum grease and it works
great. Kind of re- purposed I guess.
|
|
|
Sulaiman
International Hazard
Posts: 3554
Registered: 8-2-2015
Location: 3rd rock from the sun
Member Is Offline
|
|
That IS a neat idea that I may copy,
have you tried hot water etc. yet?
I would be a little concerrned about differential thermal expansion
(borosilicate 3.3, Alumina 7.5)
CAUTION : Hobby Chemist, not Professional or even Amateur
|
|
|
violet sin
International Hazard
Posts: 1475
Registered: 2-9-2012
Location: Daydreaming of uraninite...
Member Is Offline
Mood: Good
|
|
Might have gotten away with silicone caulking to seal the two together. Allow expansion/contraction and be chemically resistant while still being
replacable. Lexell, it comes with no bubbles in the mix. But good lord hope you dont have to pull the sword from the stone as it were. Stuff has a
good bite as far as adhesive.
https://www.google.com/search?q=lexell+caulk&num=100&...
-------
I cut the glass envelope off of a HPS grow light, to epoxy into PVC threaded fitting. It worked great untill the epoxy fully set, cracking the glass.
A real bummer as I had not counted on that much shrinkage. It was in an effort to make a clear container for scrubbing gasses, moisture or just
plain see what ever you had going on inside.
Personally I wanted to scrub NO2 into sillica jell beads, from a low % feed off electric discharge. And perhaps with a metal collar, have
the electric discharge in a similar fixed globe in upright configuration instead of hanging low.
Fun will be had eventually, think I will follow my own advice and set it wil the tube of Lexell already purchased. I had a hard time trying to flame
polish the glass edge, and there was some epoxy that curled over that chipped edge. Most likely cause of failure.
[Edited on 18-1-2017 by violet sin]
|
|
|
Maroboduus
Hazard to Others
Posts: 257
Registered: 14-9-2016
Location: 26 Ancho Street
Member Is Offline
Mood: vacant
|
|
Those bulbs are wicked tough. I've broken beer bottles against those things.
In fact I've wondered if they're just borosilicate, or something else.
Did you have any trouble cutting it?
|
|
|
violet sin
International Hazard
Posts: 1475
Registered: 2-9-2012
Location: Daydreaming of uraninite...
Member Is Offline
Mood: Good
|
|
Nope, cut off about a dozzen with a really thin rock saw for opal, 4" dia. It shows a little wear, but I haven't exactly been nice to it. The blade
is centered by hand so there is a little knock when first starting the cut. The whole edge has little chips but they stray less than 1/8" inward,
usually 1/16". I'll be cutting one a second time at the gem and mineral society monday. See if their saws are better, or at least grind it smooth
before flame polishing.
|
|
|
Joel
Harmless
Posts: 2
Registered: 26-1-2017
Location: Queensland
Member Is Offline
Mood: No Mood
|
|
This is my first post on this site, so hello everyone!
For my lab I have manufactured (mostly using scrap steel and a welder):
2 retort stands - a metal rod welded to a steel plate base
6 ring supports - a large steel washer or cut-off section of pipe welded to a bolt
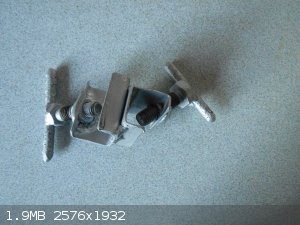
6 right angle clamps - two pieces of box section welded at right angles, with a hole cut out in one side and a nut welded on. A piece of rod welded
across the top of the bolt completes the clamp, and it screws in diagonally through the box section.
4 thermometer clamps - simply a wooden peg glued to a length of wood
2 wooden test tube stands - 15 holes @ 19 mm, and 12 holes @ 32 mm
3 wash bottle - a piece of tubing through a hole drilled in the top of a 500ml soap bottle
Boiling chips - I use chips off a piece of porous rock found lying in the paddock.
If anyone is interested I can try to post photos.
Total savings: over $170 for about 20 hours work
|
|
|
Joel
Harmless
Posts: 2
Registered: 26-1-2017
Location: Queensland
Member Is Offline
Mood: No Mood
|
|
This is one of my right angle clamps.
|
|
|
Geocachmaster
Hazard to Others
Posts: 146
Registered: 5-3-2016
Location: Maine, USA
Member Is Offline
Mood: Corroded, just like my spatulas
|
|
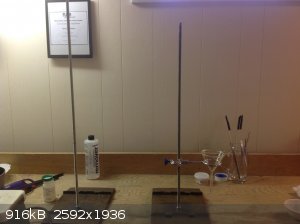
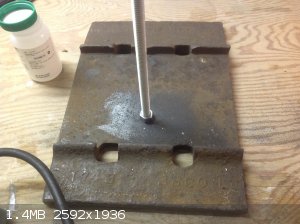
Having very little money after buying all my ground glass labware, I decided to build my own lab stands. I got two metal plates from an old railroad
(just laying on the ground) and used some extra threaded rod that was leftover from something. Holes were drilled and tapped in the middle of the
plate and a nut was added. Total cost: $0 and minimal work
|
|
|
Sulaiman
International Hazard
Posts: 3554
Registered: 8-2-2015
Location: 3rd rock from the sun
Member Is Offline
|
|
they look sturdy and stable, nice (if not pretty
(I almost lost a 2l flask today using the typical eBay retort stands with light bases.)
CAUTION : Hobby Chemist, not Professional or even Amateur
|
|
|
Geocachmaster
Hazard to Others
Posts: 146
Registered: 5-3-2016
Location: Maine, USA
Member Is Offline
Mood: Corroded, just like my spatulas
|
|
The bases are around 6 Kg so they are very sturdy and not prone to falling over. How about putting some weights on your stands for more stability?
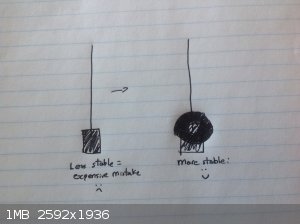
Not winning any art competitions
Edit: added "s" to stand
[Edited on 1/28/2017 by Geocachmaster]
|
|
|
Geocachmaster
Hazard to Others
Posts: 146
Registered: 5-3-2016
Location: Maine, USA
Member Is Offline
Mood: Corroded, just like my spatulas
|
|
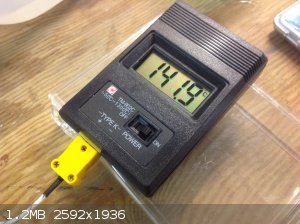
No lab oven, but I do have a cheap Walmart hotplate and a stainless steel pot.
It can even tell the temperature!
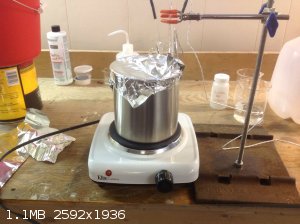 
I really need to buy a toaster oven
|
|
|
Chlorine
Hazard to Self
Posts: 56
Registered: 26-11-2016
Location: Maine, USA
Member Is Offline
Mood: Brominated
|
|
Glass vitamin jars make up 80% of my chemical storage. My parents go through about 10-12 jars a month, they also have a water tight seal.
|
|
|
tsathoggua1
Hazard to Others
Posts: 335
Registered: 8-1-2017
Location: Beyond the pale
Member Is Offline
Mood: Phosphorescent
|
|
Heh I recently repurpose my grandmother's (she is dead now) spice rack, threw out the old spices, all save for the turmeric, for the potential uses
of curcumin when I get back to working on ergot, some szechuan pepper extract (EtOAc/hydroalcoholic in concentrated iPA) and the very fresh that I
use often such as cubeb, pink peppercorns, which I myself bought, my homemade fly agaric/peppery boletus-based steak spice in ready-ground form, a
small amount at a time so it keeps better, and dried peppery bolete caps divested of the pores and dried in slices and chunks,plus a few other more
unusual spices that are either not cheap, not readily bought, or quite simply (such as Amanita muscaria, and peppery boletus, Chalciporus piperatus)
are not to be purchased in any food market, although fly agaric can be bought from head shops, the quality is unreliable, and I prefer to know that it
has been cured properly to detoxify it)
The rest of the glass jars, not boro, they have rubberized seals, the material type I don't know, so theres a fair few things I don't put in them. But
they do just fine for projects in partial-gestation, much of the time, or after having been given birth and blinking at the sudden light and squawling
for the first time as it draws its first breath Repurpose the amber glass bottles
with chemically resistant plastic (to solvolysis especially) of some kind that my chlormethiazole script comes in Repurpose the amber glass bottles
with chemically resistant plastic (to solvolysis especially) of some kind that my chlormethiazole script comes in
|
|
|
| Pages:
1
..
8
9
10
11
12
..
18 |


