| Pages:
1
..
11
12
13
14
15
..
18 |
Ubya
International Hazard

Posts: 1231
Registered: 23-11-2017
Location: Rome-Italy
Member Is Offline
Mood: I'm a maddo scientisto!!!
|
|
if you drill 2 holes on the side, one on top and one on the bottom, you can glue 2 pieces of tubing (or if it's borosilicate you could even try
welding two glass tubes) and make a water jacketed beaker
---------------------------------------------------------------------
feel free to correct my grammar, or any mistakes i make
---------------------------------------------------------------------
|
|
|
j_sum1
Administrator
Posts: 6218
Registered: 4-10-2014
Location: Unmoved
Member Is Offline
Mood: Organised
|
|
I think it is borosilicate. It is at least designed to handle the thermal stress of boiling water.
But I break glass easily enough without trying to modify it. I doubt I would make any useful progress with that process.
Anyway, I have seen jacketed beakers as you describe on ebay for not too much. But I think I have more use for a substitute dewar. Who knows. I might
even find some applications for the strainer and the screw lid
|
|
|
Eisenpanzer432
Harmless
Posts: 7
Registered: 9-2-2018
Member Is Offline
Mood: No Mood
|
|
My new lattice support, almost finished but in working condition now. The t square for size reference is 48”.

|
|
|
DavidJR
National Hazard
Posts: 908
Registered: 1-1-2018
Location: Scotland
Member Is Offline
Mood: Tired
|
|
Very nice! I've been thinking of building something like that. The commercial lab lattice kits with the connectors etc just seem ridiculously
overpriced.
Are you planning on attaching it to the wall/work surface?
[Edited on 8-11-2018 by DavidJR]
|
|
|
Ubya
International Hazard
Posts: 1231
Registered: 23-11-2017
Location: Rome-Italy
Member Is Offline
Mood: I'm a maddo scientisto!!!
|
|
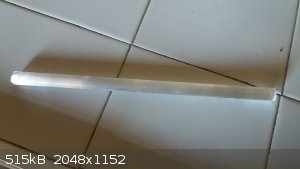
has anyone ever used this kind of quartz tubing (from oven heating elements) as a normal transparent quartz tubing?
like to hold catalysts or as a combustion tube
---------------------------------------------------------------------
feel free to correct my grammar, or any mistakes i make
---------------------------------------------------------------------
|
|
|
andy1988
Hazard to Others
Posts: 135
Registered: 11-2-2018
Location: NW Americus ([i]in re[/i] Amerigo Vespucci)
Member Is Offline
Mood: No Mood
|
|
FoodSaver Jar Sealer to extend shelf life of things (vacuum storage in mason jars at ~20-30mbar)
Using water aspirator:
With mason jars and ~$9 FoodSaver Jar Sealer (perhaps other products exist, but nothing else on shelves in U.S.). Also 5mm OD vinyl tubing, I
use next size up & beeswax to fit to aspirator, don't buy the FoodSaver's overpriced tubing as generic tubing fits perfectly... They market it
with their $60+ machines as the vacuum source... but I'm guessing aspirator has better vacuum (vapor pressure of cold water).
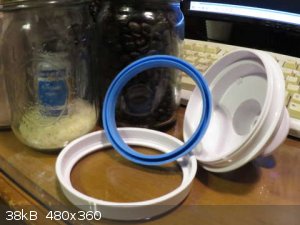 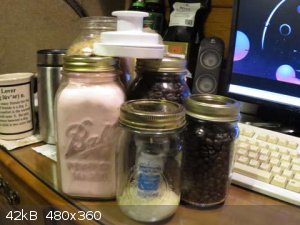
Will reduce oxidation problems like with FeSO4, and reduce moisture problems with things like potassium iodide (LOUDWOLF brand bottle pictured in mason jar with rice as desiccant) and alginate (pink powder in picture). Extends shelf
life of such things!
I buy big 5lb bag of roasted coffee beans and vacuum seal in many jars, keeps the oil from oxidizing (keeps it fresh!). Also I seal many of my
"nootropic" powders this way, like trimethylglycine [1][2]. Searching literature/google for "XYZ stability" would help me find if this procedure is useful for the substance in question.
Note: Gasket on mason jar lid seem to have shelf life differing between brands, I have a bunch laying around, hard and soft, the hard ones won't hold
vacuum (i.e. if the gasket hardens in a number of years you'll loose vacuum, lid will pop up indicating as such).
Procedure: Put lid in device and device on jar. Blue rubber holds lid up so that air can be sucked out. Blue rubber must touch glass "flange" below
threads to seal (may have to push if flange large, or remove bottom plastic ring). If jar has no flange below threads or flange too large, I think you
could use wax to temporarily seal threads. Let vacuum for a minute, pull vinyl tubing from device (not device from jar), it'll "pop" as rush of
incoming air pushes lid down, pull device off and verify sealed.
EDIT: I suppose you could also do a dry nitrogen purge first (or other appropriate gas if you have) to try to replace all oxygen
& moisture before pulling the vacuum.
[Edited on 12-12-2018 by andy1988]
|
|
|
Sulaiman
International Hazard
Posts: 3554
Registered: 8-2-2015
Location: 3rd rock from the sun
Member Is Offline
|
|
These fibreglass wicks are excellent. https://www.ebay.co.uk/itm/8-10mm-Wick-Alcohol-Kerosene-Fibe...
If you use clean alchohol the flame is almost pure blue with virtually no yellow,
useful for doing a flame test to help identify metal ions,
and of course just as a heating source.
For heating of test tubes etc. I now use IKEA tealight candles. about 30W heat output.
P.S. These wicks are also excellent for burning boric acid in methanol for an eerie green flame.
[Edited on 11-12-2018 by Sulaiman]
CAUTION : Hobby Chemist, not Professional or even Amateur
|
|
|
arkoma
Redneck Overlord
Posts: 1761
Registered: 3-2-2014
Location: On a Big Blue Marble hurtling through space
Member Is Offline
Mood: украї́нська
|
|
Corning PC-351. Fine piece of gear. Bought mine used two years ago for$80US on ebay.
"We believe the knowledge and cultural heritage of mankind should be accessible to all people around the world, regardless of their wealth, social
status, nationality, citizenship, etc" z-lib
|
|
|
Morgan
International Hazard
Posts: 1660
Registered: 28-12-2010
Member Is Offline
Mood: No Mood
|
|
Quote: Originally posted by Sulaiman  |
These fibreglass wicks are excellent. https://www.ebay.co.uk/itm/8-10mm-Wick-Alcohol-Kerosene-Fibe...
If you use clean alchohol the flame is almost pure blue with virtually no yellow,
useful for doing a flame test to help identify metal ions,
and of course just as a heating source.
For heating of test tubes etc. I now use IKEA tealight candles. about 30W heat output.
P.S. These wicks are also excellent for burning boric acid in methanol for an eerie green flame.
[Edited on 11-12-2018 by Sulaiman] |
I thought this ceramic material would be fun to experiment with as a wick-like capillary pump.
http://www.polywatt.com/CFB/CFB.html
https://www.wired.com/2003/11/the-curiously-strong-pump/
https://www.appliancedesign.com/articles/85600-igniters-burn...
|
|
|
mayko
International Hazard
Posts: 1218
Registered: 17-1-2013
Location: Carrboro, NC
Member Is Offline
Mood: anomalous (Euclid class)
|
|
inexpensive electroporation device based off piezoelectric lighters:
| Quote: |
ElectroPen: An ultralow-cost piezoelectric electroporator
Electroporation is a basic yet powerful method for delivering small molecules (RNA, DNA, drugs) across cell membranes by application of an electrical
field. Due to its vital role, electroporation has wide applicability from genetically engineering cells, to drug- and DNA-based vaccine delivery.
Despite its broad applications in biological research, the high cost of electroporators is an obstacle for many budget-conscious laboratories. To
address this need, we describe a simple, inexpensive, and hand-held electroporator inspired by a common household piezoelectric gas lighter. The
proposed 'ElectroPen' device costs about 20 cents, is portable (13 g), is fabricated on-demand using 3D-printing, and delivers repeatable
exponentially decaying pulses of about 2000 V in 5 ms. We provide a proof-of-concept demonstration by genetically transforming plasmids into E. coli
strains and show comparable transformation efficiency and cell growth with commercial devices, but at a fraction of the cost. Our results are
validated by an independent team across the globe, providing a real-world example of democratizing science through frugal tools. Thus, the simplicity,
accessibility, and affordability of our device holds potential for making modern synthetic biology accessible in high-school, community, and
field-ecology laboratories.
|
https://www.biorxiv.org/content/early/2018/12/21/448977
https://doi.org/10.1101/448977
Some backstory: this was designed by motivated high schoolers!
https://twitter.com/BhamlaLab/status/1076325049966252033
al-khemie is not a terrorist organization
"Chemicals, chemicals... I need chemicals!" - George Hayduke
"Wubbalubba dub-dub!" - Rick Sanchez
|
|
|
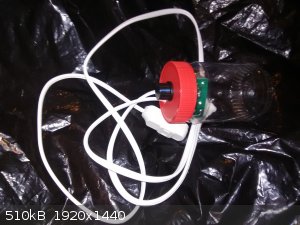
hacker
Harmless
Posts: 34
Registered: 18-12-2018
Member Is Offline
|
|
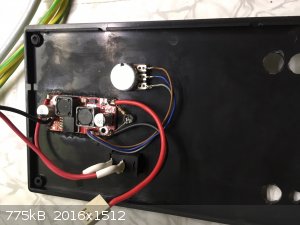
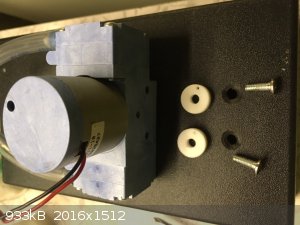
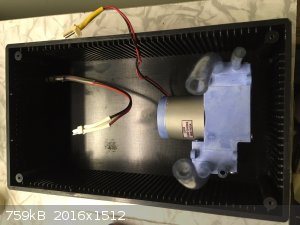
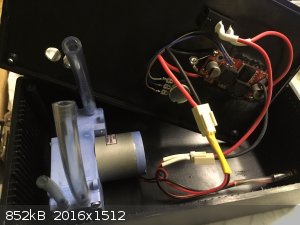
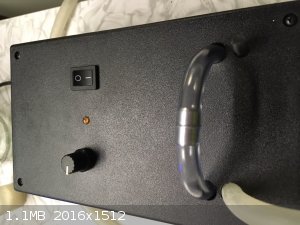
Housing for Power Controller
|
|
|
yobbo II
National Hazard
Posts: 709
Registered: 28-3-2016
Member Is Offline
Mood: No Mood
|
|
| Quote: Originally posted by RogueRose | SO I had some old 400w sodium or metal halide bulbs and I cut them open with a diamond wheel on the dremel. They cut very nicely on the far end
(where it screws in) and is just under 2" diameter making it perfect for a 2" bung/plug.
These might be great boiling flasks/distillation flasks where there may be remains in the bottom that are difficult to impossible to break up. These
are borosillicate glass and they are thicker than both beakers and round bottom flasks that I have checked (broken) by about 20-40%. The setup is
self explanitory and I'm going to test it down the road and see what the results are. I plan to use glass tubing coming out of the bung leading to a
condenser. IDK if there is anything I need to think of before this, but it seems a plausible idea.
The 400w bulbs (Phillips brand & most brands are same size) are 1,4L to 1.5L which is a very nice size and smaller 250w, 175w, 120w, 100w, etc are
all freely available from electricians and gives sizes from 220ml up to the 1.5L.
I used a simple hose clamp around the neck with some tape to give it something to hold onto.
|
How would you know they are borosilicate?
I have cut open one today and intend to fire polish the cut end.
There is a nice alumina? tube to be had inside as well.
Other halide bulbs (longer and have clear glass) have nice thin alumina tubes that are very useful for shielding thermocouples at their ends
Others contain quite a nice looking blob of sodium (I hope to remove some today). The tube inside these bulbs is u in shape, about 10 inches long and
could be used for something or other.
Yob
|
|
|
mayko
International Hazard
Posts: 1218
Registered: 17-1-2013
Location: Carrboro, NC
Member Is Offline
Mood: anomalous (Euclid class)
|
|
the poseidon syringe pump system:
| Quote: |
While open sourcing has become de rigueur in genomics dry labs, wet labs remain beholden to commercial instrument providers that rarely open source
hardware or software, and impose draconian restrictions on instrument use and modification. With a view towards joining others who are working to
change this state of affairs, we’ve posted a new preprint in which we describe an open source syringe pump and microscope system called poseidon
[....] Together, these components can be used to build a Drop-seq rig for under $400, or they can be used piecemeal for a wide variety of tasks.
|
overview from one of the authors:
https://liorpachter.wordpress.com/2019/01/18/open-sourcing-b...
preprint:
https://www.biorxiv.org/content/early/2019/01/17/521096
al-khemie is not a terrorist organization
"Chemicals, chemicals... I need chemicals!" - George Hayduke
"Wubbalubba dub-dub!" - Rick Sanchez
|
|
|
Yttrium2
Perpetual Question Machine
Posts: 1104
Registered: 7-2-2015
Member Is Offline
|
|
| Quote: Originally posted by Plunkett | I got tired of using a soup can filled with sand as a test tube holder so I made a proper one from a piece of firewood I had laying around.
|
I admire this. I admire that you took the time to figure out how to make one that looks good. ect
I'm an admirer of...
|
|
|
markx
National Hazard
Posts: 645
Registered: 7-8-2003
Location: Northern kingdom
Member Is Offline
Mood: Very Jolly
|
|
Made a small power supply with varied output voltage (0,7-40V, 4A), current control function and some measurement panels for voltage, power and
current:
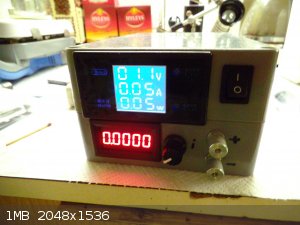 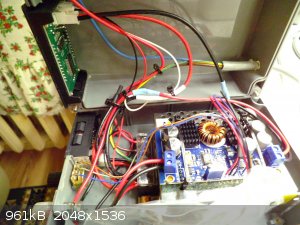
The power supply is made from a standard 12V SMPS coupled with a SEPIC converter. A versatile match that renders a very capable little lab unit for
basically a few dollars.
The blue panel meter is truly a disaster regarding the concept of accuracy....was dirt cheap though 
But on the contrary the red "high precision ampmeter" below that is truly great for the money. Perhaps I got lucky, but testing against a verified
ampmeter it shows exceptional accuracy.
Coupled with a homebrew H-bridge pulsed plating unit:
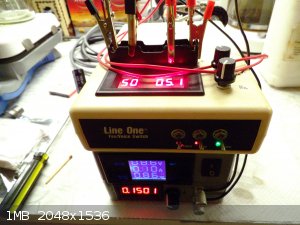 
Makes for great fun in the field of small scale electrochemistry related experimentation.
Exact science is a figment of imagination.......
|
|
|
C6(NO2)5CH2CH(CH3)N(NO2)2
Harmless
Posts: 43
Registered: 4-4-2018
Member Is Offline
Mood: No Mood
|
|
This appears to be a mild form of vacuum filtration, done using a vacuum cleaner: https://youtu.be/M8lXPlD4M3Y?t=99
I've had problems using paper filters, where the last few ml of liquid will not even drop out, presumably because the weight of the liquid is too
little to overcome surface tension. Since I don't have a "real" vacuum pump, I will totally have to try this.
Put that in your pipe and smoke it!
|
|
|
arkoma
Redneck Overlord
Posts: 1761
Registered: 3-2-2014
Location: On a Big Blue Marble hurtling through space
Member Is Offline
Mood: украї́нська
|
|
I've used a vacuum cleaner to filter before............
"We believe the knowledge and cultural heritage of mankind should be accessible to all people around the world, regardless of their wealth, social
status, nationality, citizenship, etc" z-lib
|
|
|
Ubya
International Hazard
Posts: 1231
Registered: 23-11-2017
Location: Rome-Italy
Member Is Offline
Mood: I'm a maddo scientisto!!!
|
|
| Quote: Originally posted by C6(NO2)5CH2CH(CH3)N(NO2)2 | This appears to be a mild form of vacuum filtration, done using a vacuum cleaner: https://youtu.be/M8lXPlD4M3Y?t=99
I've had problems using paper filters, where the last few ml of liquid will not even drop out, presumably because the weight of the liquid is too
little to overcome surface tension. Since I don't have a "real" vacuum pump, I will totally have to try this. |
if you are really desperate you could build this https://youtu.be/vaho7JSVS1I
pvc hand vacuum pump
---------------------------------------------------------------------
feel free to correct my grammar, or any mistakes i make
---------------------------------------------------------------------
|
|
|
markx
National Hazard
Posts: 645
Registered: 7-8-2003
Location: Northern kingdom
Member Is Offline
Mood: Very Jolly
|
|
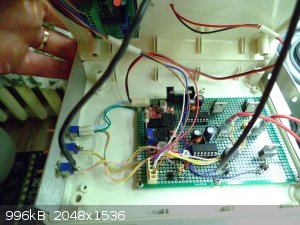
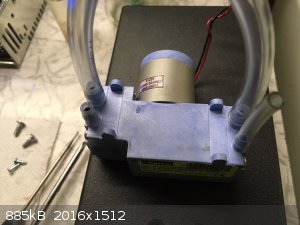
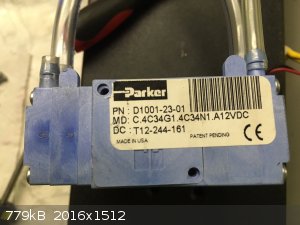
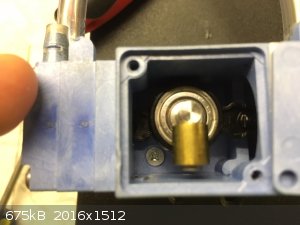
On the note of vaccuum filtration aids....I found this double membrane unit on ebay:
https://www.ebay.com/itm/Parker-DC12V-D1001-23-01-Brushless-Vacuum-Pump-Diaphragm-Pump-Dual-Head-Air-Pump/263818752821?ssPageName=STRK%3AMEBIDX%3AIT&a
mp;_trksid=p2057872.m2749.l2649
This is a really good quality and capable gadget for the money. It actually runs on bearings and even has a counterweight attached to the crankshaft
assembly. I'm very pleasantly surprised!
Time to build this into a proper casing and add a speed control circuit:
All done and the two stages connected in series for vaccuum operation:
Due to the sepic converter I added it can now be operated from basically any source of DC voltage in the range of 3-35V. Rpm can be fluently regulated
with the pot knob. It runs very smooth and quiet and pulls more than enough vaccuum for filtration operations even at minimum speed.
Exact science is a figment of imagination.......
|
|
|
Morgan
International Hazard
Posts: 1660
Registered: 28-12-2010
Member Is Offline
Mood: No Mood
|
|
| Quote: Originally posted by Morgan | I got some borosilicate drinking straws as a gift and figure they could be repurposed for something. And the little cleaning brushes reminiscent of
test tube brushes ...
[Edited on 5-1-2018 by Morgan] |
These straws
https://www.sciencemadness.org/whisper/files.php?pid=502689&...
https://www.sciencemadness.org/whisper/files.php?pid=502689&...
https://www.sciencemadness.org/whisper/files.php?pid=502689&...
and these fused quartz tubes
https://www.sciencemadness.org/whisper/files.php?pid=513305&...
https://www.sciencemadness.org/whisper/files.php?pid=513305&...
https://www.sciencemadness.org/whisper/files.php?pid=513305&...
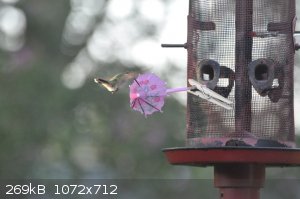
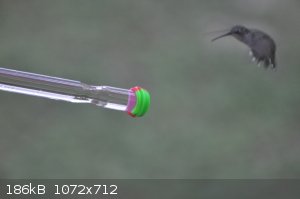
Experimenting today with glass straws, sugar water, and some red toy rocket launcher base piece of plastic, (something laying around in the garage
anyway), I was able to attract some hummingbirds. Also with one of those longer, narrow plastic drinking straws that comes with an umbrella mounted to
it worked as well. I sort of cut some of the top of the umbrella straw off and put a tiny piece of pink silicone tubing on the tip and a very tiny
silicone stopper in the tail end after filling the straw. But the plastic straw had some 4mm X 2mm fused quartz tubing sleeved inside it and that's
what was holding the "nectar".
Anyway the blur in the umbrella photo shows a bird where you can sort of make out his beak against the pink umbrella. He fed out of it but I didn't
get a shot of him with his beak in the straw. The photos were taken from inside the house because for some reason these hummingbirds are very
skittish. I don't know much about them.
[Edited on 5-9-2019 by Morgan]
|
|
|
Morgan
International Hazard
Posts: 1660
Registered: 28-12-2010
Member Is Offline
Mood: No Mood
|
|
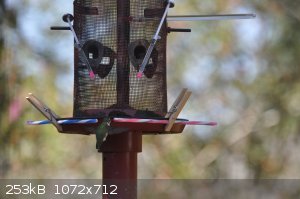
I found that a repurposed 1 ml syringe with a tiny bit of pink silicone tubing is enough to interest a hummingbird. They are easy to fill of course
but deplete quickly and require a push to refill an air gap, after the birds can no longer reach or partake inside past the .4 ml mark or so. Also a
hard plastic pink-striped straw with no other features works too. They never went for the blue straw. The very narrow fused quartz tubing 4mm X 2mm X
200mm had some takers with just a pink tip of silicone tubing at the tip as a teaser.
|
|
|
Morgan
International Hazard
Posts: 1660
Registered: 28-12-2010
Member Is Offline
Mood: No Mood
|
|
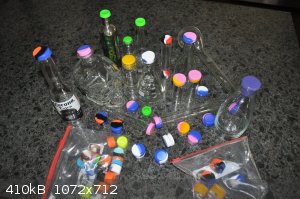
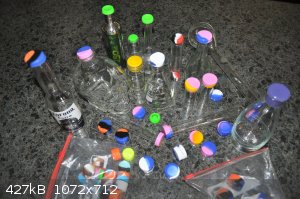
These are "silicone jars" that are sold on eBay, some 3 ml and the larger 5 ml. What's interesting about them is that you can use the inside diameter
of the two halves for different size stoppers and the outside can be pushed into a bottle neck as well. One half has a sizable flange so that makes
yet another size that it could fit into. If you think about it there are five sizes to play around with with one silicone jar.
And while I would have preferred other color schemes, a few are of a pleasing, unique design overall, not your average stoppers. And there's always
the potential for imagining unique uses for the silicone containers. I really like them - just something good to have around in the parts department.
The last photo a longish test tube with a narrowed neck whatever that's called or used for and one of those stoppers with a puncture in it is for this
hummingbird feeder. One jar top with the flange sleeves really nicely in a kjeldahl flask and all the items pictured are a good fit, silicone having a
fair amount of stretch and give and take.
[Edited on 10-9-2019 by Morgan]
|
|
|
earpain
Hazard to Others
Posts: 102
Registered: 11-9-2019
Member Is Offline
|
|
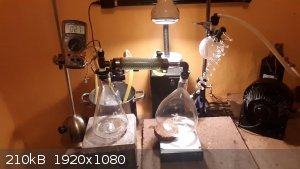
Hi first post. Lurking for years. You all are always the final say on all chemistry questions I ever research.
So here's my vacuum distillation set up. I read this entire thread, so just about all of my DIY hacks have been done by others(confirming I was
right!) But a little detail anyway:
Stand on the left holds my multimeter set to temperature sensing via a thermocouple, I tightly wound the two types of wire at the probe, pulled off a
thin 'nipple' of glass via lampworking, filled it with glycerine, and sealed the thermocouple in the glass. The base of the stand is from a fancy
architect's type of lamp, with a microphone stand bolted in. One of those metal garage lamp clamps holds the multimeter.
Not thrilled about using copper tubing for my condenser, so that will be replaced soon. I made the outer jacket from vinyl reinforced super-wide
plumbing hose, and two stoppers clamped on the ends.
The cooling bath is a large stainless steal pot, that i bolted a marine 24V water pump to. I use a 4 setting power supply to pump the coolant,
usually at 5 volts.
In lieu of a Lab jack, I stack old CD-ROM drives. Despite how it may look, that receiving flask is super sturdy where it sits.
So I did break my Graham condenser long ago, and had no choice but to cut out the glass coil using a diamond wheel, then work it over a torch to
stretch out the distance, and pull off the ends. That along with the small RBF up above is a vacuum trap.
The lab stand is again, a microphone stand, clamped into a very heavy bench vise.
And last but not least it all ends at a vacuum pump made from a window air conditioner. It reads as though I'm distilling isopropanol at 27C, but IR
Thermometer contests that it's closer to ~40C, since the thermocouple ends up within the reduced pressure environment.
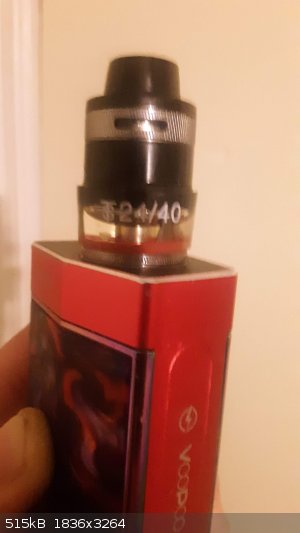
The other pic is a testament to my going on 3 years tobacco free, and my glass cold working skills=D Anybody that vapes knows how annoying it is to
break the boro glass tank part, as every tank has slightly different dimensions. The female ground glass joint from said graham condenser happened to
fit snugly, after some careful shaping and grommet fabricating. When i'm out and vaping, I'm still waiting for someone to notice the markings and
figure out the backstory.
Love this thread, and this site! Thanks everyone.
|
|
|
Ubya
International Hazard
Posts: 1231
Registered: 23-11-2017
Location: Rome-Italy
Member Is Offline
Mood: I'm a maddo scientisto!!!
|
|
@earpain
welcome to the board!
about your setup, if it works it works, who cares if it is a bit diy and rough, good job
---------------------------------------------------------------------
feel free to correct my grammar, or any mistakes i make
---------------------------------------------------------------------
|
|
|
earpain
Hazard to Others
Posts: 102
Registered: 11-9-2019
Member Is Offline
|
|
| Quote: Originally posted by Ubya | @earpain
welcome to the board!
about your setup, if it works it works, who cares if it is a bit diy and rough, good job |
Thank you @Ubya!
Yes of course I agree there. But there's this idea of 'you don't get the powertools as a student, so that when you've learned the HARD way why the
proper tools are so much better, then you've EARNED the right to use them.
For example I'm new to vacuum distillation. I've come to learn the somewhat paradoxical effect on the initial boiling flask:
On one hand, less heat is required to turn the liquid into a vapor that is light enough to float up above the ambient gas around us, and into the
condenser. On the other hand, the vacuum is sucking the heat away from the boiling flask. So..I TRULY see the benefit of using a round bottom flask
in a heating mantle, over that 1L erlenmeyer sitting on a flat hotplate.
And indeed, non-DIYers might never have had the chance to appreciate such nuances.
And then I mentioned the copper condenser. I know copper is desirable for moonshiners because it has a catalytic effect on some of the toxins, and I
think copper does something similar to drinking water. But copper is very reactive metal! As far as I know.
Anyway, thanks for the words of encouragement=D
|
|
|
| Pages:
1
..
11
12
13
14
15
..
18 |


