| Pages:
1
..
14
15
16
17
18 |
Panache
International Hazard

Posts: 1290
Registered: 18-10-2007
Member Is Offline
Mood: Instead of being my deliverance, she had a resemblance to a Kat named Frankenstein
|
|
Quote: Originally posted by Ubya  | has anyone ever used this kind of quartz tubing (from oven heating elements) as a normal transparent quartz tubing?
like to hold catalysts or as a combustion tube
|
Yes
|
|
|
Mateo_swe
National Hazard
Posts: 501
Registered: 24-8-2019
Location: Within EU
Member Is Offline
|
|
| Quote: Originally posted by earpain | | And all the organic non-polar solvents still sold to the public either boil at WAY TOO HOT degrees celsius, or just suck in general because they hide
water or they dont really dissolve stuff(naphtha) |
If you search on DCM on ebay often you will probably find someone who sells you some DCM after a while.
I do search on ebay for some usually unavailiable solvents and chemicals and i have found and bought both 10L DCM, 10L acetonitrile and acetic
anhydride.
Now im inside EU and that make that any purchased stuff from within EU does not pass customs witch is good for some rarer things.
So even if something isnt allowed on ebay it pops up sometimes so it can be worth to try a search if you are looking for something.
| Quote: Originally posted by earpain | | Now the black 'bungs' are not rubber stoppers! no no. Go to an autoparts store, they sell 'vacuum plugs'. They are like caps that you have to
stretch on to the end of a tube, and designed for systems in vacuum in a car. Cars get waaay hot. So whatever the material is, I SWEAR H2SO4 had no
effect on it. You might find a special set tjat fits many sizes. That's how I interface the thermometer into the SPD head. |
That was a good tip i will investigate, thanks.
I have bought some silicone endplugs i will use on a quarts tube for ozone generation but i would like some endplugs that are resistant to other
chemicals too.
That is also a nice tip.
As long the quarts tubes arent very thin they can be used but it all depends on the temp and application.
I will keep an eye open for those quartz tubes.
I bought some alumina tubes from china, about 20-25mm in diameter, 700mm long that i might turn into a DIY tube furnace on some rainy winter evening.
They were not as expensive as i had thought, about 50 Euros for 2 of them including shipping if i remember correctly.
They can withstand very high temps.
|
|
|
RogueRose
International Hazard
Posts: 1585
Registered: 16-6-2014
Member Is Offline
|
|
Found a nice container for a ball mill - 16 or 22 oz
I came across these stainless steel Ozark Trail double walled insulated food containers and they have a very good seal (plastic lid) and then a larger
stainless lid outside the plastic one. The shape is ideal for a ball mill. I think these would be ideal for doing smaller batches - though I'd really
like to find some 32, 64 and 128oz models for this purpose.
I've used a number of other containers and chose paint cans but after about 24 hours of milling, the walls were almost paper thin with only using
steel ball bearings (1/2") and aluminum foil & at $14 each (same price or more than buying container with paint in it!!). These containers below
are built very nicely and seal very well. They have a port that you can allow O2 to slowly seep in, so no inrush of O2 after milling.
Anyway, just an idea if anyone is looking for a container to do this. If you have any other suggestiong, please let me knot. I'd like some larger
ones 1-5gal and IDK if plastic (HDPE) will be sufficient or not.
BTY - each of these jars below are 4.25" diameter and 6.1" vs 6.9" in length (22oz being the latter).
https://www.walmart.com/ip/Ozark-Trail-22-Ounce-Double-Wall-...
https://www.walmart.com/ip/Ozark-Trail-16-Ounce-Double-Wall-...
[Edited on 10-30-2020 by RogueRose]
|
|
|
Fyndium
International Hazard
Posts: 1192
Registered: 12-7-2020
Location: Not in USA
Member Is Offline
|
|
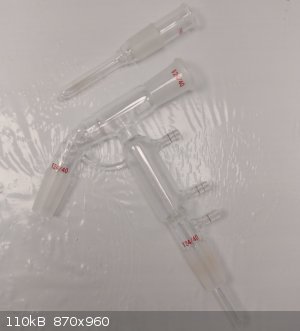
I could not find a shorter stem length thermowell, so I shortened one myself. It was just a shy too long to fit in the short path, but now it fits
perfectly.
This short path is perfect for many distillations, especially vacuum with higher bp. I could not effectively monitor the temp prior to this.
|
|
|
Piroz
Harmless
Posts: 19
Registered: 15-12-2020
Location: Poland
Member Is Offline
|
|
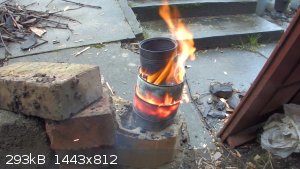
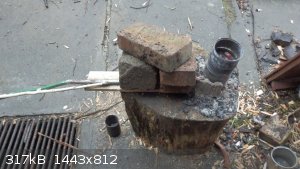
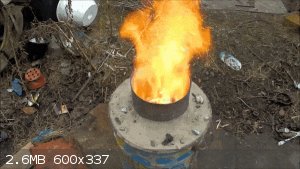
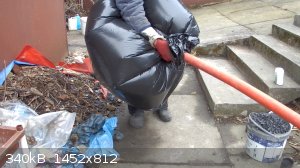
Need is the mother of invention so I have some ideas, especially I haven't much money and no job right now. This is one of these. Mini furnance from
tin cans, metal pipe, a piece of garden hose and garbage bag. It works like bellow- by compression of air in garbage bag (using force)- air is moved
trough garden hose and metal pipe into mini furnance and increase temperature of charcoal. By this way I melted aluminium and table salt (801 degrees
C). Now I'm working with bigger version of this- for melting calcium chloride needed for electrolysis of molten salt.
Here is the video- how it works (translation to english isn't completed, some missing translation on the end):
https://youtu.be/gkhVcoaFBPs
|
|
|
draculic acid69
International Hazard
Posts: 1371
Registered: 2-8-2018
Member Is Offline
|
|
I've thought of doing the same thing but stripping out the thread and drilling
a 3mm hole thru each nut and use a tap and die to thread the 3mm holes
just like a makeshift boss clamp.
|
|
|
draculic acid69
International Hazard
Posts: 1371
Registered: 2-8-2018
Member Is Offline
|
|
| Quote: Originally posted by Mateo_swe | I have decided to make a more complete heating mantle from the heating mantle sleeves i have bought.
They can be used as they are but i would like to build an enclosure so they look a bit more like a real heating mantle.
My plan is to use a stainless steel kitchen bowl, put a thick ceramic insulator blanket (25mm thick) in the bowl and then put my heating mantle sleeve
inside this.
Vermiculite can be used as extra insulation if needed, i have a lot of it.
I have found a round sheet metal lamp enclosure that looks very much like a heating mantle outer cover and i will try use this one as the outer cover
for the heating mantle.
Something like the picture i have drawn.
Then i could place the DIY heating mantle on top of my hotplate stirrer for the stirring function.
At least until i have figured out how to build the stirring function and the electrical driver.
A modified computer fan could be the start of a stirring function together with som high-temp magnet.
The driver could be a diy triac circuit or a cheap dimmer module from ebay.
It would be nice with a temperature regulating function, maybe a PID regulator with a SSR.
I think i will make a external driver/temp regulator unit so i can use it with different sizes of diy heating mantles.
First i must put together the heating mantle assembly then i can start figure out stirring, driver and temp functions.
Have any of you made something similar?
|
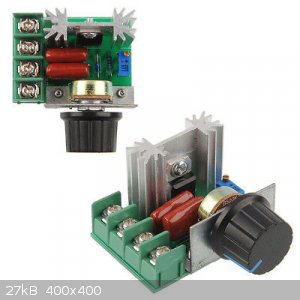
These things are just like a$4 Variac.
They've proven reliable, trustworthy,temp stable,accurate for my 1L mantles and I suspect would be fine for up to
5L mantles.Theyve proven more reliable than the original circuits in both of my mantles.they cost a few bucks and are worth every dollar 1000 times
over.
Google this and look for this picture, eBay has thousands of people selling them.pick one
2000W 220V AC SCR Electric Voltage Regulator Motor Speed Control Controller eBay.
|
|
|
Dr.Bob
International Hazard
Posts: 2656
Registered: 26-1-2011
Location: USA - NC
Member Is Offline
Mood: No Mood
|
|
You can get a similar thing at Lowes or Home Depot in the US for as a light dimmer for controlling incandescent lights and sometimes ceiling fans,
which are rated for 500 watts and can be mounted in a simple metal light switch box for a closed and safe power controller for about $8-10. These
will work well for most heating mantles, except smaller ones designed for lower voltages, which still require some way to drop the voltage, unlike
these, which simple turn the power on and off quickly to create a lower current. Glascol sells an inexpensive heating controller which is just the
same type of thing as well.
|
|
|
macckone
International Hazard
Posts: 2159
Registered: 1-3-2013
Location: Over a mile high
Member Is Offline
Mood: Electrical
|
|
I recently made a DIY overhead stirrer.
I got everything from amazon except the wall wart to power it.
I have a collection of those as probably everyone else does too.
barrel connectors for power: https://www.amazon.com/gp/product/B07C7VSRBG/
motor: https://www.amazon.com/970-RPM-6-18V-Econ-Gearmotor/dp/B019H...
motor speed controller: https://www.amazon.com/LGDehome-Controller-Adjustable-Revers...
stirrer: https://www.amazon.com/Fityle-Stainless-Electric-Overhead-St...
stirrer bearing: https://www.amazon.com/gp/product/B077LLSB1V/
coupler (4mm to 7mm) : https://www.amazon.com/gp/product/B08H25PT82/
Complete overhead stirrer set up for about $65 + tax and shipping (some items had shipping).
PS: as a bonus it is small enough to use a claisen adapter with rather than requiring a two or three neck flask and the motor fits perfectly in a
clamp.
[Edited on 26-1-2021 by macckone]
|
|
|
flaminglasrswrd
Harmless
Posts: 9
Registered: 17-9-2019
Member Is Offline
|
|
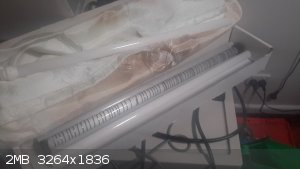
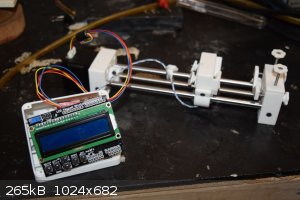
Syringe Pumps
I recently assembled a pair of syringe pumps. They are based on the Open Source Syringe Pump Project. They cost about $85 each to build, but that was higher because I paid to have the 3D parts printed. Now I have a
3D printer of my own so any more pumps will cost about $50 to build.
Overall I think they are quite useful. I chose some slightly underpowered stepper motors (300mA max) so they sometimes slip when everything isn't
perfectly aligned. That's probably a good thing.
The menu system takes some getting used to. I would like to make them computer-controlled at some point. The buttons are a little clunky.
Here they are, hard at work pumping fluids at 0.02 ml/min and 0.4 ml/min.
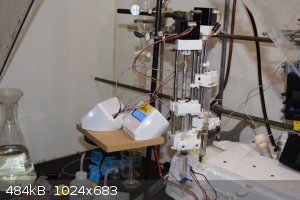
And a better view during construction.
|
|
|
mayko
International Hazard
Posts: 1218
Registered: 17-1-2013
Location: Carrboro, NC
Member Is Offline
Mood: anomalous (Euclid class)
|
|
speaking of syringe pumps, the lab that designed the Poseidon system has come out with a "sequel", an automated liquid sample collector. Column
chromatography is the first use I thought of.
"Low-cost, scalable, and automated fluid sampling for fluidics applications"
A. Sina Booeshaghi, Yeokyoung Kil, Kyung Hoi Min, Jase Gehring, Lior Pachter
| Quote: |
We present colosseum, a low-cost, modular, and automated fluid sampling device for scalable fluidic applications. The colosseum fraction collector
uses a single motor, can be built for less than $100 using off-the-shelf and 3d printed components, and can be assembled in less than an hour. Build
Instructions and source files are available at https://github.com/pachterlab/colosseum.
|
open access preprint: https://www.biorxiv.org/content/10.1101/2021.01.27.428538v1
repository: https://github.com/pachterlab/colosseum
al-khemie is not a terrorist organization
"Chemicals, chemicals... I need chemicals!" - George Hayduke
"Wubbalubba dub-dub!" - Rick Sanchez
|
|
|
Johnny Cappone
Hazard to Self
Posts: 74
Registered: 10-12-2020
Location: Brazil
Member Is Offline
|
|
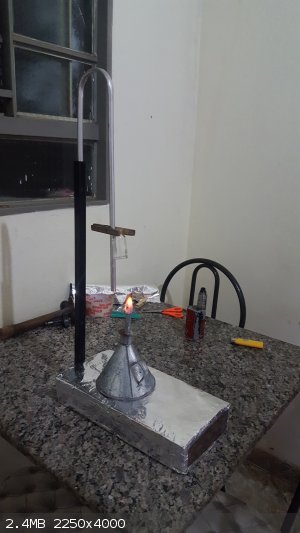
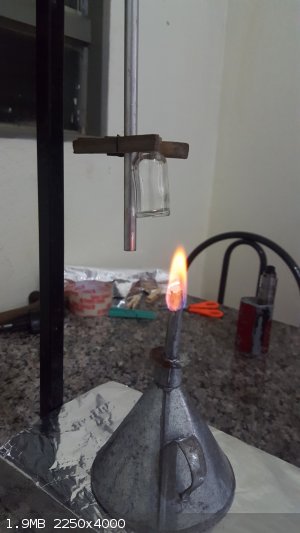
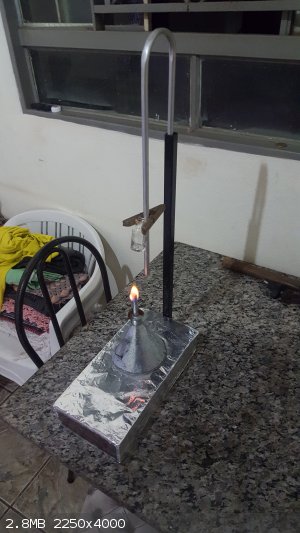
I finished building my portable micro fume hood, I will test it tomorrow and publish the results on video soon.
In such a test, I intend to use a fumigene mixture that allows me to observe how the gas flow behaves. The idea to generating the smoke is to heat a
pinch of KNO3 with excess sugar in a jar.
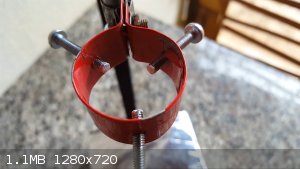
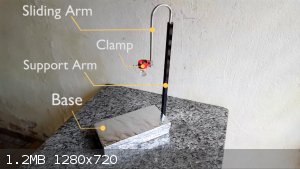
It turns out that I realized that I still don't have any support for small bottles and things like that, so I built this one on the attached photos.
The base is a heavy wooden billet (4 kg), which was wrapped in aluminum foil for purely aesthetic reasons. The main arm is an iron rod and the sliding
arm is an aluminum tube reused from an old antenna. It is possible to adjust the height at which the bottle is desired and its inclination. I still
need to think in a tweezer better than a clothespin, but for now this will work.
|
|
|
Johnny Cappone
Hazard to Self
Posts: 74
Registered: 10-12-2020
Location: Brazil
Member Is Offline
|
|
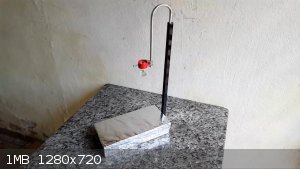
Holder V1.2
It took some work, but I got a very satisfactory result. The support/holder/stand/clamp can be seen on video here: https://youtu.be/Mi7hptaYzBA
BTW: If any english speakers watch the video, I would be very happy with an honest assessment of my english skills. Am I as bad trying to speak
english as I think?
|
|
|
Metallophile
Hazard to Self
Posts: 82
Registered: 23-3-2018
Member Is Offline
Mood: No Mood
|
|
| Quote: Originally posted by Johnny Cappone | | BTW: If any english speakers watch the video, I would be very happy with an honest assessment of my english skills. Am I as bad trying to speak
english as I think? |
I thought your English was fine! I understood everything you said.
Here is my homemade rig. It's a distillation column, which I built to distill some bromine for my element collection. After several failed attempts, I
yielded about 5g, which is good enough for me. Any comments on the column part? I was pretty much winging it based on pictures I've seen. I'm not sure
how effective it actually would be at fractionating. I could see the bromine condensing near the top and running down the column wall. Then it would
evaporate away near the bottom, when it contacted the H2O steam. This seems like the right sort of thing it should be doing, but I don't really know.

|
|
|
Mateo_swe
National Hazard
Posts: 501
Registered: 24-8-2019
Location: Within EU
Member Is Offline
|
|
Im putting together a DIY lab ozone generator from an ebay ozone generator with ceramic plates.
The plan is to use an aquarium airpump and silicone tubing to feed air first through a drying tube with MgSO4 and then into a glass jar where the
ceramic ozone generator plates from the ozone generator is placed.
Then the ozone rich air is fed from the jar through a PTFE hose to the bottom of a tall measuring cylinder filled with whatever fluid to be ozonated.
The lid of the jar is a acrylic plate with a silicone gasket.
The feedthrough holes in the acrylic lid for electrical silicone insulated leads and glass tubes are insulated with silicone to prevent leaks.
The hi-voltage driver for the ceramic plates are placed on the outside of the jar and opened up and a small fan blows to cool the electronics.
The only thing i would like to add is some way of cooling the air that is pumped into the ozone-jar and the ability to use oxygen instead of air.
There are oxygen concentrators one can buy but they are little bit expensive so i think i try with a small tube of pure oxygen if the device will seem
to work with air.
The oxygen gas would be cold from the depressurization would it not?
|
|
|
Fyndium
International Hazard
Posts: 1192
Registered: 12-7-2020
Location: Not in USA
Member Is Offline
|
|
You could just run the gas through an immersed tube, or through a flask immersed in cold bath. I might consider also immersing the ozone reactor into
a cooling bath, as it likely generates heat and can overheat quickly.
I planned on doing ozonator also at some point, I've got a similar generator from ebay. My original plan was to just put it in a plastic box or bucket
and lead a tubing from air pump into it and from there to the reaction vessel, same like you.
For better absorption, I'd get a glass frit bubbler. I already got a sintered stainless steel brewing aerator which I used once for oxidation reaction
and it worked flawlessly. A larger gas frit bubbler could be utilized from a sintered funnel of chosen size.
|
|
|
Mateo_swe
National Hazard
Posts: 501
Registered: 24-8-2019
Location: Within EU
Member Is Offline
|
|
Well, i have some aquarium bubbler stones but i guess the plastic inside isnt ozone compatible, worth a try though.
I see there are some cheap bubbler stones on ebay that says they are ozone resistant, and there is also the "Sintered Microporous stainless steel
Bubble Diffuser, ozone bubble diffuser" that looks like an all stainless real quality item.
Thats probably the same type you have.
These bubblers are more expensive, about 50 Euros for item, tax and fees to get it here but probably last a lifetime.
If my bubbler stones that i already have dont work good i will get one of the stainless steel type diffusers.
It will be fun to see how good this ozon generator will work.
I will try measure how good it works with a iodine solution.
The hardest part is probably to keep the temp low while at same time have the ozone generating plasma running that generates heat.
[Edited on 2021-2-15 by Mateo_swe]
|
|
|
Fyndium
International Hazard
Posts: 1192
Registered: 12-7-2020
Location: Not in USA
Member Is Offline
|
|
My aerator looks like following. I turned a new adapter and crimped a stainless steel tubing to the place of that hose attachment. They aren't cheap,
I paid mine the same 50€ if I remember.

If possible, might wanna also consider that sintered glass funnel thing. Likely you ain't doing any larger ozonation, but for any bigger batch sized
up more than a liter or two the smallest models of sintered funnels could be an option. They cost from 7€ apiece and will produce a really good
bubble curtain. I clean my funnels by carefully pushing air through the backside and it works very well. Most gases (NH3, HCl, formaldehyde, etc)
absorb so well that a mere tubing is enough, though.
I accidentally broke one 500mL funnel, and now I regret binning it, because it snapped clean off the sintered surface, and it could have been the
perfect aerator, large, though.
[Edited on 15-2-2021 by Fyndium]
|
|
|
Piroz
Harmless
Posts: 19
Registered: 15-12-2020
Location: Poland
Member Is Offline
|
|
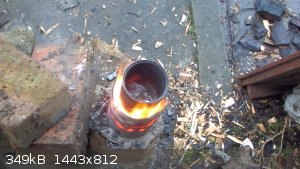
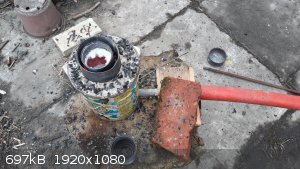
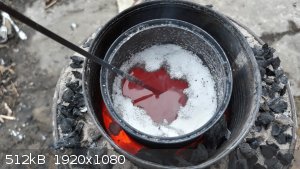
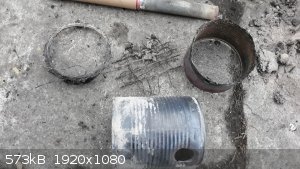
Today I tried my new improved furnance that use charcoal as fuel, powered with garbage bag. 
It melted around 250 g of table salt in less than 10 minutes. However tin cans as inner part of furnance were completely destroyed due to high
temperature after a half hour of heating. So I'll try some new tricks and make new furnance.
And here is the video:
https://youtu.be/WNNhLniRuKw
[Edited on 3-3-2021 by Piroz]
|
|
|
zed
International Hazard
Posts: 2277
Registered: 6-9-2008
Location: Great State of Jefferson, City of Portland
Member Is Offline
Mood: Semi-repentant Sith Lord
|
|
I've taken note of your mantle controllers. I'd like to have a heating mantle that has a stir function, and I was on the verge of buying one, until I
read the customer reviews.
Apparently, most of the mantles out there are unsatisfactory. The heating can't be incrementally controlled, they don't fit flasks very well, and the
stirring doesn't work very well. So, I can buy a 2L Mantle pretty cheaply, say $120 Bucks or so... But, I will have to completely revamp it, before
it performs satisfactorily.
I don't mind upgrading things that I brought for peanuts, but $120 Bucks ain't peanuts. And, sticking extra time and money into something that might
always border on junky, doesn't appeal to me. Grrr.
Guess I'll stock up on Glas-cols for the time being. And, wait for an opportunity, to either acquire a higher quality "Stir-Mantle" or improvise one.
All of this fancy new tech... it makes it hard to go back to the old ways. There's a song about that!
https://www.youtube.com/watch?v=LjCe2bYkoXY
[Edited on 22-3-2021 by zed]
[Edited on 22-3-2021 by zed]
|
|
|
Mateo_swe
National Hazard
Posts: 501
Registered: 24-8-2019
Location: Within EU
Member Is Offline
|
|
If you want a cheap option you can get a heating mantle replacement sleeve and just drive it with a variac or one of the small cheap triac drivers
found on auction sites.
The mantle sleeves can simply be placed ontop of a stirring hotplate and just use the stirring function and you have a DIY heating mantle with
stirring.
A low budget option and it works but be careful and insulate the connectors, getting electrocuted isnt healthy.
Electrical safety features such as a residual-current circuitbreaker or a isolation transformer is recomended and well spent money.
|
|
|
outer_limits
Hazard to Others
Posts: 139
Registered: 3-3-2020
Member Is Offline
Mood: hybridized
|
|
@zed,
I bought stirring mantle once and it's not very good regarding its stirring ability. Good for liquids and small amount of solids but not at all. Then
I bought a variac-controlled mantle on a rod that can be clamped to lab stand. I place it above my striplate, as Mateo_swe described and it works like
charm.
|
|
|
Sulaiman
International Hazard
Posts: 3554
Registered: 8-2-2015
Location: 3rd rock from the sun
Member Is Offline
|
|
If you get tired of pumping that bag for melting aluminium in steel cans using charcoal I can recommend one of these (if you have 12Vdc available)
https://www.ebay.co.uk/itm/12V-Electric-Air-Pump-Inflator-Be...
CAUTION : Hobby Chemist, not Professional or even Amateur
|
|
|
earpain
Hazard to Others
Posts: 102
Registered: 11-9-2019
Member Is Offline
|
|
| Quote: Originally posted by Mateo_swe | Well, i have some aquarium bubbler stones but i guess the plastic inside isnt ozone compatible, worth a try though.
I see there are some cheap bubbler stones on ebay that says they are ozone resistant, and there is also the "Sintered Microporous stainless steel
Bubble Diffuser, ozone bubble diffuser" that looks like an all stainless real quality item.
Thats probably the same type you have.
These bubblers are more expensive, about 50 Euros for item, tax and fees to get it here but probably last a lifetime.
If my bubbler stones that i already have dont work good i will get one of the stainless steel type diffusers.
It will be fun to see how good this ozon generator will work.
I will try measure how good it works with a iodine solution.
The hardest part is probably to keep the temp low while at same time have the ozone generating plasma running that generates heat.
[Edited on 2021-2-15 by Mateo_swe] |
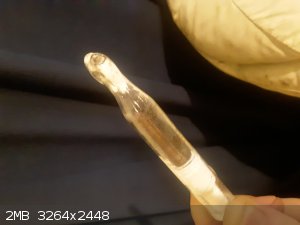
I made a very effective gas-into--liquid diffuser.
Materials:
-thin borosilicate test tube, or similar
-Woven fiberglass insulation tubes used commonly in high-powered lighting. I'm sure 'glass wool' and many others would work as well. But I went
through about 4 types of so-called 'fiber-glass' that burned, charred, disintegrated etc. when attempting the procedure
-a simple plumber's propane torch
1. rotate the end of the test tube over the flame, and use a glass rod or some pliers to 'pull off' the end of the test tub, creating a conical
tapered end, instead of the hemi-spherical one that was there previously.
2. At a convenient spot on the stretched out 'cone', use a 3-sided file, or glass cutting tool, to cleanly break off the tip. There should be an
opening somewhat smaller than the diameter of the rest of the test tube, with a glass wall that's a bit thinner
3. pull some of the threads of the fiberglass apart, and mush it together like if it were a cotton ball. Stuff this inside of the new tip. Use a stem
or screwdriver to stuff it in such that, you can still blow through the tube, but you can feel constricting.
4. This is fun. Rotate the end of the tube over the torch. Start slow. What will happen is first the outer glass will become red hot and soften,
and soon the fiberglass will slightly melt(hard to see the melting). Periodically stop and try blowing through the tube. Eventually allow it to
cool, the device is almost complete, if the fiberglass is clearly fused permanently, yet constricted air flow is possible
5. Anneal! Somehow! I just stuck it into a pot of vermiculite. One could also use an oven, the same torch, etc. The variation on this that used
shards of broken glass, requires the annealing step more-so. But still a must.
6. Test. Air or whichever gas you want to be bubbling into a solution should be constricted, and come out as hundreds of tiny foamy bubbles.
|
|
|
yobbo II
National Hazard
Posts: 709
Registered: 28-3-2016
Member Is Offline
Mood: No Mood
|
|
Shaded pole speed controller for magnetic stirrer
Shaded pole motor speed controller in attached patent.
No electronics involved. Just a flux 'shorter'.
Anyone ever tried this?
Yob
Attachment: US3286111.pdf (166kB)
This file has been downloaded 254 times
|
|
|
| Pages:
1
..
14
15
16
17
18 |


