Magpie
lab constructor

Posts: 5939
Registered: 1-11-2003
Location: USA
Member Is Offline
Mood: Chemistry: the subtle science.
|
|
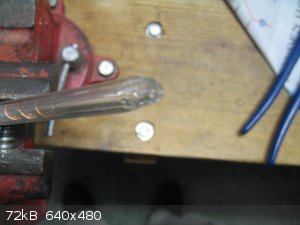
sparge tube with hot tip
Quote: Originally posted by Jimmymajesty  | Thanks Magpie,
It was not actually a toaster but your guess was very close it was in some hotplate.
What do you want to heat/pyrolyse with it?
|
I am in the process of making a sparge tube with a hot tip. The heat applied to the tip is controled using a variac transformer. Nominal voltage
will be 4vac with a power level of 16w. In dry testing this gives a tip temperature of 188°C. This tube is shown in the paint sketch attached.
I need some help from those with glassblowing experience. The gap between the inner 6mm OD tube and the outer 10mm OD tube is ~1mm or a bit larger.
I need to close this gap by fusing with melted glass. The inner tube will be held centered by two 22ga insulated wires as shown in the sketch.
I think that the outer tube could be heated to soften it then crimped to the inside tube and then fused. I'm hoping my Meker burner on MAPP gas will
get the borosilicate hot enough.
What would you suggest?

[Edited on 10-4-2015 by Magpie]
The single most important condition for a successful synthesis is good mixing - Nicodem
|
|
|
blogfast25
International Hazard
Posts: 10562
Registered: 3-2-2008
Location: Neverland
Member Is Offline
Mood: No Mood
|
|
Your Meker MAPP burner will probably be hot enough but I'd be mindful of the temperature differential between outer and inner tube. Once fusing is
achieved, that's a recipe for cracking on cooling. Only very slow cooling can prevent that, IMO.
|
|
|
Magpie
lab constructor
Posts: 5939
Registered: 1-11-2003
Location: USA
Member Is Offline
Mood: Chemistry: the subtle science.
|
|
I did a mock-up to see if I have adequate heat. It's marginal but I think it will suffice.
Some injected oxygen sure would help. But getting a real glassware torch, tanks, regulators, hoses, etc, can't be justified for my occasional needs.
The single most important condition for a successful synthesis is good mixing - Nicodem
|
|
|
Varmint
Hazard to Others
Posts: 264
Registered: 30-5-2013
Location: Near Atlanta, GA
Member Is Offline
Mood: No Mood
|
|
Magpie:
Wondering how you are going to do the copper/resistance wire interface?
I tried something similar, but ended up tossing it because the connection(s) kept failing.
On my redesign I used a tiny stainless steel tube. First I wrapped the resistance and copper in a Western Union splice, put a spot of silicone oil on
the connection (excludes air), then slid the tubing over the joint and crimped it heavily, flattening it to the extent that it would fit between the
two walls. I used Kanthal wire, and limited the input current so it can't overheat.
For the end seal, I put one layer of electrical tape on the far end of the outer glass tubing so my battery drill chuck could grip slightly without
breaking it. I set the drill speed to around 60 RPM (estimate), then used the MAPP torch to soften the glass. I lucked out and the flowing ends just
"found one another" and created a really great looking beaded seal. The steady rotation was key, and something I learned from watching many glass
blower videos.
Once it looked good, I backed the torch up in stages increasing the distance/lowering the heat over a few minutes.
Later I decided to flood the "heater channel" with silicone oil to enhance heat transfer making its operation more predictable.
[Edited on 11-4-2015 by Varmint]
|
|
|
Magpie
lab constructor
Posts: 5939
Registered: 1-11-2003
Location: USA
Member Is Offline
Mood: Chemistry: the subtle science.
|
|
Varmint, it sounds like you have a really nice sparge tube now. I think it is amazing that we both would build the same device in a very similar way.
I couldn't find anything else like it on the internet except for gas sampling applications.
I used toaster wire, which is flat. It wrapped nicely around about 1/2" of copper wire. It looks like it will stay in place - time will tell. I
thought about using those little ss crimps you can buy at the hardware store (Ace) but my clearance is so tight (~1mm) that I couldn't do that. Where
did you get that ss tubing?
I removed the insulation back about 3" on the 22ga wire so it won't be damaged by the heat.
That's a nice trick about rotating the piece in your drill.
What was your heat source for the glass melting?
I have no safeguard for high current - if I'm not careful with the variac I'm screwed.
Using a heat transfer oil would be good for some applications. I have to maintain at least 160°C. I will just be setting the variac and really don't
know what my temperature will be when in use. If I don't get plugging it's working as intended. What temperature do you maintain?
[Edited on 11-4-2015 by Magpie]
The single most important condition for a successful synthesis is good mixing - Nicodem
|
|
|
blogfast25
International Hazard
Posts: 10562
Registered: 3-2-2008
Location: Neverland
Member Is Offline
Mood: No Mood
|
|
Magpie:
What are you planning to send down that sparge tube?
|
|
|
Magpie
lab constructor
Posts: 5939
Registered: 1-11-2003
Location: USA
Member Is Offline
Mood: Chemistry: the subtle science.
|
|
chlorine. If the experiment is successful I'll post a lab report.
The single most important condition for a successful synthesis is good mixing - Nicodem
|
|
|
Varmint
Hazard to Others
Posts: 264
Registered: 30-5-2013
Location: Near Atlanta, GA
Member Is Offline
Mood: No Mood
|
|
Magpie:
MAPP did just fine, in fact I'm glad I didn't have anything hotter, it forced me to take my time and the result was better than I expected.
The oil and current limiting came along as a pair, I found sometimes I would end up with the kanthal at a dull red heat when the glass itself wasn't
warm enough to avoid plugging.
So I drowned the coil end in silicone oil, and designed a current limit driver. The goal was 350*F max with no flow, this gave me enough heat to keep
the opening from plugging.
Almost forgot, the stainless tubing came from my daughters jewelry kit! Just one of those things, she was making a bracelet and I saw the bin-box of
various pieces and asked if I could scam a few from her, almost as if it were designed for my intended purpose.
|
|
|
Magpie
lab constructor
Posts: 5939
Registered: 1-11-2003
Location: USA
Member Is Offline
Mood: Chemistry: the subtle science.
|
|
Varmint:
I found some very small tubes, silver plated, at a bead shop that will work as crimps. These are 2-3 mm long.
Based on your experience I decided to submerge the heating element in silicone oil (DOT #5). I used a hypodermic syringe. In doing this I found out
my tip was not sealed as it was leaking oil.
As I don't have any more 10mm tubing I will have to wait until I can get some shipped in before proceeding.
I am going to try to incorporate all your tips on my next try. Thanks very much relating these.
The single most important condition for a successful synthesis is good mixing - Nicodem
|
|
|
gsd
National Hazard
Posts: 847
Registered: 18-8-2005
Member Is Offline
Mood: No Mood
|
|
Hi Magpie!
For simple borosilicate glass manipulations I find the old fashioned Kerosene blow-torch extremely handy.
I wonder whether this device will be available in your part of the world.
Gsd

|
|
|
Magpie
lab constructor
Posts: 5939
Registered: 1-11-2003
Location: USA
Member Is Offline
Mood: Chemistry: the subtle science.
|
|
gsd I haven't seen one of those for a long time. I never see them in hardware stores. I think plumbers used them to melt lead back in the days of
cast iron sewer piping w/oakum and lead joints. I might be able to find one in an antique store. 
What we need is a small, cheap torch that will take propane and oxygen from 1 lb tanks. I can see it now as a Chinese product marketed through Harbor
Freight. 
Varmint:
What are the voltage and wattage of your sparge tube, and what do you use for a power supply? I considered using 5vdc but decided the power supply
should be variable. For that I needed to use AC.
The single most important condition for a successful synthesis is good mixing - Nicodem
|
|
|
Varmint
Hazard to Others
Posts: 264
Registered: 30-5-2013
Location: Near Atlanta, GA
Member Is Offline
Mood: No Mood
|
|
I'm using kanthal wire 28GA 10 total turns, so my drive parameters are so different than yours as to be utterly meaningless.
In case you can use it, another tip is on the coil itself. I tried just making the turns on the inner tube, turning back the tip end over the coil,
and put a slice of mica insulator from a TO-3 heatsink kit between the wire and coil, but had a hell of a time keeping the mica in the right place as
it was slid into position after the glass fusing. Besides, it made for a larger gap than I wanted.
The solution was to start at the middle of a 45CM section of kanthal. Make one loop around the glass tube, then fold back one end almost onto itself
just before the overlap so both tail ends could now be wound in the same direction. Once wound, the tail ends were made straight to go up the tube on
opposite sides, terminated to the copper feed wires as described, then put back on the tube so I could put the coil spacing even (about a wire-width
between turns) and make it all neat and tidy.
Keeping the glass tubes concentric during fusing was paramount as well. I used Viton O-rings spaced about 3 inches for the "hot" end, and another
right at the cold end, both these had to have their OD sanded down for a just snug fit. First I placed an o-ring on a brass mandrel that matched the
inner tude OD, spun it up in the Dremel, using 220 grit to gingerly reduce the diameter. Worked great, but you probably see the problem already (I
didn't), how to get them out when the fusing was complete? LOL, UGHHH.
For that I took a section of hobby brass tube (K&S from the hobby shop), and cut long raked "teeth" (think of it as cutting a thread clean through
the surface) on the tubing to hopefully bite into and extract the orings. It worked, but I had to push them all the way to the hot end to get enough
bite, at one point I thought it was a lost cause, but hung in there.
A much better solution (I didn't need it) would be to take some brass tubing that closely fit inside the larger tube or outside the smaller, then kink
in (or out) the end in 3 places (120*) to get the spacing right. Man I wish I had done that originally. The cold end would be easy to keep
concentric with almost anything that is east to remove by just pulling the brass tube out. O-rings, bits of rubber band at 120* centers...whatever
works.
|
|
|
Magpie
lab constructor
Posts: 5939
Registered: 1-11-2003
Location: USA
Member Is Offline
Mood: Chemistry: the subtle science.
|
|
I first must admit that I messed up when fusing my glass tubes at the ends. I tried to use a Tirill bunsen burner then a Meker burner. I forgot that
I have a Bernz-o-Matic burner ---duh. I still think a propane/oxygen torch would be ideal. I wonder what the bong makers are using - probably a
professional art glass torch. Glass suppliers sure are selling a lot of glass tubing to them over the internet.
Yes, my toaster wire is only 6.5cm long so not comparable to your Kanthal wire.
My construction was much cruder than yours. I just had one 3.25cm long loop in the shape of a hair pin. The ends were wound around 22ga copper
leads, bare for ~3" back from the connection. The toaster wire is nice to work with as it is tough, slightly springy, and flat. It is easy to wrap
around the copper wire ends. But next time I will use my crimps to assure a solid connection.
I didn't worry about the centering of the inner tube much. As long as my wires weren't touching each other I assumed it would be ok. I placed the
end of a thermocouple about a cm up the inner tube. With 4v it came right up to 188°C.
At one time I thought to use copper wire spirals to center the inner tube as I did in my mock-up testing. I was going to use dilute nitric acid to
dissolve them when done. But I worried about there being residual acid that would come back to bite me so abandoned that idea. Maybe some cotton
string that could be burnt out would work.
The single most important condition for a successful synthesis is good mixing - Nicodem
|
|
|
Texium
|
Thread Moved
22-11-2023 at 19:19 |


