| Pages:
1
..
51
52
53
54
55
..
60 |
WGTR
National Hazard

Posts: 971
Registered: 29-9-2013
Location: Online
Member Is Offline
Mood: Outline
|
|
That's why my obsessive thinking about collecting it under a vacuum. The idea of sealing the end of a very hot tube with water makes me nervous, as I
imagine scenarios where the water can get sucked into the tube, flash boil, and blow burning phosphorus everywhere. However, perhaps this will
provide some fodder for thought. Instead of sealing the tube leave it open, and use a condensor that is so cold that not only the phosphorus freezes,
but any air moisture freezes as well, ensuring that the phosphorus freezes into a matrix of ice.
The condensor could be made from two different sizes of copper tube, sealed on the ends to make a jacket. Low temp solder could be used to provide
the thermal bridge from the jacket to the iron pipe, with the advantage that the pipe could be removed by melting the solder and sliding it out from
the jacket. Higher temp solder could be used to assemble the jacket itself, so that it wouldn't fall apart if the pipe was replaced.
Perhaps a lead plug or teflon sealed pipe cap could be used on the other end of the iron pipe. A similar water/oil cooled condenser could be used on
that end to keep the cap from getting overheated. If the cap is removable, there is an advantage that a rod could be rammed straight through the iron
pipe for cleaning.
My first thought for freezing the phosphorus would be liquid nitrogen, as I'm sure this would be more than cold enough, but perhaps other coolants
would work. The phosphorus could be collected afterwards by submerging the pipe in warm water, and scooping it out.
|
|
|
macckone
International Hazard
Posts: 2159
Registered: 1-3-2013
Location: Over a mile high
Member Is Offline
Mood: Electrical
|
|
Silicones are still one of the better bets, they will glassify at high heat.
An expanding clay putty is what was traditionally used to seal phosphorus
retorts. Of course the retorts were also clay.
And traditionally they were disposable.
I suspect they where made, sealed, allowed to dry then fired as one process.
Firing, sealing, and then firing again seems wasteful of fuel.
|
|
|
BluePlanet1
Harmless
Posts: 41
Registered: 30-1-2016
Member Is Offline
Mood: No Mood
|
|
Ok I'm in a super rush to get to bed so I'm gonna upload 4 pics and respond to everything else tomorrow.
And the cap for the bigger furnace I just torched a hole in the compression cap that came with the can (not shown). So it holds the retort center
whenever the the larger steel retorts get here... which are shorter but wider than the copper one shown.

Some great stuff posted here I'll respond tomorrow. 
ps. I have 3 other baby forges that are all different lengths than stumpy there. And the perlite in the white forge will be relined or rebuilt with
the cheaper more superior aluminium silicate kitty litter clay.
[Edited on 2-3-2017 by BluePlanet1]
|
|
|
Magpie
lab constructor
Posts: 5939
Registered: 1-11-2003
Location: USA
Member Is Offline
Mood: Chemistry: the subtle science.
|
|
Here is Part#3 of my retort/condenser assembly. EMT (electrical metallic tubing) is the standard galvanized electrical conduit available at hardware
stores. The 90° elbows are standard parts. I think this is a great material as it is lightweight steel. Thanks to Rogermeryaw for suggesting its
use in making phosphorus further up in this thread. Here's a pdf with some dimensions for the standard elbows:
http://www.calconduit.com/submittal-sheets/EMT_90_ELBOWS_sub...

The single most important condition for a successful synthesis is good mixing - Nicodem
|
|
|
yobbo II
National Hazard
Posts: 709
Registered: 28-3-2016
Member Is Offline
Mood: No Mood
|
|
I seem to do nothing but criticize!
<STRIKE>Will the P not condence and solidify in the condenser and plug it.</STRIKE>
Just seen the 75C water in.
Reading up in the thread I realize that a steel retort will not suit using Phosphoric acid as the starting material as it is corrosive to steel ,
bummer, or would it be OK for a run or 2 since the mixture of carbon and phosphoric acid is 'reducing' mixture.
[Edited on 2-3-2017 by yobbo II]
|
|
|
WGTR
National Hazard
Posts: 971
Registered: 29-9-2013
Location: Online
Member Is Offline
Mood: Outline
|
|
If you're going to add an inlet for an inert gas purge, then perhaps it's unnecessary to dip the condenser tube beneath water to collect your product.
Simply let it drip into the water from the condenser. A purged container with an allowance for a small bleed hole could keep slight positive
pressure of the inert gas in the collection vessel, and keep oxygen away.
[Edited on 3-2-2017 by WGTR]
|
|
|
BluePlanet1
Harmless
Posts: 41
Registered: 30-1-2016
Member Is Offline
Mood: No Mood
|
|
These designs are awesome! I love watching smart people engineer things straight from their brain.
So far we've had designs submitted that use...
1) Steel plates & bolts for compression fitting. This is an interesting idea & very simple idea. The end plates could be
grinded round to fit better in a circular furnace. But I'm highly suspicious that flat steel plates on the end of a pipe... even tightened hard with
screws.... that this would create an air tight seal without some type of circular rim on the plates that protrudes into the pipe. Like imagine this is
the plate now: _________
I think it would have to be changed to: ___/--------\___
I've seen P4 easily escape tightly threaded caps that were screwed on TIGHT and SEALED with a mixture of water glass & perlite dust (fired before
the reaction). But even with all that pressure the P4 slipped out like the snake it is.
Still I like this idea due to how easy it would be to clean & refill the retort. And I think it could work IF I take a large drill bit
the same exact diameter of the pipe, carve a shallow, circular recess into the steel plate.... then pack that recess with dry betonite rocket clay.
Because if I can get dry clay between the plate & pipe before it's compressed I guarantee that would work. Dry, packed bentonite clay is
impossible for P4 to get through. It holds up against rocket exhaust under unbelievably high pressure. But my old sodium silicate-perlite
dust seals break down in the threads soon as its heated.
I'm putting this on my list of things to test... likely with a drilled recess & hopefully will get around to it next week.
2) Magpies retort & gasket idea. Aside from the jacket and gasket that looks like the design I've been using that's been failing
over and over lol. The idea of using threads was first inspired by that (swedish?) college student on page 8 who used oxy-ace with those "exotic" red
pipes. But then he casually disappeared from the forum forever so I can't pester him about exactly what type of pipe that was or IF he used a sealant,
what sealant and more generally - how he avoided leaks.
I've been doing this reaction under the assumption that the AL reaction quickly burns any O2 out of the vessel, leaving nitrogen... which should be no
(not much) different than adding a N2 feed.
Then my assumption with coal is CO2 is produced in the vessel immediately which should also prevent any burning. But who knows? P4s affinity for
oxygen is unbelievably strong... maybe purging is something I can't skip although I'd love to avoid drilling any more holes.
3) WGTRs vacuum idea. That sketch is awesome & innovative. I stared at your picture idk how long but I'm trying to approach this
experiment with a strict doctrine of "social accessibility". This thread has been going on for >>>15 years now which unbelievable to think
about.
And when I first came here (before registering) I remember reading up to the page about microwaving phosphoric acid with coal and thinking "this
shouldn't be like astrophysics" then left the forum for a long time before coming back. I was that intimidated by the level of skill some people have
on this forum.
Also, not to be political but I'm trying to "liberate" this reaction so it's accessible to amateur chemists. 15 yrs ago I was 19, going to college and
doing Grignard reactions in my mothers basement. It's unbelievable how EASY it was to get so many different chemicals back then.
But today, science & innovation... basic elements & chemicals... the things that use to make science FUN & EXCITING... it seems like
they've been regulated out of existence. Which has made science excruciatingly boring for kids. Maybe I'm getting old but I'd love to start a science
revolution that puts the DEA out of business. They regulate phosphorus and watch anyone who buys it cause of a few idiots methheads. Then those
methheads go blow up labs with ammonia & curious kids start doing dangerous things just to procure basic elements that yes are dangerous but it's
always the danger that excites & inspires kids. Like blowing up HHO balloons in a classroom. I did that when I was 16 not in a lab but right in
front of the class my teacher let me do that. If you did that today the FBI would probably raid the school....
----------------------
READ THIS IF YOU READ ANYTHING
Back on topic - Solution 1: I learned something new today which are the thermal expansion coefficients for steel & copper.
My retort-distiller passed an air compression test at room temperature. Then I put the steel retort in my freezer and the copper in boiling water. I
came back, did an air test and guess what? An immediate breach of air.
I clearly see what's happening now. It's not thermal expansion that's the problem it's ignoring this fact that's the problem.
The threads on the steel are on the OUTSIDE. The threads on the copper are on the INSIDE. So if I fire this the copper expands at a much higher
coefficient than the steel, causing the copper threads to PULL AWAY from the steel threads. And the solution I think is very easy. Reverse the
threads. If the steel is tapped to have threads on the INSIDE and copper on the OUTSIDE, then the EXPANDING COPPER will expand >>>into the
steel.
Every reaction I've done the threads have been the opposite direction. And since steel is denser than copper if any threads get ruined it's more
likely to be the softer, bronze alloy (I keep saying copper but mean bronze).
But I don't think the threads will be ruined that fast and even if they are I only have to replace the cheap bronze distiller (Lowes), the steel from
ebay should last much longer.
Solution 2 - This is getting long so I'll be brief AP. If solution 1 doesn't work as planned I thought of something simple. Why not
just copy roger on a smaller scale? He was able to stop leaks merely thanks to the clay-dirt environment he was working in. Where in the video he
packs dirt AROUND the distiller.... and just like that the P4 has no chance of escape.
So I picked up one of those large black tubberware boxes at the dollar store. It's like 16" L X 12" W X 5" deep.
If solution 1 fails I'm filling up that tubberware box with my fine, kitty clay. Which packs down much harder than what roger used (it's that rocket
nozzle clay). Then I'll dig a hole in the clay and place the furnace in it sideways. I'll pack the dry clay down hard with my hands around the
distiller and dig out a hole for the exhaust flames. Then dig another hole for the water collector.
I really think this idea is the best since I'm just stealing rogers environment, using higher grade clay ($4 for 25lbs at ShopRite) and replicating it
in a smaller sand box. And I'll still test other designs but right now I'm putting my money on the sand box and reversing the threads... although I
won't touch the threads till I'm done playing in my sandbox. This could work as it is.
Will update soon & cheers to all.
ps. For anyone wondering why I froze the steel rather than heat both it's because I didn't wanna torch it yet and was more focused on how much bronze
actually expands which is A LOT.
[Edited on 3-3-2017 by BluePlanet1]
|
|
|
WGTR
National Hazard
Posts: 971
Registered: 29-9-2013
Location: Online
Member Is Offline
Mood: Outline
|
|
Sorry, I have several different ideas running through my head all at once. The drawing I posted actually doesn't use a vacuum, it's just a straight
piece of iron gas pipe, with a condenser/cooling jacket on either end. On one end is a condenser cold enough to freeze phosphorus and (hopefully) be
cold enough to prevent it from reacting with oxygen during the course of the reaction. On the other end it's possible to have a teflon sealed pipe
cap, with a cooling jacket that keeps the temp around 100C or so, enough to maintain some phosphorus vapor pressure on that end.
I'm posting on a smart phone right now. Unfortunately my writing isn't usually very coherent on the first draft, but it's very difficult for me to
edit things on this tiny screen. I don't personally care to "stick it to the man" or anything; I'm more interested in the science of it all. I'm not
quite sure what use I'd have for phosphorus even if I made some, although I am curious if solid phosphorus will withstand atmospheric conditions if
kept very cold. If so, how cold does it need to be? The last time I just made mg quantities under vacuum, and watched the glass tube glow in the
dark as I let oxygen slip in. That was cool. Then I went on to something else...
|
|
|
Magpie
lab constructor
Posts: 5939
Registered: 1-11-2003
Location: USA
Member Is Offline
Mood: Chemistry: the subtle science.
|
|
For my design the coarse threads are not meant to act as a seal. They are there to allow making a tight seal at the gasket - this is common industry
practice. This is the same function as the use of bolt threads on Yobbo's design.
Solid P will just sit there at room temperature, slowly oxidizing. After sufficiently self-heating it will self-ignite.
[Edited on 3-3-2017 by Magpie]
The single most important condition for a successful synthesis is good mixing - Nicodem
|
|
|
yobbo II
National Hazard
Posts: 709
Registered: 28-3-2016
Member Is Offline
Mood: No Mood
|
|
I went to make a retort via some box iron and welding. I cannot attempt to implement the idea of the bolts
holding on two end plates on a pipe idea as my furnace is too small. It is only the size of a single
alumina brick.
As a modification to make it a bit smaller, I was simply going to weld on the bottom plate and bolt
the top plate onto the pipe
by welding a flange with nuts welded on the inside and a plate bolted on to it as the removable lid.
I was going to lap (grind very flat) the lid and the flange to form a seal. It sounded like a lot
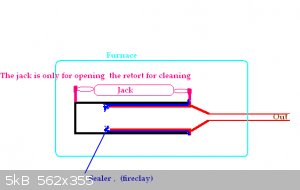
of work when I actually thought about it so I went with what is in the picture.
Consists of one pipe slid
inside another pipe. The pipes are a fairly good fit for each other. The inside pipe has the output
pipe welded to it. I am hopeing that fire clay (hardware shop) will be the seal.
There is a very large distance between one end of the seal and the other end so I think this will work?
The gas will have a very large distance to travel if it wants to excape in the wrong place.
The to pipes will be pulled apart (after I have made my P!) fOR cleaning out. It may take some pulling
and pushing and perhaps it will seize altogether.
My pipe is box iron btw about 2 by 2 and 8 inches long (it just fits into the oven and no more).
Now all I need is P compound. All I have is phosphoric acid which I hope to neutralize with NaOH
to get a compound that I can put into the retort. What compound will I have exactly can someone
tell me?
Thanks,
Y II
|
|
|
BluePlanet1
Harmless
Posts: 41
Registered: 30-1-2016
Member Is Offline
Mood: No Mood
|
|
Thanks WGTR & Magpie.
Last night I made the most significant advance after 1 1/2 yrs of obsessing about this reaction. Then I came back shouting in joy &
posted the solution with pictures. Then after 2 hrs I deleted the post.
I decided it's too important to spoil until I'm completely done modifying what I have to.
THE SOLUTION IS...
1) As simple as it gets.
2) Extremely accessible, practical and scalable.
3) 100% fail proof w/no exceptions.
4) So fail proof it'll work on a bad connection from your retort to distiller.
5) Takes minutes to do and undo after every reaction.
6) Revolutionizes this reaction forever.
7) I'm not exaggerating at all.
Finally, I can start firing off as many reactions as I want on any scale I want nor do I need a giant sandbox or any of the mess I thought of before.
And it has a few other benefits but I might spoil this too soon.
I really really think the forums gonna love this.
I'm gonna put a lot of time into filming & editing the first introductory video. Follow up tests will be shorter. I just need 1-2 days for a pic
of the final design. Then 3-5 days should be enough for the 1st video. 
edit: yobo, you somehow slipped in as I was typing. Looking at your design I'd highly recommend you pause what you're doing till you see how I
engineered mine. Phosphoric acid + NaOH I believe gives Na3PO4 vs the NaPO3. Since that compound has more sodium it will need more sand to form the
intermediate and likely more AL/C to reduce it. Though clearly right now you can just mix till neutral, purify and dry the Na3PO4 then we can do the
math later if you want?
[Edited on 4-3-2017 by BluePlanet1]
|
|
|
BluePlanet1
Harmless
Posts: 41
Registered: 30-1-2016
Member Is Offline
Mood: No Mood
|
|
I wanted to add something I haven't seen talked about much in this thread. Which is the synthesis of sodium hexametaphosphate.
According to wikipedia this stuff is fairly easy to make. And since it's the preferred phosphate it would be nice to synth a batch just to see how
it's made.
Wikipedia says that monosodium phosphate is made by the "partial neutralization" of phosphoric acid. That the pKa of monosodium phosphate is 6.8-7.2.
With pKa just being the PH of that salt in solution. Which is a bit confusing because the avg of 6.8 + 7.2 = 7... which is neutral. Not "partially"
neutral... although pKa is not the same as PH (I'm no expert on this).
But based on wikipedia, if you "partially" neutralize phosphoric acid with sodium hydroxide you get the monosodium phosphate.
Then if you extract the monosodium phosphate and heat it to 179C it converts to sodium acid pyrophosphate.
And if you heat the sodium acid pyrophosphate even further (doesn't mention what temperature) it converts to sodium hexametaphosphate.
The dozens of different sodium phosphate salts have always confused me.
But apparently to make sodium hexametaphosphate you just "partially neutralize" phosphoric acid which can be bought at Home Depot, extract the salt
& apparently at some hot temperature it releases H2O & breaks down to the prefered hexametaphosphate.
The only 2 things I don't get is why they call it "partial neutralization" if the PH of the pyrophosphate in solution is suppose to be around 7. What
exactly would be "full neutralization"? (question 1)
And furthermore exactly what temperature it converts to the hexameta. I'd assume somewhere between 400-600C would be good since the hexameta is fairly
stable? (question 2)
Personally I have 3lbs of NaPO3 & doubt I'll run out but it would be cool if someone could explain exactly what "partial neutralization" means? A
pKa of 7 is a PH of 7 with the monosodium in solution. But that sounds like full neutral to me not partially neutral. Here are the pages for
reference:
https://en.wikipedia.org/wiki/Monosodium_phosphate
https://en.wikipedia.org/wiki/Disodium_pyrophosphate
https://en.wikipedia.org/wiki/Sodium_hexametaphosphate
|
|
|
j_sum1
Administrator
Posts: 6218
Registered: 4-10-2014
Location: Unmoved
Member Is Offline
Mood: Organised
|
|
Phosphoric acid is triprotic: meaning it can donate up to tree H+ ions. A neutralisation reaction is to react these H+ with a base to eave a salt.
In this particular case only one of the three H+ is reacted hence only a partial neutralisation reaction. The fact that it occurs at a pH of 7 is
pretty much a fluke and largely irrelevant. The term neutralisation refers to the acid-base reaction and not to the pH of the product solution.
And yeah, there are heaps of different phosphates. I am like you and have not gotten my head around them yet. I am doing well if I can remember all
of the sulfates. Sodium hexametaphosphate is available as a water softener IIRC. Given that phosphoric acid and pure phosphates are not readily
available OTC where I live, I figured that when it is my turn to make some phosphorus I would simply buy what I need.
|
|
|
BluePlanet1
Harmless
Posts: 41
Registered: 30-1-2016
Member Is Offline
Mood: No Mood
|
|
Quote: Originally posted by j_sum1  | Phosphoric acid is triprotic: meaning it can donate up to tree H+ ions. A neutralisation reaction is to react these H+ with a base to eave a salt.
In this particular case only one of the three H+ is reacted hence only a partial neutralisation reaction. The fact that it occurs at a pH of 7 is
pretty much a fluke and largely irrelevant. The term neutralisation refers to the acid-base reaction and not to the pH of the product solution.
And yeah, there are heaps of different phosphates. I am like you and have not gotten my head around them yet. I am doing well if I can remember all
of the sulfates. Sodium hexametaphosphate is available as a water softener IIRC. Given that phosphoric acid and pure phosphates are not readily
available OTC where I live, I figured that when it is my turn to make some phosphorus I would simply buy what I need. |
That explains it perfectly, thank you!
I just read through a 5 page patent for converting TSP / Na3PO4 into NaPO3. Since in the US most water softeners are just NaCl and TSP is the only
accessible phosphate.
The patent with images is here: https://www.google.com/patents/US4777026
HERE'S CLIFF NOTES FOR ANYONE WHO CARES -
The reaction happens in 3 stages with strict temperature and PH control.
TSP / Na3PO4 is added to water at 60C, CO2 gas is bubbled through and the temp is slowly brought down to 30C while monitoring the PH from 13.5 to 9.2.
This produces Na2PO4 and NaCO3.
Then the temperature is dropped to 20C to freeze out the disodium / Na2PO4.
The disodium phosphate is washed with cold water & added back to the recycled sodium carbonate water solution at 50C.
CO2 is again bubbled through the solution as the temp is again slowly brought down from 50C to 20C monitoring the PH from 9.2 - 7.5. This is when
disodium phosphate splits into a mixture of di and monosodium phosphates.
Then the temp is further lowered and the sodium hexametaphosphate separates out.
So in essence it can be done at home but is a serious PITA. Not worth the time I'll just reup on ebay.
Will update tomorrow!
|
|
|
JJay
International Hazard
Posts: 3440
Registered: 15-10-2015
Member Is Offline
|
|
I had always thought you could just use a couple of pipe nipples with an elbow and a cap, putting some bone meal in one end and capping it, leading
the other end into water, and heating the closed end with a torch. I guess it's not that simple....
|
|
|
BluePlanet1
Harmless
Posts: 41
Registered: 30-1-2016
Member Is Offline
Mood: No Mood
|
|
| Quote: Originally posted by JJay | | I had always thought you could just use a couple of pipe nipples with an elbow and a cap, putting some bone meal in one end and capping it, leading
the other end into water, and heating the closed end with a torch. I guess it's not that simple.... |
A while back I tried calcium phosphate (TSP + damprid) + sand and coal. When the crucible cooled down a bit I took off the lid and saw P4 glowing
& burning with a distinct garlic smell. But the amount that burns off is nothing compared to NaPO3.
I've also burned chicken bone with my oxyhydro torch (just to see what happens)... it makes the foulest, most disgusting stench I ever smelled in my
life. Like a mixture of burning flesh and phosphorous oxides. I remember wanting to vomit & will never burn bone again lol.
-----
QUICK UPDATE:
I'm making good progress on the new design what's taking up the most time is just taking pictures of everything in stages with good lighting then
cropping and resaving all the photos.
I'm taking pictures of EVERY part of the process from ingredients used (2), where you can get them (everywhere), how I process them (blender), the
ratios I use (1.1), how I bang & pack the clay, how I quickly remove the coffee can without distorting the wet clay, how I drill the 6 holes (new
design needs 6 holes in 3 different places) how I fire it to get it rock hard (oven first while wet at low heat then torch 24 hours later), then I'll
get to retort-distiller and how everything comes together tomorrow.
It may sound complicated but it's real simple. You just buy 2 bags of material (under $20), blend them, mix them dry (I shake in tubberware), wet
them, pack it in, drill, fire.
It took LOTS of testing to settle on these 2 ingredients... and using any other form of silica (like silica gel or regular sand) will give you a weak,
inferior fire brick.
Overall about 90 mins of work.
If you like the quality of the firebrick (you will) and wanna melt metal then build a 2nd forge for that purpose.
If you DO NOT want to build a forge the only other stuff I'd recommend is k-26 alumina-silica fire brick: http://www.ebay.com/itm/like/201220850196?lpid=82&chn=ps...
That firebrick will also work perfectly. You can buy the firebrick, 25gm and 45gm CO2 cartridges and NaPO3 all on ebay for around $50. If you want to
make larger amounts of P4 then I'd buy the 45gm and 90gm CO2 cartridges. These 90gm are pretty big & can likely do 10+gms of P4 per synth. Figure
around 4-5gms for the 45gm and 2-3gms for the 25gm.
I'll be back later tonight or tomorrow with pics.
Oh and monday-tuesday I'll be swamped with work so I likely won't fire till wed-thurs then figure around next weekend for the first video. After that
I'll start rapid firing and testing for purity & yield.
Cheers!
|
|
|
BluePlanet1
Harmless
Posts: 41
Registered: 30-1-2016
Member Is Offline
Mood: No Mood
|
|
OK! Furnace is done.
I'm working on a long post with lots of pics, will probably take 2+ hours to edit & put everything together so if it gets late I may have to
finish tomorrow.
I just want everyone to stay tuned because the forums gonna love this.
Also, just for context the post is going to be split into 2 sections. The first section will be the post I deleted last week. Which is just 7 bullet
points and 2 pictures. It was THAT POST which triggered this innovation so if you read that first you'll understand exactly why I arrived to this
conclusion and why I believe this design is the best.
Be back soon...
|
|
|
yobbo II
National Hazard
Posts: 709
Registered: 28-3-2016
Member Is Offline
Mood: No Mood
|
|
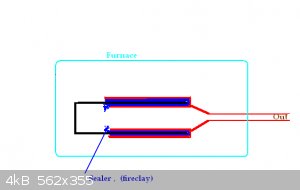
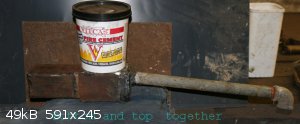
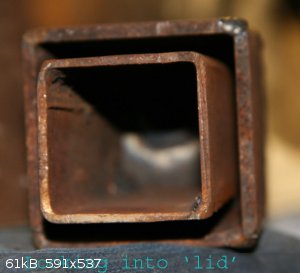
Made a modification to my reusable retort.
A second 'barrier' was added in parallel to the inside barrier.
See picture.
Another way of explaining what is happening is that the (square in my case) pipe that holds the stuff slides up into the 'lid'. The lid is sort of
double walled and the P will have twice the length to travel before it can go where it is not wanted.
I will be using fire clay as the sealer.
It's a rather big job to make this retort. Better to just have a pipe. Weld on a flat lid at the bottom. Same at the top + output pipe. Charge via
the (fairly large dia) output pipe. When you are finished the run, cut the pipe (the retort) in half fairly tidy, clean out and reweld.
Yob
[Edited on 10-3-2017 by yobbo II]
|
|
|
BluePlanet1
Harmless
Posts: 41
Registered: 30-1-2016
Member Is Offline
Mood: No Mood
|
|
UPDATE:
This is a C&P of last weeks deleted post...
--------------------------------------------------------
OK I JUST CRACKED THIS WIDE OPEN!!!
This just changed the nature of this P4 game and is so stupid simple I can't believe how long it took to think of this. I 100% guarantee this will not
only work but it will work with a horrible connection from your retort to the distiller.
Here's the answer:
1) You turn the retort upside down, connect distiller from the side.
2) The forge keeps 1 hole on the bottom for the distiller.
3) The forge gets another hole on the opposite side, up higher for the exhaust.
4) Forge walls will be built to extend above the bottom of the retort.
5) Since all threads & all connections now sit directly in the middle... YOU PACK DRY BENTONITE CLAY (OR BLENDED PERLITE DUST) IN THE BOTTOM.
AROUND THE SIDES OF THE RETORT. That seals off all connections from air.
6) Turn the forge upside down now and you fire it from the BOTTOM.
7) P4 has no choice but to come straight out the distiller.
Tomorrow I'm going to make a new forge but just look at these 2 pictures and it should click immediately.

I'm so freaking pumped now! I'm officially ready to start small & large scale testing, I can begin filming now I just need a longer forge and
extra hole.
--------------------------------------------------------
PART 2 - THE NEW DESIGN
I'm not going to go crazy going into detail I'll just post all the pics with captions.
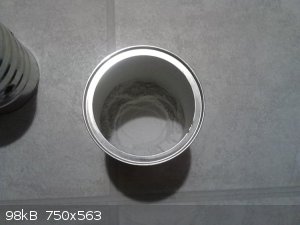
An empty, drilled out coffee can.
1, 1/2" hole for the distiller.
4, 3/8" holes for the gas injection and exhaust.

Wrapped a spray can with thick paper, hot glued the edges.
Blended perlite dust in top left can.
Blended aluminum silicate (bentonite kitty clay) from Shoprite on top right.
Mixture in larger bottom can.
Front of completed forge.
You see the distiller on the bottom and 2 exhaust holes.
Back of forge. Gas can be injected in either hole. Then the free 3 holes help regulate the exhaust. It's not necessary to have this many holes but it
regulates the pressure/exhaust better and also allows you to flip the forge sideways OR upside down to inject gas from the sides or "top" which
becomes the bottom.
Vertical look down into the forge.
The space between the 4 higher holes and 1 lower (distiller) hole is where you pack your clay or perlite dust. You just dump in a few scoops and pack
it down around the bottom.
To pack and close the threads you can just use perlite dust.
Or you can use a 50/50 mix of perlite dust and kitty clay.
All I know is you can pack either material on the bottom. It gets hard like a rock while dry just by packing. Then you can turn the forge side ways or
upside down to position the distiller in water.
This allows you to use not so good connections. Then you scrape / break out the packing agent with a screw driver. And so people are aware, I already
tested perlite on one of my first retorts & know it blocks P4 (as does rocket clay). I was just using in a really bad way that took hours to set
up for every burn... and I quickly lost my mind using that design.
This design is like a compact propane hybrid of what roger did.
All I need to do now is patch the cracks. The forge works fine as is and the cracks only go down 2-3" but aesthetically I hate looking at them. And by
this weekend I'll film my first fire along with measuring yield, cost, time, efficiency, etc. 
ps. Quick note. The distiller pipe I used is 3" I have a longer 6" one in my tool box and will use that for the reaction with the forge turned
horizontal.
[Edited on 10-3-2017 by BluePlanet1]
|
|
|
yobbo II
National Hazard
Posts: 709
Registered: 28-3-2016
Member Is Offline
Mood: No Mood
|
|
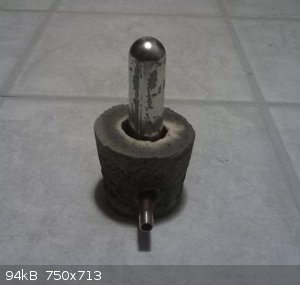
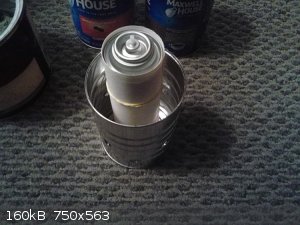
Just to recap. What are the co2 cylinders made from as I have not been able to get a clear answer.
Also is copper up to the job. It melts at 1085c and it is close to the 'action'.
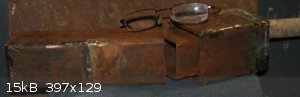
Some photo's of my one and only.
[Edited on 11-3-2017 by yobbo II]
|
|
|
BluePlanet1
Harmless
Posts: 41
Registered: 30-1-2016
Member Is Offline
Mood: No Mood
|
|
| Quote: Originally posted by yobbo II |
Just to recap. What are the co2 cylinders made from as I have not been able to get a clear answer.
Also is copper up to the job. It melts at 1085c and it is close to the 'action'.
|
Sorry. If anyone has any questions feel free to ask.
All the CO2 cylinders are made of stainless steel. And I checked them with a magnet just to be sure.
From the bottom of the copper tube to the the bottom of the exhaust holes (how thick the silica will be packed) is 1 1/4".
From the top of the copper to the bottom of the exhaust holes is 3/4".
So for the copper to melt, that bright yellow heat would need to penetrate more than 3/4" deep.
And when the forge gets hot the deepest I've seen the liner glow is maybe 1/4". Then also, (when the forge is completely dry) the liner vitrifies to
clay glass about 2-3MM deep. And it seems like after that glass layer forms in the liner it makes it much harder for heat to penetrate.
Thus I expect the same will happen to the packing agent. The surface will probably melt and vitrify 2-3MM deep. Then I'll have to poke through that
surface like ice to remove the shell and packing agent. And I'll lose a bit of a perlite everytime I fire not that big a deal.
edit: Just saw your setup. That's a pretty cool design and your welds look much cleaner than mine. If those joints hold up to P4 must say I'll be
pretty damn impressed.
[Edited on 11-3-2017 by BluePlanet1]
|
|
|
BluePlanet1
Harmless
Posts: 41
Registered: 30-1-2016
Member Is Offline
Mood: No Mood
|
|
Quick update.
I wanted to make my forge look "pretty" before filming so I repaired all the cracks and leveled off a few bumps & things before giving it it's
final fire. The forge looks great now and the liner finally changed black to white so it's dry enough to fire the coal redux.
I also made a couple 2" frisbee escalators. So it fires 25gm CO2 cartridges as is. 45gms with 1 frisbee up top. And 90gm with 2 frisbees.
Only problem now a blizzard is coming tomorrow. So I have lots of chores to do but should have off tues-wed and will likely start filming after the
blizzard begins tomorrow.
Will update soon!
|
|
|
BluePlanet1
Harmless
Posts: 41
Registered: 30-1-2016
Member Is Offline
Mood: No Mood
|
|
Ok, it took longer for the forge to dry than expected but it's getting hot as heck right now.
I'll be proceeding forth with the carbothermal redux as follows:
2 (NaPO3)6 + 15 C + 6 SiO2 = 6 Na2SiO3 + 15 CO2 +3 P4
Amounts will be:
34G NaPO3
5G C2
10G SiO2
Theoretically expected to produce:
20G Na2SiO3
18G CO2
10G P4
Unlike the Al redux, the byproducts should be >>>28G lighter.
So if you think about it, we're removing 58% the weight of the entire slag (more than half).
Instead of the formation of 28G Al2O3... which appears to do nothing but lock up the slag & potentially react with free P4.... we'll get 18G CO2
that leaves the vessel along with a highest theoretical yield of 10gm P4.
That leaves much purer Na2SiO3 in the steel retort. With a melting point of 1088C.
So like I've noticed (from previous smaller reactions) the end product IS much more brittle, highly water soluble and doesn't lock up to the formation
of alumina. And if you just think about this logically the increased formation of almost 60% Al2O3 by weight (in the Al reduction).... just the
initial "blast off" I believe it fuses all that alumina to the silicate and EVEN IF you're pushing the temperature up REAL HIGH, just the presence of
so much alumina should be locking up lots of P4. That's my theory at least.
With the carbothermal redux, only Na2SiO3 should be left in the retort.
Which melts at 1088C.
So the sodium silicate will most definitely REMAIN MOLTEN in the steel retort as long as the forge is on.
There will be no alumina to lock up the silicate.
And the production of 18G CO2 should help "unlock" and carry out more P4.
This is all just theory of course but I'm getting everything together now and we're gonna see if carbon produces higher yields.
|
|
|
j_sum1
Administrator
Posts: 6218
Registered: 4-10-2014
Location: Unmoved
Member Is Offline
Mood: Organised
|
|
Ok. I see what you are doing now.
How does the thermodynamics look? Meaning how do the heats of reaction compare? I would have thought that inclusion of aluminium would provide
significant energy for the reaction and make it more likely to proceed.
|
|
|
charley1957
Hazard to Others
Posts: 137
Registered: 18-2-2012
Location: Texas
Member Is Offline
Mood: Extracted
|
|
Some of us are still following your progress. I'm especially interested to see how this turns out without the aluminum. I've been quietly following
this entire thread since I discovered it a few weeks ago, and steadily building my own setup. I've not participated in the discussion or asked
questions as most all my questions have been answered by others here. Here's hoping you indeed break this whole thing wide open.
|
|
|
| Pages:
1
..
51
52
53
54
55
..
60 |


