BlackDragon2712
Hazard to Others

Posts: 124
Registered: 22-12-2012
Location: Everywhere
Member Is Offline
Mood: Sleepy
|
|
Simple and cheap Agar media for home microbiology
Lots of interesting reagents can be obtained through the metabolism of bacteria and they have been
increasingly getting more and more importance in industrial processes for the same reason.
They are everywhere, and they grow everywhere. Most of common bacteria do not require specialized growth medium and they are actually very easy to
grow even in a home-made set up.
Most homemade mediums described online promotes the growth of fungus over bacteria and some lacks of any aseptic technique at all.
I just want to share my experience making a decent enough medium for bacterial growth that avoids to an extent the growth of fungus in the medium. I
will update this post when I apply improvements in the method described below.
-> Materials:
1-) 0.8g of Peptone *
2-) 2g of Agar Agar
3-) 100ml of water
4-) (>2) Petri dishes
5-) Filter paper
6-) Microwave
7-) 500ml Erlenmeyer flask
*NOTE 1 see below
->Procedure:
100ml of distilled water was heated close to ~80°C in a 500ml Erlenmeyer flask and 0.8g of peptone (beef
bouillon in this case) was dissolved on it. The mixture was filtered through normal coffee filters and then 2g of Agar powder was added to the
filtrate. The flask was sealed with plastic wrap and paper in the top. Immediately after, the agar and the two petri dishes were put in the microwave
and heated for 1 1/2 minutes. (It's important to consider that the volume of the Erlenmeyer should be at least two times bigger
than the volume of its content) After this, 2 petri dishes were filled with about ~25 ml of the media each.
For the cultivation procedure a sample of dog faeces was obtained and suspended in distilled water. The
work up was performed under an open flame in order to avoid contamination of flying microorganisms. The cultivation procedure was performed in only
one small area of the plate and in only one of the two petri dishes, I made it this way to test the sterilization effectiveness of the microwave. The
plates were incubated in hot water for 24hr maintaining a temperature of 38°C constant (Alternatively a light incubator can be design) (Most bacteria
will not be harmed by temperature shifts, but their growth will be slowed down to 48h or more) (Some bacteria can even grow at room
temperature)
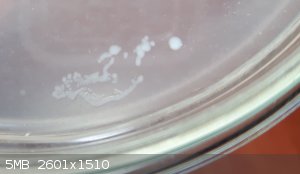
Culture plate before cultivation:

->Results:
White, wet, big colonies were detected on the cultivation zone. No bacteria growth was detected in any
other side of the same plate neither on the second petri dish prepared. Recognition of the bacterial culture was not performed.
Culture plate after cultivation and incubation:
->Discussion:
The method described is a very easy and cheap way of producing bacterial colonies but it definitely can be
improved. For future experiments maybe adding a sugar like sucrose may promote the growth of nonspecific bacteria, the problem would be that the
growth of fungus would be greatly increased as well, the use of an improvised glove box would solve this (between other) problem. Another problem is
to find easy and cheap sources of peptone, for this the enzymatic digestion of soy powder with papain shows promising potential for the home scientist
but experiments are yet to be performed.
A replacement for the Agar powder could be unflavoured gelatine, the problem with this is that fungus
growth is favoured in this medium and some bacteria can easily dissolve the gelatine.
Despite the fact that only a small group of bacteria grew in the medium, re-cultivation by following the
same procedure but modifying the cultivation method by cultivating the entire plate this time and not only a small area should produce a much large
amount of bacteria in the plate (Remember to make a control plate in order to ensure the sterilizing method because sometimes it can fail)
*NOTE 1: Peptone is the result of protein digestion. It
can be obtained from beef bouillon that specifies the content of peptone or meat digestion products. It can also be made by enzyme digestion of meat
with peptones or papain (obtained from meat tenderizer powder). It can be made by acid hydrolysis of meat but the problem with this is that the final
product needs to be further purified due to the low pH and the salt content of the hydrolysate produced. They can also be made by enzymatic digestion
of soy powder but the amino acids in the media may vary from those obtained from meat and it doesn't contain cystein or tryptophan whose absence could
inhibit the growth of certain bacteria.
->Links:
http://www.solabia.com/solabia/content/NT000043E6.pdf
http://onlinelibrary.wiley.com/doi/10.1111/j.1432-1033.1982....
[Edited on 05/12/2013 by BlackDragon2712]
|
|
|
Metacelsus
International Hazard
Posts: 2531
Registered: 26-12-2012
Location: Boston, MA
Member Is Offline
Mood: Double, double, toil and trouble
|
|
Nice work. I'm surprised the microwave treatment was enough to prevent contamination of the plates. Now, can you determine the CFU/mL of your dog poo?
Here's the LB agar recipe I've used:
Per 100 mL volume (makes ~4 agar plates):
1 gram tryptone
0.5 gram yeast extract (dry powder)
1 gram sodium chloride
2 grams agar
This is then autoclaved (pressure cooker, basically).
There are many, many other kinds of solid media, and each one is best for certain kinds of microbes.
[Edited on 10-2-2016 by Metacelsus]
|
|
|
BlackDragon2712
Hazard to Others
Posts: 124
Registered: 22-12-2012
Location: Everywhere
Member Is Offline
Mood: Sleepy
|
|
Thanks!
No, I cleaned the plate after the experiment because I was in a rush by the time...
Interesting recipe... it looks very simple to make, did you buy the tryptone or made it yourself?
|
|
|
FranklinNewhart
Harmless
Posts: 6
Registered: 8-2-2017
Member Is Offline
Mood: No Mood
|
|
I do a lot of Brewing and my home laboratory is focussed around that. I do not use Agar. I mostly grow yeast on my plates so I prepare my plates
using Knox Gelatin and Plain Malt Wort as it contains all the nutrients needed for yeast culturing.
To prepare Plain Malt Wort I use Euro-Pilsen Malt. Grind 4 ounces in a blender and steep in 120 F water. Raise mixture to 135 F and rest for five
minutes. There will be cooling during this time. Raise mixture to 145 F and rest again. When temp has dropped to 135 F raise temp to 155 F and rest
again. Raise to 165 and rest again. These rests allow the Alpha and Beta Amylase to break down the starch. But you are still stuck with the 1-6
bonds. If you wish to get rid of most of them and convert all the sugars then cool the Wort to 120 and add 2 more ounces of ground malt. Raise the
temp to the same rest points and when you are finished you will have 2/3 of the 1-6 bonds removed. Do an Iodine test for starch and inspect under a
microscope. If there is any purple then you did it wrong. The enzyme that breaks the 1-6 bond is only active between 130 and 135 F and becomes
denatured above 140 F but it can't do it's work until the Amylase has done it's work. That is why you need to cool and start over, and why you only
get to convert 2/3 of the 1-6 bonds.
Pour the Wort through a strainer into a seprartory funnel and let sit to cool and settle. Remove the trub from the bottom when that is done, and use
the cooled Wort to prepare your gelatine. You could just as easily use agar if you have it but I have always found the gelatine works just fine.
If you want to add any other nutrients to this preparation the two to use are DAP (Disodium Phosphate) And Vitamin B Complex.
Have enough Petri Dishes ready for 1 1/2 cups of solution. I use glass ones so I prepare them in a Pressure Cooker but if you just have the plastic
ones then use the Microwave. I Use a fish tank with a glass lid and a strong light bulb with a thermostat control on it for an incubation chamber.
|
|
|
BlackDragon2712
Hazard to Others
Posts: 124
Registered: 22-12-2012
Location: Everywhere
Member Is Offline
Mood: Sleepy
|
|
Just a quick update...
I've been using this as an incubator and despite how ridiculous it looks, it actually works pretty well... You just have to fill it up with hot
boiling water 3 times a day and bacterial growth can be speed up from a week to 24 hours
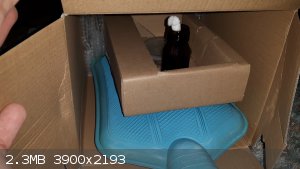
Here I cultured Klebsiella pneumoniae using the incubator shown above and this is 18 hours after inoculation
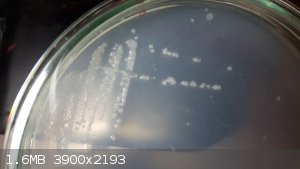
One obvious problem is temperature control for most demanding bacterias. I am still thinking how to overcome this problem using really really
household materials.
On another point, I am still testing new homemade mediums that could effectively inhibit most growth of fungal species.
|
|
|
JJay
International Hazard
Posts: 3440
Registered: 15-10-2015
Member Is Offline
|
|
That is pretty cool. You could hook up a regular thermostat with something like a light bulb or nichrome wire (which you can get out of a toaster).
This may require a relay or other control circuitry... that would be easiest to build using components bought online or from an electronics store, but
you might be able to scavenge something from a broken space heater.
|
|
|
BlackDragon2712
Hazard to Others
Posts: 124
Registered: 22-12-2012
Location: Everywhere
Member Is Offline
Mood: Sleepy
|
|
Quote: Originally posted by JJay  | | That is pretty cool. You could hook up a regular thermostat with something like a light bulb or nichrome wire (which you can get out of a toaster).
This may require a relay or other control circuitry... that would be easiest to build using components bought online or from an electronics store, but
you might be able to scavenge something from a broken space heater. |
It's seems like I'm buying broken toasters now haha. I do agree that this would be indeed the easiest way to have some level of control over the
temperature and I think that nichrome should be the way to go... I will have to give it a thought first though since I am plain bad with electronics,
but how hard can it be considering that there should be plenty of diagrams for this
|
|
|
JJay
International Hazard
Posts: 3440
Registered: 15-10-2015
Member Is Offline
|
|
It's practically child's play with something like this: http://www.ebay.com/itm/110V-10A-Temperature-Controller-Temp...
|
|
|
charley1957
Hazard to Others
Posts: 137
Registered: 18-2-2012
Location: Texas
Member Is Offline
Mood: Extracted
|
|
I built an incubator from an old dorm refrigerator, using a 40W bulb connected to a water heater thermostat. Now the thermostat just barely works at
its lower range, but with a little finagling I'm sure it could be modified a little to go a little lower. Anyway, mine stays right at 38-39C. Also I
put a little computer fan in there to circulate the air for a more even warmth. Very cheap, very effective.
You can’t claim you drank all day if you didn’t start early in the morning.
|
|
|
pesco
Harmless
Posts: 20
Registered: 19-11-2015
Member Is Offline
Mood: No Mood
|
|
Simplest thermostat for these temperatures can be made out of
- 2 fish tanks, 1 small enough to fit inside the other with around 50mm gap between walls around
- aquarium thermostat. More then one of the same type for more uniform and reliable temperature control
- submersible aquarium pump for mixing water around.
Procedure:
- place small tank inside the big one. The small one can not be too deep or you will have to make pretty robust catches/holders to keep it submerged.
- fill the big tank with water
- place aquarium thermostat in the corner. If you want to use more then place them in opposite corners.
- place submersible pump (or few on opposite walls) between walls of big and small tanks. Direct the flow horizontally along the glass walls
- set desired temperature, turn on pumps and thermostats.
- place you sample in small empty tank and place glass lid on it.
For more energy efficient arrangement glue/attach styrofoam/polyurethane sheets to all sides of big tank making kind of a insulated box.
Aquariums/tanks do not have to be made out of glass, polyethylene, acrylic etc is fine.
You can even use two plastic buckets !
All components widely available and pretty cheap.
Works like a treat.
Perfect for people who can or don't want to fiddle around with building controllers etc.
Have fun! 
|
|
|


