charley1957
Hazard to Others

Posts: 137
Registered: 18-2-2012
Location: Texas
Member Is Offline
Mood: Extracted
|
|
My lab beginnings.
 When I was 14 or so, my cousin gave me an unwanted chemistry set she got for Christmas. My grandfather finally relented to my bugging and built me
this chemistry lab bench. When I was 14 or so, my cousin gave me an unwanted chemistry set she got for Christmas. My grandfather finally relented to my bugging and built me
this chemistry lab bench. 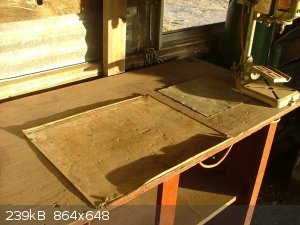 The metal plate in the front center is the lid to that chemistry set. The other piece of tin you see to the right of that is where I covered up the
hole that was made for a gallon ice cream bucket which was my lab sink. The metal plate in the front center is the lid to that chemistry set. The other piece of tin you see to the right of that is where I covered up the
hole that was made for a gallon ice cream bucket which was my lab sink. 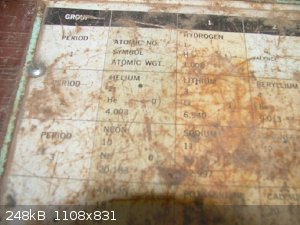 A closeup of what is left of the periodic table that was printed on the inside of the chemistry set lid. A closeup of what is left of the periodic table that was printed on the inside of the chemistry set lid.
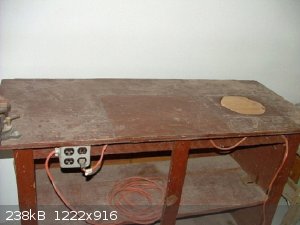 A few years ago I found Robert Bruce Thompson's book "Illustrated Guide to Home Chemistry Experiments." I got the chemistry bug again, bad this
time. So I decided to build a proper lab. I started with the old lab bench my grandfather built for me. The first thing was to clean up the top and
plug up the hole. A few years ago I found Robert Bruce Thompson's book "Illustrated Guide to Home Chemistry Experiments." I got the chemistry bug again, bad this
time. So I decided to build a proper lab. I started with the old lab bench my grandfather built for me. The first thing was to clean up the top and
plug up the hole.
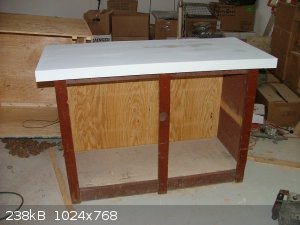 Here's the finished top. You can also see a new plywood back on it. The old one was a couple of pieces of masonite that were badly water damaged
and coming loose at the bottom. Here's the finished top. You can also see a new plywood back on it. The old one was a couple of pieces of masonite that were badly water damaged
and coming loose at the bottom.
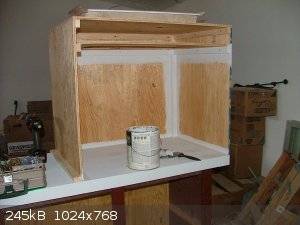 This is the fume hood at the beginning. This is the fume hood at the beginning.
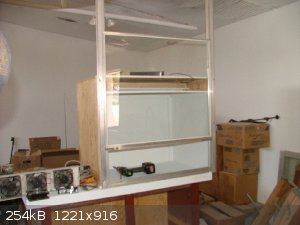 Here you can see the storm door I used as a sash for the front of the fume hood. Here you can see the storm door I used as a sash for the front of the fume hood.
 And here is the final fume hood, until a few days ago, when I had to make it taller because I couldn't set up my Vigreux column inside. I have more
pics of that, and more of the lab coming. And here is the final fume hood, until a few days ago, when I had to make it taller because I couldn't set up my Vigreux column inside. I have more
pics of that, and more of the lab coming.
You can’t claim you drank all day if you didn’t start early in the morning.
|
|
|
charley1957
Hazard to Others
Posts: 137
Registered: 18-2-2012
Location: Texas
Member Is Offline
Mood: Extracted
|
|
Continuation of my lab beginnings
 See the nasty-looking joint in the body of the fume hood just above the stainless bowls? That's where I extended the fume hood up just the other
day. I'll paint that soon. See the nasty-looking joint in the body of the fume hood just above the stainless bowls? That's where I extended the fume hood up just the other
day. I'll paint that soon.
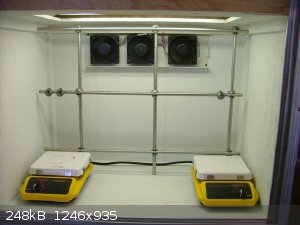
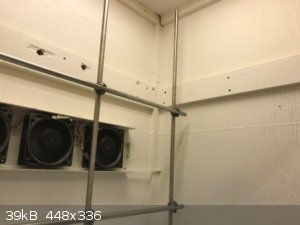 Look at all that room inside now! The fans are from an old server, and they lead out through the wall with a piece of 4" dryer vent, to another
squirrel cage fan I salvaged from a large microwave oven. It all exhausts about 5 feet above the roof. Look at all that room inside now! The fans are from an old server, and they lead out through the wall with a piece of 4" dryer vent, to another
squirrel cage fan I salvaged from a large microwave oven. It all exhausts about 5 feet above the roof.
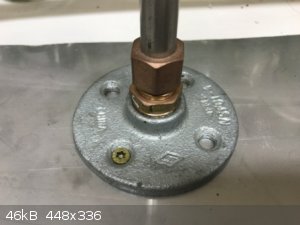 You can see a lab frame inside the fume hood. I have another I built on the main lab bench also. My last job had lots of scrap 1/2" stainless
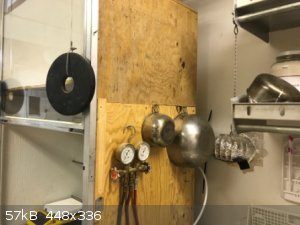
steel tubing. I picked up a bunch of that, bought some lab frame clamps on eBay, and set about making lab frames. This picture shows a plain cast
iron floor hub, 1/2" NPT. Into that is threaded a 1/2" X 1/2" pipe to tubing adapter. Then the tubing is tightened in to the adapter with the brass
nut. For about $4 apiece I made four or five of these, versus almost $40 apiece for commercially-manufactured ones. All this stuff I bought at the
local lumber yard. You can see a lab frame inside the fume hood. I have another I built on the main lab bench also. My last job had lots of scrap 1/2" stainless
steel tubing. I picked up a bunch of that, bought some lab frame clamps on eBay, and set about making lab frames. This picture shows a plain cast
iron floor hub, 1/2" NPT. Into that is threaded a 1/2" X 1/2" pipe to tubing adapter. Then the tubing is tightened in to the adapter with the brass
nut. For about $4 apiece I made four or five of these, versus almost $40 apiece for commercially-manufactured ones. All this stuff I bought at the
local lumber yard.
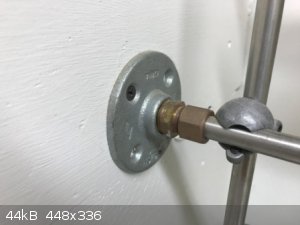 Here's another one I used to secure the end of the middle rail of my bench frame. Stainless tubing was what was available to me, but the rods can
be made of anything of 1/2" diameter, even solid rod of any kind. Here's another one I used to secure the end of the middle rail of my bench frame. Stainless tubing was what was available to me, but the rods can
be made of anything of 1/2" diameter, even solid rod of any kind.
I have ordered more lab frame clamps from eBay to finish the frames. They've worked fine without every intersection being clamped, but I just want
them to be as sturdy as I can make them. I've not seen these clamps for a while, but some came on just the other day and I snagged them.
You can’t claim you drank all day if you didn’t start early in the morning.
|
|
|
JJay
International Hazard
Posts: 3440
Registered: 15-10-2015
Member Is Offline
|
|
Nice lab. I'm using a 4 inch vent for my fume hood as well. If you're working with toxic substances (chlorine comes to mind), you want a face velocity
of at minimum 60 FPM (100 is better). That works out to a sash height of about six inches.
|
|
|
CharlieA
National Hazard
Posts: 645
Registered: 11-8-2015
Location: Missouri, USA
Member Is Offline
Mood: No Mood
|
|
Great job on your lab.  May I ask the dimensions of your fume hood? May I ask the dimensions of your fume hood?
|
|
|
j_sum1
Administrator
Posts: 6219
Registered: 4-10-2014
Location: Unmoved
Member Is Offline
Mood: Organised
|
|
Saweeet!!
Nice space. Your fume hood looks similar to what I am planning for mine in terms of shape dimensions and construction. I bet you're happy with it.
|
|
|
charley1957
Hazard to Others
Posts: 137
Registered: 18-2-2012
Location: Texas
Member Is Offline
Mood: Extracted
|
|
Thanks all for the compliments. JJay, I've seen a thread somewhere about all the calculations that go into proper fume hood design. Just know that I
didn't calculate anything. I have no idea what my airflow is. I just know that I've worked with some nasty stuff and so far I've not experienced any
vapor/gas escape as far as I can tell. I do wonder about my dryer vent material, though. I thought it was aluminum foil on a steel spiral, but it
seems to be a stiff plastic covered by a reflective coating of some sort. I sometimes worry about something eating through the plastic. The whole
thing reminds me of Mylar.
Charlie A, the fume hood's inside dimensions are 42 in. tall, 33 wide and 23 deep. The depth was determined be the front to back width of the lab
bench it was built on. The aluminum storm door determined the width, and I just lately had to add on to the height because I originally built it too
short. It all got a new coat of paint because of the modification. The frame rails all had a coat of rust on them, and that all got cleaned up too. I
just lately found a bunch of scrap stainless steel sheeting which I used to cover the bottom of the fume hood and all my bench and counter tops with.
So much easier to keep clean than painted wood.
I will post a lab tour soon in the appropriate place in the forum.
You can’t claim you drank all day if you didn’t start early in the morning.
|
|
|
nanoAmp
Harmless
Posts: 4
Registered: 1-6-2017
Location: Melbourne, Australia
Member Is Offline
Mood: In the ZONE :-)
|
|
Reading this post, encouraged me to break out the old chemistry set and get my lab going.
hope to post a few pics of it soon.
[Edited on 29-7-2017 by nanoAmp]
|
|
|


