Sciencemadness Discussion Board

LET THIS SIGNAL THE END OF THE FRIDGE PUMP QUESTIONS!

 Pages:  1  

peach - 5-9-2010 at 17:44

No need to UTFSE, I've done it all for you, and then some more. A lot more actually.

I can't imagine there's a whole lot more you'll need to know, but I'll add some more on the exotic ideas later, perhaps with the help of my arch nemesis, entropy...

Names dropped; entropy, bartlog, JohnWW, chief

{edit} some of the captions aren't popping up when I click these on here, so you may want to youtube them directly, as they contain corrections or extra information {/done}

<object width="480" height="385"><param name="movie" value="http://www.youtube.com/v/1J2wSKImeJQ?fs=1&amp;hl=en_GB"></param><param name="allowFullScreen" value="true"></param><param name="allowscriptaccess" value="always"></param><embed src="http://www.youtube.com/v/1J2wSKImeJQ?fs=1&amp;hl=en_GB" type="application/x-shockwave-flash" allowscriptaccess="always" allowfullscreen="true" width="480" height="385"></embed></object>

<object width="480" height="385"><param name="movie" value="http://www.youtube.com/v/G53jY8bw2YI?fs=1&amp;hl=en_GB"></param><param name="allowFullScreen" value="true"></param><param name="allowscriptaccess" value="always"></param><embed src="http://www.youtube.com/v/G53jY8bw2YI?fs=1&amp;hl=en_GB" type="application/x-shockwave-flash" allowscriptaccess="always" allowfullscreen="true" width="480" height="385"></embed></object>

<object width="480" height="385"><param name="movie" value="http://www.youtube.com/v/wMmscJVBLUU?fs=1&amp;hl=en_GB"></param><param name="allowFullScreen" value="true"></param><param name="allowscriptaccess" value="always"></param><embed src="http://www.youtube.com/v/wMmscJVBLUU?fs=1&amp;hl=en_GB" type="application/x-shockwave-flash" allowscriptaccess="always" allowfullscreen="true" width="480" height="385"></embed></object>

<object width="480" height="385"><param name="movie" value="http://www.youtube.com/v/Vv_VQ7-WD2o?fs=1&amp;hl=en_GB"></param><param name="allowFullScreen" value="true"></param><param name="allowscriptaccess" value="always"></param><embed src="http://www.youtube.com/v/Vv_VQ7-WD2o?fs=1&amp;hl=en_GB" type="application/x-shockwave-flash" allowscriptaccess="always" allowfullscreen="true" width="480" height="385"></embed></object>

<object width="480" height="385"><param name="movie" value="http://www.youtube.com/v/pJTyvcV1v6w?fs=1&amp;hl=en_GB"></param><param name="allowFullScreen" value="true"></param><param name="allowscriptaccess" value="always"></param><embed src="http://www.youtube.com/v/pJTyvcV1v6w?fs=1&amp;hl=en_GB" type="application/x-shockwave-flash" allowscriptaccess="always" allowfullscreen="true" width="480" height="385"></embed></object>

[Edited on 6-9-2010 by peach]

psychokinetic - 5-9-2010 at 17:51

I have a question about fridge pumps....

*leaves*

Chainhit222 - 5-9-2010 at 18:57

what is that white band around your head

my dad cut one of those pumps open once (using a band saw) and spilled it all over my moms roses lol

[Edited on 6-9-2010 by Chainhit222]

peach - 5-9-2010 at 18:59

Quote: Originally posted by Chainhit222  
what is that white band around your head


My dirty hippy length hair is now getting in my eyes all the time and I'm too busy sawing things open to get it cut, so I'm using this girly headband occasionally for an enhanced viewing experience of reality.

Chainhit222 - 5-9-2010 at 19:04

hang a air freshener off of it

but I enjoyed the videos, they are entertaining to watch. You need DMT to unlock the higher dimension spheres.

[Edited on 6-9-2010 by Chainhit222]

peach - 5-9-2010 at 19:51

Quote: Originally posted by Chainhit222  
hang a air freshener off of it


:D

I also spilled the oil all over the grass when I drained one to measure the oil volume in there, and then walked away for a minute leaving it balanced on it's side.

There was a blast furnace near our house, back in the olden days. Rather than use expensive hardcore (which is always expensive), the builders bought all the clinker from the furnace.

That means the lawn is now laced with an under layer of fairly caustic crap. When I clean the glassware, I'll often purposefully spill the washes of sulphuric over the lawn. It loves it. And me taking the occasional wazz on there in the dead of night.

DJF90 - 6-9-2010 at 00:37

Really good job peach, very informative videos and I love the humour too!

smaerd - 6-9-2010 at 09:09

Amazing video's I learned a whole lot. Funny stuff too. I really appreciate the hard-work I'm sure that was.

Cheers

edit - this should be stickied

[Edited on 6-9-2010 by smaerd]

BromicAcid - 6-9-2010 at 12:11

This should be put into a full length feature and put into Member Publications, our first feature film starring Peach.

denatured - 7-9-2010 at 00:08

I second Bromic, this is really nice. thanks Peach.

psychokinetic - 7-9-2010 at 01:19

Oh peach, I could listen to you all day *dreamy eyes*
Also, more males should wear headbands. There's something about them when worn correctly.

-ahem- yes, full length and publish.

Fleaker - 7-9-2010 at 18:38

"I suck very hard"--peach.

^ Just kidding. Kudos to him for actually showing his face. That should definitely convince us all of your good and honest ambitions.

Very nicely put together. Now I want a video tutorial on demethylation :-P

peach - 7-9-2010 at 23:46

Thanks for all the nice replies. It did indeed take forever to make something that long on a 256mb computer, so I'd be happy if just one person got some use out it.

I think more of us should post videos. This is one of, well probably the best at home chemistry forum on the web. Yet youtoop is populated by unhelpful, kind of boring videos about acetone peroxide and pipe bombs. I think team science madness could do a little better than that (len and his sodium, the lead acid chambers, etc). It could also make the massive project threads a lot more productive. It's hard to have an unnecessary flame war when you can see the other person.

All of you will have cameras that record, and can click upload. I expect a lot of us have glassware and odd things the standard younoober will want to see or knowledge of SOMETHING others can learn from. None of us know everything, but I suspect some of your are downplaying your own ability versus the standard youtube viewer.

I troll Jeri Ellsworth's videos a lot, she does them for electronics and are a good example of what I mean.

First person to make a video with their face and voice in it gets an instant subscription from John. ;)

Demethylation, I may do that since it's very pretty seeing all the purple and orange everywhere, it's an odd reaction (as it can seems to be able to do a very passable impression of tar and illustrates how there is a spectrum within the hard / soft definitions of lewis acids) and it'd give me a chance to whip out some fancy looking glass.

It's cost me a few thousand pounds in equipment and reagents to figure out the demethylation, and a few years, amongst other things. £1k per view? :P

[Edited on 8-9-2010 by peach]

spong - 8-9-2010 at 04:20

Great video Peach :D
I need to get a metric nomograph, it would save me so much time using an internet calculator. I've gone and got one out of an old fridge now so I can join in the fun :) It's not pulling the best the vacuum (I could only get warm water to boil, no gauge yet) but as you said in the video, it could just be the refrigerant boiling off still. I'll have to make some videos on AlCl3 production, once I make a new youtube account with a user name I didn't pick when I was 13.

peach - 8-9-2010 at 05:31

I have to start getting some money together to pay for the things you see in the videos (being jobless and having £10+k's worth of student debt), so you can have a customized, hand written, all units and laminated nomograph for a £2 + p&p gift thru palpaid. :D

"But John... you have all those pumps! Why do you need MOAR money!?", I'm refitting them to sell them, not collecting them. :P

I checked that pump again just now, and the pressure had gone up a bit, indicating there's still refrigerant in it. I've flicked it back on, blocked the intake and will leave it overnight to go.

You should expect some level of nuncing around from the pumps when they first come out, they will take time to sit still.

You don't have to be doing something super novel to make a worthwhile video, you could just post up a reply to that one featuring you pulling one out and doing the same thing to show it in a different way. It may also raise questions I didn't cover.

[Edited on 8-9-2010 by peach]

aonomus - 9-9-2010 at 21:09

I have figured out why my overheating issues were so bad with my rotary compressor, in order for the motor to fully come up to speed, there must be slight backpressure on the output side of the pump. Once it reaches full revs, current draw decreases, and it pumps slightly faster and to a lower vacuum (although it looks like both gauges I had were crap, and they broke, so I need new ones).

Once I have a nice unit set up with a digital vacuum gauge and such setup for fast/easy use, I'll probably film a short video.

peach - 10-9-2010 at 03:28

A pump that requires additional back pressure? Yikes.

Thanks for the update on these, and a video (with a bit of detail) would be great (once it's uploaded, click 'video reply' on mine and then link to yours, so it's all in one place), since I didn't have one to hand to take to bits and talk about in those videos. If I find one, or anyone would like to post me one, I'll do a video about those too.

I'd also like to look at and take apart the pumps from superfreezers. Donations welcome. ;)

aonomus - 10-9-2010 at 03:38

I've seen videos of 95kW (yikes) scroll compressors, wonder whats in there? :P

When I have it all pretty looking I'll do a video response; it won't contain anything of the disassembly, but I'll try to cover what I know. It is a old R22 new-old-stock AC pump, so it seems to be a pretty good way of getting new pumps without refrigerant if you can source them.

peach - 13-9-2010 at 18:34

I decided to leave these up in case you want to see inside a piston fridge pump more, but I strongly suspect the pressures on the gauges are wrong.

Actual pressure from distillation temperatures and nomograph, ~26mBar, ~20 Torr


<object width="660" height="525"><param name="movie" value="http://www.youtube.com/v/a8i6iaXUI_s?fs=1&amp;hl=en_GB&amp;color1=0x5d1719&amp;color2=0xcd311b&amp;border=1"></param>& lt;param name="allowFullScreen" value="true"></param><param name="allowscriptaccess" value="always"></param><embed src="http://www.youtube.com/v/a8i6iaXUI_s?fs=1&amp;hl=en_GB&amp;color1=0x5d1719&amp;color2=0xcd311b&amp;border=1" type="application/x-shockwave-flash" allowscriptaccess="always" allowfullscreen="true" width="660" height="525"></embed></object>

<object width="660" height="525"><param name="movie" value="http://www.youtube.com/v/akTissGoLY8?fs=1&amp;hl=en_GB&amp;color1=0x5d1719&amp;color2=0xcd311b&amp;border=1"></param>& lt;param name="allowFullScreen" value="true"></param><param name="allowscriptaccess" value="always"></param><embed src="http://www.youtube.com/v/akTissGoLY8?fs=1&amp;hl=en_GB&amp;color1=0x5d1719&amp;color2=0xcd311b&amp;border=1" type="application/x-shockwave-flash" allowscriptaccess="always" allowfullscreen="true" width="660" height="525"></embed></object>

<object width="660" height="525"><param name="movie" value="http://www.youtube.com/v/_0t_ES_O8sE?fs=1&amp;hl=en_GB&amp;color1=0x5d1719&amp;color2=0xcd311b&amp;border=1"></param>& lt;param name="allowFullScreen" value="true"></param><param name="allowscriptaccess" value="always"></param><embed src="http://www.youtube.com/v/_0t_ES_O8sE?fs=1&amp;hl=en_GB&amp;color1=0x5d1719&amp;color2=0xcd311b&amp;border=1" type="application/x-shockwave-flash" allowscriptaccess="always" allowfullscreen="true" width="660" height="525"></embed></object>

<object width="660" height="525"><param name="movie" value="http://www.youtube.com/v/NI_x2dXv4As?fs=1&amp;hl=en_GB&amp;color1=0x5d1719&amp;color2=0xcd311b&amp;border=1"></param>& lt;param name="allowFullScreen" value="true"></param><param name="allowscriptaccess" value="always"></param><embed src="http://www.youtube.com/v/NI_x2dXv4As?fs=1&amp;hl=en_GB&amp;color1=0x5d1719&amp;color2=0xcd311b&amp;border=1" type="application/x-shockwave-flash" allowscriptaccess="always" allowfullscreen="true" width="660" height="525"></embed></object>

<object width="660" height="525"><param name="movie" value="http://www.youtube.com/v/ZGL9M-p35Ik?fs=1&amp;hl=en_GB&amp;color1=0x5d1719&amp;color2=0xcd311b&amp;border=1"></param>& lt;param name="allowFullScreen" value="true"></param><param name="allowscriptaccess" value="always"></param><embed src="http://www.youtube.com/v/ZGL9M-p35Ik?fs=1&amp;hl=en_GB&amp;color1=0x5d1719&amp;color2=0xcd311b&amp;border=1" type="application/x-shockwave-flash" allowscriptaccess="always" allowfullscreen="true" width="660" height="525"></embed></object>

<object width="660" height="525"><param name="movie" value="http://www.youtube.com/v/g05PoZdRbzA?fs=1&amp;hl=en_GB&amp;color1=0x5d1719&amp;color2=0xcd311b&amp;border=1"></param>& lt;param name="allowFullScreen" value="true"></param><param name="allowscriptaccess" value="always"></param><embed src="http://www.youtube.com/v/g05PoZdRbzA?fs=1&amp;hl=en_GB&amp;color1=0x5d1719&amp;color2=0xcd311b&amp;border=1" type="application/x-shockwave-flash" allowscriptaccess="always" allowfullscreen="true" width="660" height="525"></embed></object>

<object width="660" height="525"><param name="movie" value="http://www.youtube.com/v/tvvGeqc0Jro?fs=1&amp;hl=en_GB&amp;color1=0x5d1719&amp;color2=0xcd311b&amp;border=1"></param>& lt;param name="allowFullScreen" value="true"></param><param name="allowscriptaccess" value="always"></param><embed src="http://www.youtube.com/v/tvvGeqc0Jro?fs=1&amp;hl=en_GB&amp;color1=0x5d1719&amp;color2=0xcd311b&amp;border=1" type="application/x-shockwave-flash" allowscriptaccess="always" allowfullscreen="true" width="660" height="525"></embed></object>

[Edited on 14-9-2010 by peach]

aonomus - 13-9-2010 at 19:25

A slightly boring take on rotary refrigeration/AC compressors, and the results.

<object width="480" height="385"><param name="movie" value="http://www.youtube.com/v/-CIoY5gbt9c?fs=1&amp;hl=en_US"></param><param name="allowFullScreen" value="true"></param><param name="allowscriptaccess" value="always"></param><embed src="http://www.youtube.com/v/-CIoY5gbt9c?fs=1&amp;hl=en_US" type="application/x-shockwave-flash" allowscriptaccess="always" allowfullscreen="true" width="480" height="385"></embed></object>

psychokinetic - 13-9-2010 at 19:25

Oh my virgin eyes!

I'll watch them when I have internet that's faster than a backed up mule.

peach - 13-9-2010 at 20:01

HOLY MOLY, you've gone purple! :P

Excellent! To see another person helping on this.

I have a few annoying observations to make, which I don't really want to knowing how hard it is to make these videos but thought they'd be helpful in some way.


I also forgot to point out how the motor will burn it's self out if left in the 'hum' state.

Those filters are SO damn expensive from BOC. They're just a bit of material in a plastic can.

I also missed out what the oil in the pistons was. The oil bit is helpful.

73C YIKES in a few minutes! That's friction for you. Mine was at 51C after 3h+ none stop, with high vacuum grease on the piston. I can see why there are so many questions about cooling these pumps from the US / Canada guys. 150C, I could fry my breakfast on that after an all night distillation.

Subscribbled and ratified.

Thanks again for the video and trying to help!

[Edited on 14-9-2010 by peach]

Magpie - 13-9-2010 at 20:07

Very nice! Kudos to Peach for special comedic effects, and to aonomus for organization and conciseness.

I must say that Peach has tied axehandle in turning his living quarters into an industrial development laboratory. :D

aonomus - 13-9-2010 at 20:10

The cooling issue is a tenuous one at best right now, I can do most things I need such as filtrations, distillations, etc, but keeping the pump at a reasonable temp is the problem, and thats when its running at full speed.

I toyed with over-filling the pump with oil so that the oil will act as a heat transfer fluid to the casing (which I could then add heatsinks to), but all that happens is an oil geyser out the top, that just goes straight through the filter. And the 150degC warning is if the thermal protection switch is installed, which for me it is not. The pump isn't meant for unattended operation.

Also, the small oil/water separator I bought for $10 failed, miserably.

I made a few more modifications, using my 3 position switch to turn on a fan before the compressor (allowing me to run the fan without the compressor running to allow for cooldown periods before fully shutting down), and I need to build a trap, a brute force oil collector (maybe using something like a household water filter for sheer surface area), and a activated carbon trap for organics before they enter the pump (because I don't have LN on tap, or dry ice in a cooler stocked).

As for the oil filters, I believe we have EMF20's fitted to our edwards pumps at work, but the filter inserts haven't been changed in.... [range-exceeded], and oil mist just sprays out the top because the filters are so badly clogged the pressure relief valve pops open. I think we would save more money properly maintaining the pumps vs spending more on vac pump oil....

I'll try to film a quick video once I have the pump traps built (trying to do so on a minimum/zero budget is hard!), but I'm trying to get it set up so I can just regularly maintain it so that I can flip the switch to 'on' and expect the pump to work reasonably well without being a hazard to my health.

Edit:
Quote:
and to aonomus for organization and conciseness.


13 minutes is concise?! I feel terrible about slapping that video together like that, but I didn't want to spend more time on the video than the pump itself.

[Edited on 14-9-2010 by aonomus]

peach - 13-9-2010 at 20:36

@Magpie

Darn right! I'm not letting go on those things until they a.) can't do any better, b.) explode.

The way they are from the factory is just to make things simple for the home user who's never going to want to see it, let alone do anything to it. The R600a means they're essentially designed to pump from a butane cylinder, fairly flammable stuff. The severe lack of rubber based seals or vanes should make them fairly corrosion / solvent resistant also. And they're built to a standard inside where I seriously suspect they can do a lot better than they will straight out of the skip, with not much effort. I have honestly seen Edwards etc brand names that look worse inside, for thousands.

@aonomus
Could you bend a bit of sheet metal into a heatsink, or submerge the pump?

If you remove the can, you may (like I found with pistons) be able to run it on it's own for better cooling? I don't know, those AC things never turn up at the tip round here. It's too cold most of the time to need one, but I love having cool fresh air around. I have all the windows open and heating off right now, and it's 5am in September.

I know that you could theoretically run a lab rotary without the oil box on it, you'd just need to catch the oil in the exhaust and let the pump suck it back in through a bit of tube or something like that (there's a port on the bottom of the pump heads). Again, the box is there to make it look neater and make it easier for the normal users. But it may be worth the slight extra effort required in ripping it off to get it running cooler during 3-6h distillations.

With the solvents thing, it's worth sticking some carbon in the way if only to trap the traces. But, as I say in the nomnomnomograph video, if the thing you're working on isn't particularly sensitive to heat, you can always raise the pressure a little to catch the solvent in the condenser. No need to buy the trap, or the nitrogen. Or even use such a low pressure in the first place.

Remember, the Buchi V700 pump has a pressure of ~10mBar, dead on the piston fridge pump pressure range; 35-20mBar normal, 15-10mBar for two in series or one with vacuum pump oil squirted in.

The Buchi V700 is $2,160! :o :mad:

When doing filtrations that I know are going to clog up (and so boil the solvent), I'll stick the flask in the freezer for a while when I know I'm getting close to needing it. Then wrap it in a microfibre cloth or two.

As soon as the solvent tries to boil on the way through, it's going to evaporatively cool it's self and stop (due to the insulation).

[Edited on 14-9-2010 by peach]

aonomus - 13-9-2010 at 20:58

Chances are what I will do is bend some sheet aluminum (or just sheet metal) into L's with notches on the top/bottom, then ziptie/worm gear clamp them onto the casing with thermal goop. I already have a fan aimed at the casing which helps control temperatures somewhat, I'll report back with results when they mean something.

peach - 14-9-2010 at 12:52

I've just been trying to recheck the gauge I have again against the pump out of it's case. The gauge is almost certainly skewed as it approaches zero.

If my boiling point is correct, it's running at something more like 26mBar.

I also noted that the dial was now reading a little higher than before even with only it connected after the distillations. I tried reapplying some more grease and saw it fall a little again.

That means the thicker grease outside the can idea isn't going to work, at least at the speed it's running (which is likely way quicker than it needs to be to maintain the vacuum; the glass isn't leaking anywhere near 0.2CFM); it's running out of the chamber too quickly.

Options remaining, use a significantly thicker oil (heavy motor grade?) and simply squirt it into the can. Slow the piston down with a variac or step down perhaps.

I suspected that gauge was up to no good, and have seen numerous guys on youtube mentioning strange skewing effects around zero with the mechanicals. I can't triple check it without the hot gauge behaving. Aonomus, are you set up to distill things? If so, have a go with some distilled water (or anything else you can get as a solid reference) and see how that rotary is managing.

If I can find some heavy oil in the garage, I'll give that a whirl too.

[Edited on 14-9-2010 by peach]

aonomus - 14-9-2010 at 20:00

I have the glassware, just not the time. Being gainfully employed can also be quite the detractor to tinkering....

I'll give it a shot trying to do vac. distillation after I make a makeshift drying tube using plumbing parts and CaCl2 prills probably on the weekend, maybe sooner.... I managed to break both my crappy vac. gauges, so it will be hard for me to determine what the vacuum is.

peach - 15-9-2010 at 02:23

Nooooo, I mean, check the vacuum using a distillation.

If you distill something that you know is next to pure (preferably something with a BP over 200C), the temperature it comes over under vacuum can go through a nomograph to tell you the pressure.

And you can check things like your thermometer against a known standard, boiling distilled water and ice made from the same

spong - 16-9-2010 at 22:17

Connecting the tube straight to the air inlet is a great idea peach :D I might have to try that and then reseal the can so the oil can still flow around, I wouldn't have to worry about sucking solvents and water through it then.
I have a fridge pump question though...
I got one from uni today, they were throwing out some fridges and freezers from the biochem building, I couldn't help myself. I got it home and opened it up to wire the plug on and realized the capacitor isn't there :mad: I doubt I'd be 
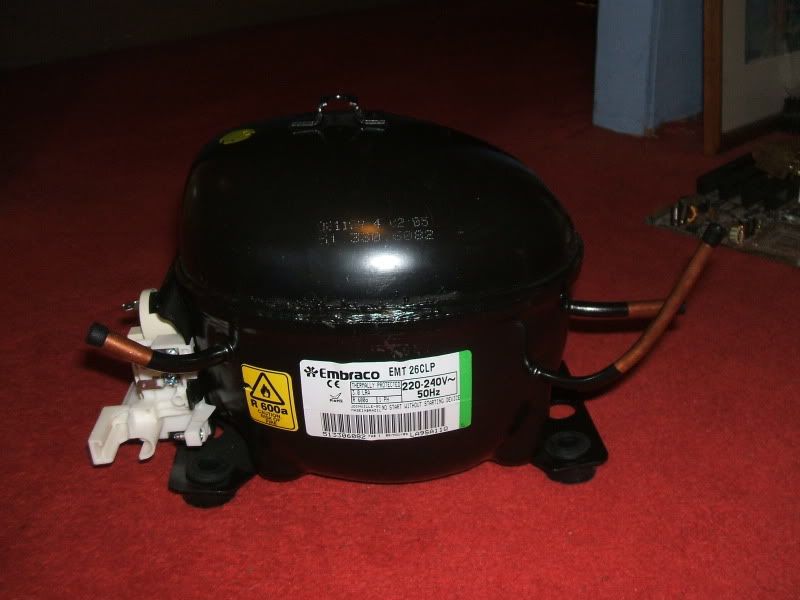
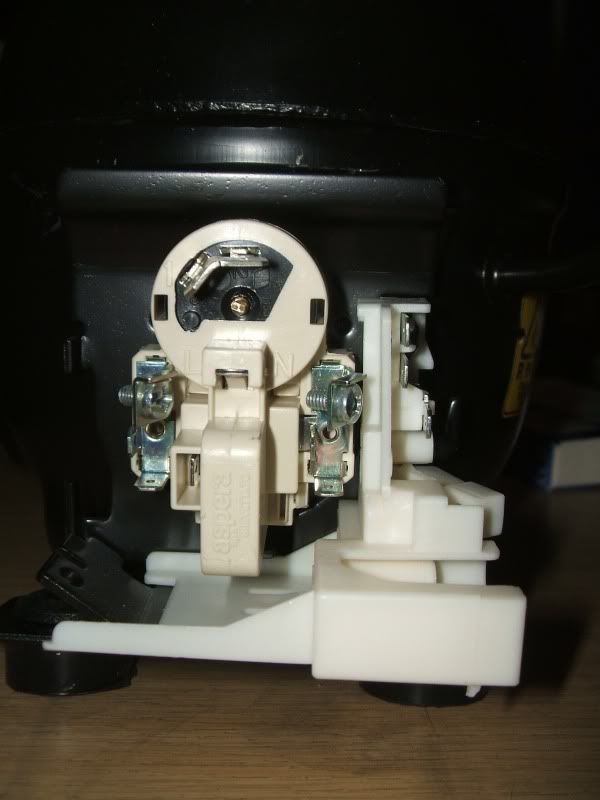
able to get it either without tearing the whole thing apart. There was the power cord which led into the little box on the side of it and a white cord that ran out into the fridge somewhere. The white cord had 4 wires, one earth, one white, brown and blue. the brown and white both connect to the relay I think it is in different spots and the blue attaches to the motor protector along with a wire from mains.
Here's photos, they'd explain it better than me. I was wanting to put the cap from my old compressor onto this one but don't know which two wires to use.


Hopefully I can get this running, I was wandering around the building and saw a few -80C freezers, if this was one of those then I'd have a pretty hefty pump :D


[Edited on 17-9-2010 by spong]

Contrabasso - 16-9-2010 at 23:49

Well my target with fridge pomp vac distillation was(is still!) to distil off nitric acid at something like 60C rather than 80C so that there is still an easy condensation task but a lower amount of red fume made and dissolved. Quite simply bleeding air into the vac line with a needle valve to hit a boil at 60c will do for me. I don't care what the pressure/vacuum is just I want clean WFNA at 1.50x SG

aonomus - 17-9-2010 at 18:56

I just tried a vacuum distillation with water; as soon as I applied vacuum the water started to boil and my max achieved pressure was at 20degC vapor temp, maxing out at 23degC when it really got going (bumping and boiling fast). My condenser water was simply too warm (read: 15degC), so I did end up sucking alot of water into the pump. I ran it for an extra hour and I hope I got all the water out of it.

Using a nomograph, 20-23degC works out to about 40-50mmHg, not as strong as I'd hoped, but that was limited by the vapor pressure of water. If I were to try to distill something like phosphoric or sulfuric acid, I'm sure I could get the pressure even further down.

I think this pump is overkill for vacuum filtrations (read: flask implosion!?) but good for distillations.

Oh, and with the cooling fan I rigged up blowing against the casing (no heatsinking or anything, just the bare painted steel case), external temperature was about 40degC average for the 30 minute run. I suppose enough water got sucked in to help cool it down, as the water started to evaporate, taking heat with it.

Magpie - 17-9-2010 at 19:42

I'm confused as to how you measured your vacuum. If using water I would start out with the water as cold as possible, letting it warm to room temperature slowly under your pump's vacuum. When the water starts to boil I would shut down the pump and measure the water temperature. Then go to a vapor pressure table or graph (vapor pressure vs temperature) and look up the vapor pressure corresponding to the temperature you measured. This vapor pressure is the pressure of your vacuum chamber. I don't see any need for a nomograph.

If this is what you did, then I just didn't understand.

aonomus - 17-9-2010 at 19:57

My basement is pretty darn cold, initial temp of the water was around 8-10degC, RT was 19. I placed the flask in a water bath at 20degC and applied vacuum. On boiling, water temperature was 20degC, as was the vapor. Once the boiling subsided, heat was applied to the water bath, and boiling resumed, with temperature at 23degC constant.

Looks like by vapor pressure ( P = e(20.386-5132/T) ), pressure was around 17-20mmHg (I'm giving this a bit of range for error).

peach - 18-9-2010 at 01:08

You definitely want to ignore what the liquid does at first, it'll almost always start to boil, or at least de-gas, as soon as the vacuum is applied, then stop. Temperature measurements at that stage are fairly useless.

I tried checking mine with eugenol, because it normally boils at somewhere around 250C and I knew the oil was relatively pure, meaning it'll distort the measurements less at low pressures. The glass had also just been given a very good clean and the thermometer is a pricey mercury one from Germany made to a BS standard.

Your 17-20mmHg translates to 22.5-26.5mBar, about what I was getting with the fridge pump out of it's casing.

I suspect, even with a cold basement, that water may be skewing the pressure the rotary can achieve. You may need to give it another go with some reasonably pure, high BP oil and ice around the receiver. Also, try measuring the amount of material going in and coming back out at the start and end of the distillation (with a pipette or scale that will give some level of accuracy given the volume / mass used), to tell you if any has buggered off during the process.

I've tried distilling things like cyclohexane (ATM BP ~80C I think) under fridge pump vacuum. Even with my coil condenser cooled with ice, a remarkable amount has 'disappeared' when it comes to checking the results.

{edit}I have a PDF in the works where I've plotted various methods of weighing against the recently calibrated 0.1mg balance I have access to. I've tried those nasty looking £8.99 0.01g weed dealer scales from China, the digital ones for the kitchen, splitting piles of table salt by eye, using rulers over pens as balance beams and using randomly selected coins out of my pocket as reference masses. The nasty looking £8.99 are keeping a less than 1% error up to about 50g, despite me spilling agar and all kinds of crap over them, overloading them and never calibrating them. The kitchen ones have a huge amount of error in that region, but that then drops to about 1% over 100g. Stacks of coins can also produce a reference mass with vanishingly low errors as the error goes positive and negative over the years by an equal amount, so stacks of them cancel each elements error. Amusingly, I can see the mint tweaking the presses as the mass of the coins changes over the years. There is a very stable, periodic sine wave pattern.{/edit}

@sponge bob square panties

Try starting it without the cap, a lot of them work fine without it. If that fails, I'll double check mine (or check it anyway if I remember next time I'm beside it). I currently have so much to do it's becoming tricky to keep up with it all.

Print, colour in.... :D "I know I've gone outside the lines, but that's okay, because I like bein' myself"


[Edited on 18-9-2010 by peach]

spong - 18-9-2010 at 04:29

Yeah hopefully it would work without it, which pins should I wire the mains power onto? There's three, one of them would be the starting coil wouldn't it? I might have a rummage around that dumpster again on Monday and see if I can pull the cap out, there was some glassware in it too but most of it was broken.
I tried testing my pump out with the water boiling method, 34C, 50mbar... Not too good.

aonomus - 18-9-2010 at 06:30

I think that while my pump vacuum is high, its useless for low boiling stuff unless I can cool my condenser down way below RT using some sort of refrigeration system (that is pretty hardcore).

That might even be my next project, convert some sort of refrigeration system into a recirculating chiller.

Or just get a cheap chest freezer, pop a few holes in the side, add a large reservoir and allow it to cool before starting a distillation.

peach - 18-9-2010 at 06:44

50mBar isn't that bad, it's still going to cause problems trying to distill solvents without some serious cooling on the go, and it's low enough to drop the high boiling oils down towards hot water bath temperatures.

I'll have a look at my fridge victims next time I go down (not long). Telepathetically send me "check the wires" waves.

psychokinetic - 18-9-2010 at 14:13

Peach, would a fridge pump be able to get to such a vacuum that spongebob squarepants would expand to fill a 20L jug?
Would he survive?
Would he go back to his normal shape, or be forever known as Spongebob Flaccidpants?

watson.fawkes - 18-9-2010 at 18:27

Quote: Originally posted by psychokinetic  
Peach, would a fridge pump be able to get to such a vacuum that spongebob squarepants would expand to fill a 20L jug?
I believe that Mr. Squarepants is an open-cell foam, and therefore no.

starch - 19-9-2010 at 23:07

peach thank you for this amazing thread

you have really cleared a lot of questions up for me

thank you very much indeed

take care

peach - 21-9-2010 at 14:44

Quote: Originally posted by aonomus  
I think that while my pump vacuum is high, its useless for low boiling stuff unless I can cool my condenser down way below RT using some sort of refrigeration system (that is pretty hardcore).


I've been watching the rest of your youtube videos and love them. A lot of them are virtually identical to what I'm interested in or thinking of, the magnets in fingers, syringe pumps, arduino's, axel f. ;)

Shame we don't live a bit closer.

In terms of the pressure problems, you can simply bleed a bit of atmosphere into the system at the intake of the pump to raise the pressure.

I'm working on some things you may be interested in. I stuck a pressure and vacuum gauge on a 60ml BD Plastipak and measured a peak of 100psi+ when squeezing it with my hands, before the tiny length of vacuum hose I was using to connect them with started to balloon out. The pressure sits still for a long while, but is slowly dropping on the one I'm leaving clamped (it looks like it's leaking round the seal). I'll report back on where it finally stays put and may try solvents (which would encourage the seal to swell and block the pressure in better).

Sticking the vacuum gauge on there, it can drop the pressure by 9/10th's of an ATM with one pull of the plunger. I don't have a one way valve handy to try lots of pulls.

I'm wondering about pumping solvent, noble gases, reactive gases, circulating jackets, running higher pressure reactions, arranging three in a rotary setup and driving them with a geared microwave turntable motor, using them for flash chromatography and so on. All of which I'm sure you could apply your Arduino talents to or produce something useful with. E.g. use a length of black iron pipe & some caps to hold the syringe and force the plunger down with a stepper. I'm still having major problems getting into microcontrollers. I've tried, multiple times, and am now reading John's book on the MSP430, since I have one. I am worried about picking up an Arduino in case it teaches me to program in a manner too reliant on the compiler and someone else's work; which may scupper my plans down line.

I also put the gauge on a fridge compressor and read 600 - 800psi, mainly towards 800. The nomograph result I got for redistilling some 250C oil under vacuum, run in reverse, would suggest something like 550psi. Either way, it's worryingly high and I won't stand in the same room as it at this early stage of things (that's saying something considering what else I get up to, minus gloves, masks or goggles).

Quote: Originally posted by Magpie  
I'm confused as to how you measured your vacuum. If using water I would start out with the water as cold as possible, letting it warm to room temperature slowly under your pump's vacuum. When the water starts to boil I would shut down the pump and measure the water temperature. Then go to a vapor pressure table or graph (vapor pressure vs temperature) and look up the vapor pressure corresponding to the temperature you measured. This vapor pressure is the pressure of your vacuum chamber. I don't see any need for a nomograph.

If this is what you did, then I just didn't understand.


That will work, but redistilling a suitable amount of a high boiler is going to produce a more stable, applicable to another distillation, result. And distillations is the main aim of the game for most people.

When you shut the pump off on that, oil will start to back stream, so you'd need a tap (I'm guessing this is what you mean). Also, even with the tap in place, the temperature will skew as the solution continues to boil in a now enclosed volume.

You shouldn't be using water, or anything that boils near it, for these tests really. All of these pumps, aspirators included, will reduce the pressure low enough that enough will boil off from the receiving flask to skew the pressure you finally work out. If it boils below water, even ice cooling the receiver won't work.

Hence my recommendation of a reasonably pure, high boiling oil for the test; if you want to see how low it can theoretically go. That's not entirely necessary for a lot of chemistry work, but it is for checking the maximums the pumps can do under the best circumstances. And it's important when distilling high BP oils, which is when a vacuum is really needed.

Quote: Originally posted by psychokinetic  
Peach, would a fridge pump be able to get to such a vacuum that spongebob squarepants would expand to fill a 20L jug?
Would he survive?
Would he go back to his normal shape, or be forever known as Spongebob Flaccidpants?


Squarepants lives under the sea. He'd burst on land, or suffer some form of major brain hemorrhage and clotting issues (he probably has already, so that's not going to help at all).

Quote: Originally posted by spong  
Yeah hopefully it would work without it, which pins should I wire the mains power onto? There's three, one of them would be the starting coil wouldn't it? I might have a rummage around that dumpster again on Monday and see if I can pull the cap out, there was some glassware in it too but most of it was broken.
I tried testing my pump out with the water boiling method, 34C, 50mbar... Not too good.


I might have missed something, but how did you test it if it's not wired to anything? Unless you mean a different pump? :P

Those pins shouldn't be wired direct to the mains. The pump will almost certainly sit there going "Hummmmm" if you do, then it'll burn out and need to go in the bin.

You need to push that starting relay back on there.

Quote: Originally posted by watson.fawkes  
I believe that Mr. Squarepants is an open-cell foam, and therefore no.


This reminds me of aerogel. I've been reading into making that, it looks like fun. Particularly if I can sort out molding it into solid forms as opposed to the gravel United Nuclear sells. That's got to make one brutally compact furnace.

Quote: Originally posted by starch  
peach thank you for this amazing thread

you have really cleared a lot of questions up for me

thank you very much indeed

take care


No problems. The biggest thank you would be for you to start making some similar videos. Too much sitting around knowing things and not telling anyone until they make a mistake, then pouncing and saying 'har har' goes on in forums I feel.

[Edited on 21-9-2010 by peach]

aonomus - 21-9-2010 at 14:54

Quote:
Shame we don't live closer


Canada still respects the Queen for some reason, is that close enough?

Quote:
In terms of the pressure problems, you can simply bleed a bit of atmosphere into the system at the intake of the pump to raise the pressure.


I have a needle valve I managed to get from a welding shop that was used, needed a little bit of cleaning on the inside, but the valve seat was still clean and working.

@peach: shoot me a U2U and we can chat off-board (more convenient perhaps).

food - 24-9-2010 at 23:45

Hi, great work dude; maybe you're tired of hearing that by now. Really though. I've been curious about fridge pumps for a while now, but been put off by what I'd been hearing and reading. Even at an appliance repair shop the fellow told me, 'oh, it will just burn out'. You're videos have answered a bunch of questions, and anticipated even more.

I didn't do more than test the pump in the photo that I've (hopefully) attached, but everything that I'd read about overheating prompted me to wind hose around and against the pump body in a preemptive mickey mouse attempt at cooling. So I find your reports quite encouraging.

I may be back. Politely asking questions. Cheers

(edit; don't know why I can't see the attached pic; will return to this later)

[Edited on 25-9-2010 by food]

Contrabasso - 25-9-2010 at 02:57

Airflow needle valve came from a pet shop (fish tank section) for £2.99 and it's nominally waterproof!

peach - 25-9-2010 at 18:20

No, it's seriously fine, continue telling me how nice I am. Presents, kisses and monetary donations are especially welcome. :P

The overheating thing, anomonus has demonstrated, is a big divide between the US and Europe.

In the US, a lot of guys seem to be using those rotary things from AC units. And his was absolutely roasting in no time.

The piston kind, the little humming black boxes in the backs of kitchen fridges / freezers, they don't seem to have any major heat issues. I've never used a fan on one, and run them for half a day solid, or more. They do get fresh cup of tea hot, but a fan from a computer fan will sort that if you're worried about it.

I have now gone fridge pump cracky, and have been coming up with all kinds of ideas I want to try with them (decent vacuum, 500psi+ positive pressures and they're free, there's lot of things they could potentially do). So there may be more unusual things on the way. I would have put some more up by now, but an item I need has mysteriously gone missing (that kind of missing where you put it down, turn around, turn back and it's gone for two weeks).

I was hoping there'd be some easy way to drop the temperatures even more, but the laboratory super freezers (I've now discovered) are genuinely quite complicated. They use one pump to cool the other. But that's not still out of the question, since I haven't read into it enough (e.g. stick one freezer inside another).

I've also been looking at how syringes perform, the big, wash your horse's nasty cut out, disposable kind. They can be used to generate reactive gases for tests or producing small batches of things. And they don't pop until at least over 100psi.

I think they're polypropylene, which is fine around cyclohexane. One of the key solvents for chromatography. Combined with a suitable polar solvent, they could make a very cheap flash chromatography setup. The current industry innovation in flash is mid pressure, ~150psi. Some domain as the syringes can manage.

Feel free to ask away. The reason I started this thread was to finally clump all the fridge questions in one place, get them answered and move on. Because every forum I've ever visited about science is stuck in neutral with the fridge pump questions.

[Edited on 26-9-2010 by peach]

aonomus - 25-9-2010 at 21:01

So an update: under vacuum, continual operation (1h+ filtering fine metal hydroxides), and with a fan pointed at the pump, I get about 40-50degC, the fan really does help alot. Additionally, getting the motor up to full speed helps alot with the heating issues.


hissingnoise - 26-9-2010 at 11:44

Quote: Originally posted by peach  
(that kind of missing where you put it down, turn around, turn back and it's gone for two weeks).

Oh, right - the kind with two outcomes - 1) wife or SO finds missing item after search lasting 3 microseconds and 2) wife busy (cooking or shopping or whatever), so distressed hobbyist freaks out using foul language in loud voice thereby pissing off said wife or SO; peace only being restored in wee, small hours.
Know them well. . .


Magpie - 26-9-2010 at 12:15

Quote: Originally posted by hissingnoise  

Oh, right - the kind with two outcomes - 1) wife or SO finds missing item after search lasting 3 microseconds and 2) wife busy (cooking or shopping or whatever), so distressed hobbyist freaks out using foul language in loud voice thereby pissing off said wife or SO; peace only being restored in wee, small hours.
Know them well. . .


Recommendation for above:
1) Counsel wife or SO not to enter lab except by special invitation - for their own safety of course.
2) Kitchen utensils are to move in one direction only: from kitchen to lab, never the reverse.

peach - 26-9-2010 at 14:03

;)

If I was going to be pessimistic, I might suggest things like that 'go missing' when they're tidying up.

I think I've mentioned this before, but I've never had any fire problems despite leaving solvent soaked cloths all over the place, it in the sink and on me, whilst I sit around smoking or using a blow torch.

A 'fee-male' cat entered the scene not long ago and, for the first time in around a decade plus, within literally 30s, whooompf.... the surface is on fire, the drain is on fire.... she's shitting her pants.

Reason, attempting to light a candle and then place it next to the used cloths.

When I was in my teens, I was trying to clean bia-tch-umen tar off the bathroom floor at one point, which had been used to stick the tiles down in the days of old. I was sat, with the door closed, with the entire floor drenched in petrol and the can next to me. I turned around at one point to discover, yes... ANOTHER CANDLE had been light nearby. My face was going numb by that point (after hours of the addictive petrol smell), yet even I was still coherent enough to realize that might be a poor choice of time to light a candle, in the middle of the day.

Not long after, that incident, I came home to discover my mum had set the curtains on fire (and they were still on fire). Cause.... candle.

Girls + letting THEM light the candles.... bad, bad, combination. That's probably why their hearts melt when they discover a pro has done it for them.

Star Trek votes pro for domestic violence (upskirt cam);


Anyway, I'm STILL looking for this thing.

I always thought, if God does exist, I'm probably getting stuck in limbo for a few centuries when I die. Where I'll eek out my time coming back as a ghost, moving pens, pencils and other stationary items when they're needed.

"It looks like you're writing a letter, so I'm taking this pen"


[Edited on 26-9-2010 by peach]

food - 26-9-2010 at 20:44

How about oil from the output? Were you saying in one of the videos that you weren't seeing any?

I just powered up one of the pumps that I've scavenged (it's a piston type fridge pump; looks like what you're using). I'm seeing something from the out tube. You can feel a faint something on your fingers in the output stream, and a piece of tissue shows something after a few seconds. Unless that might be residual traces of refrigerant coming out the oil? It's only been run out of the fridge for an hour or so. I do have the tube aloft, above the pump.

I anticipated getting some kind of a filter on that if the pump is otherwise usable.

Got a kick out your elastic band ball. I cadge elastics directly from our postie regularly. He's a bit more 'enviromentally conscious'; many of them just drop them on the pavement.

pump_1.jpg - 280kB

ok, cool, got the snap up; my nice elastic bands, oh, and a pump. I've not been running it like this, I jerry rigged the cooling hose after all the alarmist overheating info that I'd read (or misunderstood)

as shown, the kitchen/lab tool migration has been eliminated by merging the two locations

peach - 27-9-2010 at 11:46

I see what looks like 115V written on the side of that, meaning you may be in the US right? If so, that may be one of those rotary type ones anonononmus was talking about, which is much more likely to spit oil out. You can hear in his video that they make quite a lot of noise at atmospheric pressure. Where as the piston kinds make very little and pretty much go silent under vacuum (to the point that people think they're stopped running).

Try putting a glass cup over the exhaust and cling filming the top over, then let it run for a while. If there's a serious oil problem, you'll see droplets on the walls, or a puddle at the bottom.

If it's a piston kind, that may just mean it's settling and has gotten some oil in the pump head when you started moving it. If it keeps doing it, you'll want some form of oil capture on the exhaust if it's going to be running at or near atmosphere for ages.

I just noticed on a very new piston pump I removed, the tiny expansion bulb is packed with something. I haven't cut it open but, if I shake it, I can hear something that sounds like little pellets or beads in there (about 2-3mm big judging by the sound and the fact they won't pour out of the tubing attached). I wouldn't be surprised if those are just little chips of metal to catch any oil mist and send it back.

The oil capturing thing doesn't need to be complicated, a bit of copper tubing (from a bin / skip) soldered on there and filled with something suitable (glass beads, BB's, lots of tiny springs, swarf / chips from a lathe, wire wool) will give the mist somewhere to collect and drip back down from.

I had a gigantic Alcatel pump at one point, which would usually be £2k+, and the oil trap on the exhaust was just a tube with a big spring in it.

When the pump is under vacuum, the misting should drop WAAAAY down to practically zero. It's the gas flowing through that's blowing the oil out. With no (or next to no) gas going through, there's nothing to blow it anymore.

Lots of the references for using these fridge pumps come from the guys using them in the opposite direction, to give positive pressure for airbrushes, spray guns and the like. They're using them in a way where oil will be hugely encouraged to leave the pump because they're running around atmosphere so much of the time.

If you're worried about the oil level dropping, chop the end off that oil fill line on the top left in the picture and you can squirt some more in with a syringe, no problems.

I like the cooling setup happening there. You didn't ever work palletizing boxes did you? I did. 12h shift on my feet continually, and an hours bus ride each way. The sound of the factory never left my brain, even as I tried to fall asleep.

[Edited on 27-9-2010 by peach]

food - 27-9-2010 at 14:49

I'm in western Canada, not far from where Fraser empties into the Strait of Georgia.

I'll take your suggestion with the cup, see what happens.

As far as the pump, I'd be surprised if it's not the piston type. Everything that I've seen so far, without doing pump surgery, indicates: piston. It's dead quiet. Like you say, you could miss that it's even running.

Not so much concerned about losing oil as breathing it, or air-brushing the room with it:)

You're a psychic ! I did work crating and/or palleting boilers and furnaces for a (brief) time. At that time I don't think that saran wrap type products had made their appearance in the shipping department. In an unguarded moment the air powered wood stapler came to rest on my boot and drove a 2 inch staple through one of my toes, straddling the bone. Ahhhh, happy memories!

peach - 27-9-2010 at 16:27

If it's super quiet, it's almost certainly a piston one yep.

Try letting it run for a while. It might just be that some oil as splashed up the intakes inside.

Tell you what, if that level of oil mist worries you, never buy a lab rotary. The room looks like a rainy cloud has taken up residence about after about two minutes at atmospheric.

I'm not psychic, I can simply see the force flowing within the wrapping, the Jedi signature. Even if cling film wasn't around then, it's omnipresent nature seems to have become part of your packing soul afterwards.

I got really pissed off at one point and the machines were permanently set to run slightly quicker than the humans could pack, so packing ran at maximum speed and there'd be a pile to get on with when something went wrong. I packed one pallet with all the boxes sticking out at wonky angles and then everyone got upset (the pallet came back). They even had hourly graphs of packing performance up in the washing 'airlock' to encourage line to line competition. Bastards.

food - 28-9-2010 at 16:41

After a big google push searching discharge and oil mist filters it finally dawned on me that draping a hose out the window is an option too. We'll see.

I do have an ancient Edwards ES100. I traded labour for it. I got a pdf from absolutevacuum.co.uk, and a manual from the interweb. I've not done more than run it up. It's a beast alright, very noisy, oily etc. I think that it may benefit from a tune-up. The manual is a treat; 'Care and Maintenance Manual' for ES and ED 35, 75, 150, and 250, and ED500. I could upload that if there is interest (18M).

That job sounds .. special. Like a Charlie Chaplin movie. That's my polite take on it; good that you managed to escape.

Cheers

peach - 28-9-2010 at 17:34

I've taken an Edwards to bits.

The complexity of doing it depends on how good you are with your hands. It's either going to end up a.) broken b.) fine

If you have experience machining things (know what a surface grinder is etc), welding, are good at DIY'ing, you'll probably be okay with it.

Taking them to bits and changing the oil doesn't always increase the vacuum. And the vacuum degrades quite drastically on them as so much starts leaking / boiling at their maximum vacuum. If the vacuum level is poor, try degassing the oil first, as there may simply be something dissolved in it (like a solvent or other volatile). The degassing can take a good while. Block the intake and leave it running, checking the pressure every half hour or so. If it keeps falling once it's hot, there's probably something in the oil (water is a good possibility). Leave it going until the reading sits still. The manufacturers claim 0.001mbar, but the reality is, most of them are floating around 0.05 to 0.1mbar after they've been used a bit; particularly if you're not super duper careful with them. Easily enough for distillations (too much in fact), but that theoretical factory rating doesn't last all that long outside of the physics labs (where they spend their lives sucking down chambers full of dry, noble gases).

It's also reaching into the pressure ranges where simple push fit rubber hose connection leak enough to distort the pressures if they're not tight and left alone. I can see the vacuum changing if I lean on the hose. Which is why they have those compression flanges on them and use bellowed pipes that don't bend so easily. At the diffusion / turbo / ion pressures, the rubber in the seals begins to bleed, so they use discs of copper. The flanges have knife edges on them that pierce the copper and seal the flange. Then the disc goes in the bin when the chamber is opened.

On the subject of taking lab pumps to bits, the insides are usually a.) the same as a fridge pump in terms of casting and machining b.) if they're a few years old and have been run near anything damp (like the atmosphere), they'll look like a cake of rust inside, unlike a fridge pump (the pump head is usually cast iron and will rust in hours once the grease is off). The rust isn't an issue provided the mating surfaces are still good, which they universally should be if they've mated corrected. They're surface ground and have oil constantly trapped between them, so it's hard for water to even get in there once they're clamped together.

If you take it apart, have a big tray / box next to you and expect oil everywhere. As every single part comes out, drop it into a cup for that section and put it in the box. Some of the bits are tiny and essential. Fire up the digital camera and take lots of photos in case you forget where things go.

I've also bought things from absolute vacuum before. I can tell you right now, that picture of a military jet on their logo does quite an injustice to their service. Which is piss poor by normal standards. I'm still waiting for a reply from them, week two later, and they have my money.

If I call them, they tell me to email them. If I email them, they don't reply. They're selling used vacuum pumps, not nuclear bombs ffs.

[Edited on 29-9-2010 by peach]

food - 28-9-2010 at 18:19

For a while I was itching to get the thing in pieces. I didn't do that yet. A whole bunch of reasons.

To mate a hose to the vacuum input I found a suitable plastic barb and siliconed it in. Well that works, how well I'm not sure. I ran it with the input closed and the ballast open for an hour, maybe longer. Didn't seem to make that much difference. Not changed the oil yet, didn't want to spend the money. I'd been expecting a fiercer vacuum from this item, it is after all a 'high vacuum' device. (disclaimer: these forays into vacuum pumps are something new for me; don't have much related background to draw on)

I was thinking, well, maybe the vanes are worn or deteriorated, which might affect the performance.

I'll be giving it some attention at some point.

It would be nice to have a guage to check pressure. I came across a suggestion on a hobby site today that mentioned vacuum fuel pressure guages from auto stores. Don't have much cash to throw at this right now. At around $15 canadian sounds too good to be true, but maybe handy for not-so-low-pressures?

Disappointed to hear about your absolute vacuum experience. My illusions lie shattered. I had been suitably impressed the way that they got right back to me with that pdf. I got an email from them yesterday, oddly enough. 'dear customer, we're moving, this is our new address', that type of thing. Maybe the move has buggered up their response time.

Cheers


peach - 28-9-2010 at 18:49

Silicon seals will work fine at distillation pressures, don't stress. I've checked it, they do. So will epoxy glue. You just need to be sure it's not on a connection that'll be routinely knocked around and bent.

As I show in one of the videos, I can put my hand over the intake on the rotary pump (below 1mbar) and it's fine (I've seen a guy doing it with a 40CFM rotary with a roots blower on top of that). You can't judge the vacuum that way as an absolute vacuum is only ever -atmospheric, not -200bar. You'd have a far, far worse time trying to inhale off a freshly filled cylinder of nitrogen. About 200x worse.

Neither is a $15 auto guage going to get even close to accurate on rotary pressures. I have a fairly expensive mechanical gauge that you see in some of those videos, it still can't deal with it.

This is where vacuums start getting expensive. Sub 100mbar and down below 1mbar, you need expensive gauges. Look for mechanicals that start at 100mbar (1/10th atmospheric) if you're going the mechanical route, not 1000mbar (atmospheric). 1/10th atm is where volatiles start boiling around room temperature, and where high BP oils boil at water bath temperatures (you should be using a foil TP, not baths).

Also in those videos, you see the fridge pumps and aspirators are right down near the outer space line compared atmospheric pressure. It's a massive leap for the gauge to make, trying to read accurately in the last 1% of it's range.

Physics labs will usually have quite a few different, very expensive, gauges on a chamber, involving things like Iridium (a platinum group metal). And they'll break if switched on at the wrong time.

Auto gauges are designed to deal with atmosphere to the turbo pressures. And a turbo in a car is no where near the turbo in a physics lab.

This is why I go on a big anti-rotary campaign a lot of the time. Under those pressures, the solvents boil too low to capture, the pumps costs a lot, maintaining them costs a lot and the gauges are expensive. And using them for a solvent boil off is the wrong idea in the first place if you don't have liquid nitrogen in the condenser. Even dry ice isn't cold enough for solvents under rotary pressures. Then there are yet more problems. Liquid oxygen collecting in the condenser. Storing the cryogens, pumping them, the hazmat delivery on the cyrogens, the training needed to handle them. The cost rockets up into the thousands (new dual stage edwards $2k? controller $1k? trap $200+?, cryogenics $xlotsmorex, special vacuum taps $more). For what? Lots of TRULY unnecessary, counter productive zeros? Solvent in the pump? Even curly arrow has fallen into the trap, and other chem bloggers, of thinking a rotovap should go on the latest rotary pump. No. Even Buchi says no, and then charge you $1-2.5k for their pump, which works at fridge pump / cold aspirator pressures.

Talking about pressures, here's my thought for the day. Even in space, the maximum pressure differential is only 1 atm, 14psi. At the bottom of the Mariana trench in the sea, the pressure is about 16,000 psi with humans inside. That's not messing around!

Jelli-fishies in the Mariana trench (it's 6-7 miles down! :o and pitch black, at 16kpsi).


[Edited on 29-9-2010 by peach]

food - 28-9-2010 at 21:12

LET THIS SIGNAL THE BEGINNING OF THE FRIDGE PUMP QUESTIONS!

alternate title

you make some good points, more in line with my economy as well

thanks

the rifters books are set in and around Mariana trench; free online for your reading pleasure


peach - 29-9-2010 at 09:08

Provided they're all in one thread from now on, that's cool also. It was having the splattered all over the forum and being repeated that wasn't helping.

peach - 29-9-2010 at 09:10

Provided they're all in one thread from now on, that's cool also. It was having the splattered all over the forum and being repeated that wasn't helping.

psychokinetic - 29-9-2010 at 11:34

Quote: Originally posted by peach  
Provided they're all in one thread from now on, that's cool also. It was having the splattered all over the forum and being repeated that wasn't helping.

Quote: Originally posted by peach  
It was having the splattered all over the forum and being repeated that wasn't helping.

Quote: Originally posted by peach  
being repeated that wasn't helping.

Quote: Originally posted by peach  
being repeated

Quote: Originally posted by peach  
repeated.


Nice one.


food - 5-10-2010 at 17:21

ahoy ahoy

didn't want to get back to this before I'd actually done something with the pump

I did, I put together a very diy buchner funnel and used it to do some filtering. Worked super well. If anything it seemed I could have gotten by with less vacuum. Did I read something about using aquarium parts to bleed air into the system? It would be nice to be able to moderate the vacuum.

Also, peach, in one of your videos you mentioned getting quirky results once your pump was warmed up. That's getting ahead of things for what I'm doing, but if you have any comments about that it would be interesting.

I'm not going to worry about guages right now. No budget for it really. I did put some warm water into a flask and put the vacuum on it, after a few seconds it came to a boil. I have a few pieces of glassware, but no thermometer adapter.

Also putting the oil dispersion concerns on hold. Running it briefly to filter stuff it's not bothering me.

Meanwhile an idea for hose, when you don't have the right stuff: if you've got softer hose that your pump and the barbs on your glassware will accept, it can be stiffened with a very rigid, narrow white hose that the hardware stores carry (not sure what you'd call it, it's white and not transparent). Your pump and item-to-be-evacuated are connected with the softer hose, inside the softer hose you have a length of this very stiff, narrow hose running barb tip to barb tip. Kind of cheesy, but it work[s|ed].

Cheers

aonomus - 5-10-2010 at 18:06

My macgyver oil trap is simply a mineral oil plastic bottle (the same one used to store the old ester oil and used to contain the new mineral oil that the pump was flushed with) with a hose in the neck of the bottle and a few cotton balls jammed into the gap. They act like a good enough filter to be cheap yet knock down probably 99% of the oil fumes/water droplets. Plastic bottle also means no shattering risk under pressure.

peach - 5-10-2010 at 18:10

A long spring, or anything like that will do as well. In the UK PVC tubing is stiff enough it'll work, because it's quite a bit tougher when it's cold.

You can use anything to control the vacuum so long as it creates a controllable hole.

The quirky results thing, sometimes if I leave some of them on for hours, the pressure starts bouncing up and down a bit, which bumps the flask and the temperatures. I haven't tried it yet, but I suspect putting two in series will get rid of that.

The precise pressure isn't super important a lot of the time. If you're distilling something and you know it has a big percentage of some splittable component in it, you'll see it appear on the thermometer at some temperature. So long as the temperature sits still, it's doing what you want it to, distilling it without much oxygen around and at a significantly lower temperature.

Knowing the precise pressure is only important when you're trying to identify something using the boiling point as a piece of evidence. If you already know what it is and that there's lots there, that's not a problem.

Filtering things, the pressure is easily low enough. If it won't filter on a fridge pump, it probably won't do much better on a lab pump.

One of the main problems with filtering things as the paper or sinter starts to clog is that the pressure in the flask and around the filter drops really low. The solvent then boils and cools it's self to a near solid. So the filter element literally freezes up and zero will go through. That could actually happen worse with a lab pump, as the lower pressure isn't going to help pull things through much, but it will boil the solvents way below zero.

I've had some filtrations where it'll literally all day or days to get them through. The solution isn't high vacuum;

Wrap a super dry, fluffy towel around the vacuum flask, preferably all precooled. When the solvent tries to boil, it will rapidly stop as it can't pick up anymore heat to do so.

Stick a second hand, ultra cheap, adjustable hot air gun near the filter element and stem and gently warm them up.

That can get those same filtrations done in minutes.

If that fails, fire up the stirring. The very CAREFUL stirring. ;)

food - 5-10-2010 at 18:29

@aonomus you mention 'new mineral oil', is that just to replace dirty oil or are you changing to different oil to improve performance?

@peach that's pretty funky that business with the solvent state change, I wouldn't have expected that. What's that about careful stirring as he final option, stirring what?

peach - 5-10-2010 at 19:44

The filter cake.

That is the last resort. If it's a paper filter, there's a good chance you'll rip the paper and dump your thus far hard won cake into the flask. Much swearing will follow. If it's a glass sinter, you'll damage the sinter and make cleaning it a whore of a job. Lots more swearing and possible alcohol problems as you deal with buying another funnel.

The solvent solidification thing is a bit unexpected and it took me a minute to work out what was going on when I first saw it happen. But it can stop a filtration dead, so there won't be a single drop coming through.

It starts happening when you're dealing with very fine, packable cakes and volatile solvents. Precipitates with a particle size around 10um or below are a good bet it's on the way. :P

It's also more prone to happen with sinter / frit funnels, because the cake will clog the entire surface the vacuum is trying to suck through, and effectively produce a stopper in the top of the flask. Solvent boils off in the sinter, the rest coming through solidifies. The problem snowballs too, well, iceballs. It starts, clogs a bit, makes it's self worse, cools more, clogs more, cools more and so on until it's solid.

Pretty much anything that forms visible grains or crystals, or only has a tiny amount of fine muck in it, will be fine though.

[Edited on 6-10-2010 by peach]

aonomus - 5-10-2010 at 19:51

Mineral oil was used to flush out the ester oil that the AC compressor contained. The ester oil is as the name implies, an ester of some carboxylic acid and alcohol. Water vapor will hydrolyze the ester oil and make it non-lubricating, causing wear on the pump and overheating. With the old ester oil it heated up far too much, but once I got it hot, and drained all the oil, flushed it with a few 100 mL of new mineral oil, drained that, and put in brand new mineral oil, it ran cooler and should be more resistant to water vapor causing corrosion to the pump.

Unfortunately the change in oil also means an decrease in the maximum achievable vacuum (vapor pressure limited), and that the mineral oil seems to really easily flow out of the pump, through the oil trap, and into the oil collecting bottle.

peach - 5-10-2010 at 20:19

With the inclusion of a drip tray, you could use the surplus to deep fry. I bet deep friend, freeze dried product is mighty greasy. All the better for my Atkins diet. :D

food - 5-10-2010 at 20:38

Ok. The sinter/frit problems are luxuries that I don't have yet. My homemade funnel barely lasted through the job that I used it in before the disc buckled. I'm filing this away though. For future frozen filters. That and the heater-towel solution. Looking forward to cooling my own cakes at some point.

And solvent stripping. I'd been thinking that with a pump it would be that much easier to reclaim solvents. Only now seeing that the lower boiling point could turn out to be only one side of the coin, ie. recondensing the solvent might be an issue. We'll see.

As for the oil type, I've no idea what is in there now in the way of oil. When you said mineral oil do you mean the mineral oil that you'd buy in a drugstore, or are you referring to a mineral oil type of oil?

aonomus - 5-10-2010 at 20:52

I used USP mineral oil, but in general mineral oil refers to long chain alkanes. USP mineral oil is used as a laxative, lubricant, etc.

For solvent stripping, you'll either need an absurdly large surface area for condensation, and/or cold condensation surfaces. You'll find one or both of these in most rotovaps (water temperature varies, but even under strong vacuum a rotovap will still collect a good amount of solvent being removed without much trouble.

food - 5-10-2010 at 21:43

thanks for the replies

that rotovap thing sounds cool

what part of the fridge do I salvage that from?

night

edit ooops, I was negligent when it came to reading through the beginning of this thread (I skipped right to the videos:)). Your compressor is a different type than mine. Mine is labeled R12 and if I'm understanding correctly uses a different oil. So these considerations don't apply. Please correct me if I'm wrong in this. Again, thanks and good night ~food edit

[Edited on 6-10-2010 by food]

peach - 6-10-2010 at 02:56

"15 pounds of yogurt!? I can't eat all that!"
"Ho ho! It's not going in that end, boy!"


I've read A LOT of blogs and messages on the web, by people who have degrees in chemistry, about connecting rotovaps to dual stage rotaries and even high vacuum lines, which are sometimes running from diffusions elsewhere.

Then they complain about regulating the vacuum and the cold finger not being effective enough, so go out and buy yet more stuff to try and fix a mistake they've already paid a few thousand too much for; connecting the rotary / high vacuum line to it.

Nomograph.

Buchi's own line of pumps run around the pressure of a fridge pump / aspirator, but cost thousands.

Think about the quantity of handy gear the money for those over specified pumps could have bought if spent more carefully. Lots.

In terms of at home chemistry;

A fridge pump will get volatiles with a 100C BP at atmospheric pressure right down to the point where an ice cooled coil can have difficulty. You'll certainly want the receiver in a salt / ice bath if there's going to be a lot of solvent coming over, or it'll boil out of that too and through the pump; wasting solvent. I tried it without cooling the receiver and using cyclohexane on a fridge pump. About 80% of the solvent went missing.

Having dry ice and liquid around for home chemistry is fairly advanced stuff for most people, and a lot of effort. So ~20C is the minimum you'll want for an ice cooled condenser.

Even Buchi's running dry ice traps can struggle around those pressures, because they're pulling it off at a huge rate compared to a normal distillation, so it moves past the condenser quickly. Cold fingers, of coarse, have a pretty poor surface area by comparison with a double jacketed coil. So relying just on the temperature gradient is pushing one's luck.

The other option is nitrogen, liquid. Then those same chemists complain about oxygen collecting in the fingers and traps. Not realizing they can easily raise the BP to a number of specific temperatures, so it'll condense the acid gases but not fill the trap with liquid oxygen (which is quite likely to catch alight or explode depending on what else is in there).

Buchi rotovaps already cost a darn fortune considering something very similar can be achieved with glass that will do other tricks as well.

Add a rotary, and it's going to end up costing a whole lot more in terms of controllers, traps, cryogenics, taps etc. I mean, close to $10k. All to remove some solvent.

I can certainly see their uses for heavy use, intensive lab work where saving a few minutes is important. But I fear too many of the chemistry student coming through now will be far to used to the pull the handle and press go approach.

That would be okay, provided it worked every time and was cost effective. But with each rotovap sinking a good chunk of a member of the teaching staffs salary, and then sometimes pulling the solvent through to the pump or unacceptably bumping, that's a bit much.

There are also cheaper ways to build a rotovap than Buchi are using. I may give them a go at some point and challenge the Buchi empire.

[Edited on 6-10-2010 by peach]

aonomus - 6-10-2010 at 04:17

As a side issue, rotovaps exist that are fully self contained, computer controlled that vary the bath temperature and vacuum pressure (via variable speed diaphragm pump) specific to each solvent you are using (preprogrammed in). An example is the Ika RV10 (look on youtube, the video is like porn for chemists). TBH I've never had to go higher than 60degC on an air aspirator setup with my rotovap at work, but the air aspirator is fairly weak compared to a water aspirator, or, a vacuum pump.

A vacuum pump is only good if you know how to use it and you're not brute-forcing the problem by trying to max out the vacuum to strip solvent really really fast.

peach - 6-10-2010 at 05:44

Precisely.

And using an air aspirator is dead on, as the BP of most volatiles approachs 20C as the pressure get's to around 50mBar. Which is a warm water aspirator, fridge or diaphragm pump.

I just did a search for the RV10 videos on google and the first link I clicked, World News, had my videos on there. This is my 15 minutes of fame then, complete with a 6 year old girl's headband on.

That IKA is not as expensive as I was expecting it to be with all those motors and displays on there, but at $4k it's still a fair chunk of cash that would need you to be doing some intensive boil offs for it to be worth it.

I'm glad your guys at work have figured out that theirs will actually mong out if connected to a rotary or high vacuum line. As the majority of web based things I've read have been the opposite. Going straight onto some monster pump and then wondering why it keeps bumping like a jiggly girls ass on MTV, or why the pump oil is constantly filling with solvent.

I'd buy one for at home use if I could get hold of a rotovap cheap, but I'd spend money on more normal glass first (more beakers, stirring rods, weighing boats, blah blah blah). A rotovap is, of coarse, useless if you have nothing needing it's services. And a lot of the glass that produces things that then go into the rotovap will also evaporate solvents very quickly.

It's all down to evaporation speed alone. So the savings in evaporation time have to balance out the massive capital cost for it to be worthwhile. I can empty a 500ml flask in not a lot of time just with a stir bar and hotplate. In a uni lab were you have 30 guys all trying to run things through, the extra minute or two is important. At home, hmmmmmmm, questionable at $4k.

I saw a funny TV show from the US, a cookery one. Expecting to see hand whisks and folding spoons, to my surprise, he had a brand new Buchi sat on the worktop.

That's not an ice cream machine. :P

I know they do food science at school, but that's taking things a bit far.

compressor oil

food - 6-10-2010 at 08:18

aonomus' comments on oil and oil changes sent me off on a google quest. For the benefit of those who may follow I'll summarize.

Due to concerns in the late 1980s over the negative impact of refrigerants on the environment moves were undertaken to switch to more 'environmentally friendly' materials. Newly built hardware comes with the newer refrigerant and older models may be retrofitted. google 'r12 r134a retrofit refrigerator'.

Along with the newer refrigerants comes different oil in the compressor. I have two scavenged compressors; both piston driven, with the familiar dome top. The older is labelled R12, which was the older 'bad' refrigerant. The newer is labelled R134a, the new refrigerant. The older model will use mineral oil, the newer one will most likely use a synthetic oil.

The very hydroscopic nature of some of the new oils and their tendency to hang on to the absorbed moisture may be a factor in the long term viability of the compressor as a vacuum pump(?). Older and newer oils differ in other respects as well, and ought not to be mixed.

This is all new to me so I can't say what the implications of different oils are, however if you're looking to top up your device you may want to keep this in mind.

watson.fawkes - 6-10-2010 at 12:42

Quote: Originally posted by food  
The older is labelled R12, which was the older 'bad' refrigerant. The newer is labelled R134a, the new refrigerant. The older model will use mineral oil, the newer one will most likely use a synthetic oil.
The restriction on lubricant comes from the refrigerant, not the pump. If you aren't using a refrigerant, you have a rather greater choice of lubricants, including petroleum oils. The only thing to really get right is to clean out all the old lubricant first, as some lubricants aren't inter-compatible (i.e. don't mix them).

food - 6-10-2010 at 14:21

good to know

switching oils may be something of an 'experiment' though. Whilst googling the oil business I was coming across posts describing issues with the newer oil leaking where the older (heavier?) oil hadn't been leaking after doing conversions


[Edited on 6-10-2010 by food]

spong - 10-10-2010 at 02:14

I got my new fridge pump working :D I ended up cutting off the extra blue wire and wiring the white and brown together. It gets down to 40mbar using water to calculate it, I then put this one and my old one from the shop fridge in series, they quickly boiled water at room temp and at 13C, giving 15mbar using an online calculator. I knew they could do better than that with more time so I tried clove oil, it boiled at 64C, assuming a boiling point of 255C the calculator gave a pressure of 4mbar :D
Provided eugenol/clove oils heat of vaporization was somewhere around 43KJ/mol (does anyone have this data by any chance?) and the clove oil has a boiling point somewhere between 248-260 then that's a pretty good vacuum :)
Thanks for the help/ideas Peach, it didn't need a capacitor after all that :)

peach - 10-10-2010 at 02:34

EXCELLENT!

I happy success story.

With two of them, you now have the option to span pretty much the entire pressure range needed for practical distillation, and can jump between two pressures by just disconnecting one of them.

The pressures right to me.

They'll be slightly higher than they would with a gauge only on the port due to the distillation not performing 100% efficiently, but it's close enough.

You can't use them as precise numbers for determining BP's on different materials, but they're close enough that you can estimate where a main band should be, and spot it when it appears as a likely candidate.

[Edited on 10-10-2010 by peach]

trichosaurus - 18-11-2010 at 18:40

Silicone Compressor Oil?

Recently scavenged a compressor pump from an R134a shorty fridge that runs nearly silently so i'm guessing its piston based. The factory lubricant is most likely an ester oil of some sort to be compatible with R134a and would not do too well in wet filtering or distillation applications. I have relatively cheap access to silicone oil :D, and am wondering if any of you have had experience with replacing factory lube with this silicone oil in fridge pumps. A quick google search suggests silicone oil is preferred for vacuum applications due to low out gassing. Any incompatibilities if there is still a bit of the factory lube left in and mixed with the new silicone oil? Any suggestions as to removing the factory oil from the sealed can? Thanks

@Peach many thanks for all the info and splendid videos!


[Edited on 19-11-2010 by trichosaurus]

[Edited on 19-11-2010 by trichosaurus]

food - 2-12-2010 at 21:19

food here .. with some feedback. I'd been wondering about the oil making it out of the .. output end. I picked up a basic filter from a place supplying parts for air tools etc. It was CAN $10. Very basic. When I searched I discovered a wide range of filters for various devices that could be presed into service scrubbing the compressor outlet. ie. This site may be of interest to other members, http://www.mcmaster.com .

Budget and convenience moved me to pick up this item.


pump_filter_0.jpg - 189kB
I haven't used the pump much, but it seems to be doing 'something'. There's a valve, lower right in snap, to drain off captured oil. That's about it. I mounted it on the copper outlet tube with a section of plastic hose for gasket.

The pump is very quiet. I forgot to power it down and it was on for around 40 mins or so just inhaling away. After that, depressing the valve on the filter gave a little gush of oil. So, yes, it is doing something.

In anticipation of longer runs I've upgraded the cooling system. From latex bondage spirals (earlier snap) to a cooling unit scarfed from a computer. It's like an auto radiator with a pair of fans; needs cold water and 12VDC. Also seems to work and to do 'something'. Sucks down the temperature on the pump housing.


pump_filter_1.jpg - 108kB

I'm expecting good things from this.

aonomus - 5-12-2010 at 16:16

A revisit after a month or 2 of hard usage: multiple vacuum distillations of solvents, vacuum filtrations (with controlled air leak to reduce pressure differential) with corrosive filtrate (read: HCl!!!) and other various bits of abuse (a fair amount of solvent and water being pulled through but dried by allowing the temperature to rise while drawing air straight through the pump) I have something to report.

The pump still lives on, after multiple oil changes to standard drug store mineral oil, I get 24inHg as the strongest vacuum possible at this moment in time. Perhaps corrosive vapors caused damage, however I suspect more of the problem has to do with the natural vapor pressure of hot mineral oil itself. It already vaporizes readily at about 120degC under atmospheric pressure, so at 40-50degC I would suspect a fair bit of it is lost as vapor and is reducing the maximum attainable vacuum.

Other than the drop in maximum attainable vacuum, the pump is a little harder to start, taking an extra second or 2 to really start turning once I hit the start winding, and it takes a few minutes on 'low' before the start winding can be turned on again briefly to push it into full power. Keeping a fan blowing across the casing does help with the heat, though a cold bath may help the situation more.

Edit: a thought that came in mind was that perhaps the 24inHg measurement may be inaccurate. Considering that the pressure gauge I have is an Omega, -30inHg to 100psi gauge, perhaps its accuracy is to be questioned at the low end of its range. I will order a full scale 0-30inHg gauge next chance I get.

[Edited on 6-12-2010 by aonomus]

aonomus - 17-12-2010 at 19:10

Apologies for the necro, I got a more accurate vacuum gauge. Actual vacuum is 28.5inHg. Pump still going strong, but starting is becoming harder.

IrC - 18-12-2010 at 20:31

I think you guys are wasting your time using these pumps unless you are looking for a distillation setup or a roughing pump. 40 mb = 30,000 microns if I did the math right. For a decent laser you need to get down to say 60 microns or lower. The link below is only a hundred bucks, 126 with shipping, and gets down to 37.5 microns. Assuming you blow half this trying to get a vacuum system built out of a refrigerator you are not gaining much. Double that amount and you have a brand new pump which will do very well. Myself I look at the pumps you are using as roughing pumps at best. I used to use one for this reason just to save on my expensive pumps, never turning them on until the roughing pump has gone as far as it can. Later I found a surplus rotary in need of a rebuild so it only gets to 150 or so microns as my roughing pump, replacing my old refrigeration compressor pump. Just seems to me the pump below is a better use of your time.

http://cgi.ebay.com/3CFM-REFRIGERATION-AIR-CONDITIONING-VACU...

I have a question for someone. What kind of glue sticks to plexiglass and seals down to say one micron. My vacuum station gets down to near 60 microns, and my big pump takes it down to just under a micron. I posted pics of the station elsewhere. I took it out of storage, meaning to build my own CO2 laser for years but never getting around to it until recently. Anyway I was down to 11 microns and heard a crack, the Plexiglas is half inch thick but I fear it is gone now. Imagine a 14 inch square surface with inlet in center. Glued to the Plexiglas surface is a neoprene disc which the bell jar sits on. My fear was after seeing the crack that while the bell could hold a micron, the Plexiglas could suddenly implode upwards into the bell jar. So I set out to rebuild the entire top deciding to tear it apart and add a metal plate under a new sheet of 1 inch Plexiglas to eliminate the possibility of implosion. The worst that could happen now is the metal starts to pull up cracking the Plexiglas surface, yes wrecking the top forcing another rebuild but eliminating the implosion risk.

When I first built the station 60 microns was the best I could do, by design I had already added a port to connect a better pump but until recently 60 microns was my limit. I know the Plexiglas - epoxy - neoprene works as I have pumped the bell jar to 60 microns, shut the valve and seen it hold there all day, implying the epoxy was sealing to the Plexiglas well.

I used epoxy to glue the disc to the Plexiglas surface. What appears to be happening now is around 11 microns the disc starts to swell upward and leaking begins. As far as I can tell the epoxy does not 'wet' the Plexiglas. Maybe 'wet' is a poor term, by this I mean the air seems to be leaking between the hard epoxy and the Plexiglas surface. The epoxy is rock solid and firmly stuck to the Plexiglas, yet this is the only route I can find for air to leak in. I would have thought the interface between epoxy and Plexiglas would be thin to a very microscopic degree yet it appears air is actually finding it's way under the epoxy. So my question is, considering out gassing and other important parameters, what type of glue does anyone think would be good to glue the disc to the Plexiglas surface?

If you study the link below you will see the piston pump is the poorest vacuum of any on the chart.

http://www.highvacpumps.com/engineering/pressure.html


As I hate reading these pages to see useless dead links I will swipe their image and leave it here, just in case the link ever goes dead.


[Edited on 12-19-2010 by IrC]

pressure.gif - 22kB

aonomus - 18-12-2010 at 21:21

I would argue the point that these setups are 'useless'. These are good for a roughing pump and/or distillation/convenience vacuum filtration pump there is nothing as cheap and sacrificial. Not everyone has access to cheap pumps from Harbor Freight either. I'd agree that a $75-100 rotary from Harbor Freight is essentially sacrificial, but if you can't get your hands on one....

For physics experiments however, I agree that these are mostly useless.

Regarding your cracked plexiglass: A thought comes to mind. Pull a *light* vacuum and drip DCM into the crack, allowing the vacuum to suck it in. Let it work its way in and then leave it to dry, the solvent weld will be better than nothing.

I think that if anything, the distortion in the plexiglass disc is causing your leaks. Perhaps if your plexiglass is clear underneeth (ie: no steel backing plate), you could drip water into any possible spots where leaks could be occuring and let the liquid show you where leaks occur visually.

IrC - 19-12-2010 at 17:17

Quote: Originally posted by aonomus  
I would argue the point that these setups are 'useless'. These are good for a roughing pump and/or distillation/convenience vacuum filtration pump there is nothing as cheap and sacrificial. Not everyone has access to cheap pumps from Harbor Freight either. I'd agree that a $75-100 rotary from Harbor Freight is essentially sacrificial, but if you can't get your hands on one....

For physics experiments however, I agree that these are mostly useless.

Regarding your cracked plexiglass: A thought comes to mind. Pull a *light* vacuum and drip DCM into the crack, allowing the vacuum to suck it in. Let it work its way in and then leave it to dry, the solvent weld will be better than nothing.

I think that if anything, the distortion in the plexiglass disc is causing your leaks. Perhaps if your plexiglass is clear underneeth (ie: no steel backing plate), you could drip water into any possible spots where leaks could be occuring and let the liquid show you where leaks occur visually.


No argument, this is precisely what I said in my first line.

"unless you are looking for a distillation setup or a roughing pump"

If 20" Hg is good enough Gast pumps come to mind. They will run 24/7 no problem. Around $200 everywhere I looked online but I see these in the $10 or $20 range used - good all the time. Have a half dozen of them but the only decent use I have is when I built my vacuum desoldering station.

I agree for my physics madsci they just were not good enough. Anyone wishing to get a good enough vacuum for even a simple glow discharge will be wanting. In the early 60's I did the refer thing out of necessity and/or poverty but they are messy and like to burn up with long use. Bad design for what we do since most designs to circulate the oil with the freon, at least the ones decades ago did. Never looked at any newer refrigerators for this use since I long ago gave up and bought a good pump, able to get down in the 65 micron range.

The disc is not Plexiglas it is the neoprene gasket glued to the surface of a new sheet of Plexiglas. I am wondering if the crap from wallmart is too blame. Did the formula for cheap Chinese epoxy change? When I first built my vacuum station I bought epoxy from Ace hardware. For this new job I bought a few tubes of epoxy from wallmart. In the last 2 days I cleaned it up and re glued a new gasket down. After over 24 hours to cure it did the same damn thing. Air comes in under the gasket and lifts it (watching through the bell jar) pulling the epoxy from the surface. This crap never was an issue even once when I built it years ago. The epoxy is the problem. So I ask again, any ideas on glue?

Today I tried using a ring shaped gasket to eliminate the center portion lifting up. Better until around 200 microns then leaking between the Plexiglas and gasket occurs, this time using grey epoxy from Home Depot. Seems the surface of the Plexiglas is so smooth nothing sticks well enough. This is perplexing as it looks no different than the old top except the old one is cracked now. I guess I am off to find a better material but Plexiglass was easy to work. Would be harder to drill holes for vacuum and electrodes if I used a slab of marble and metal I shy away from as it is a real pain to run electrodes through it running in the hundred KV range. Ceramic standoffs take up too much room and are damn near impossible to seal. Also ozone from corona was a pain and lowered voltages which is why I went to Plexiglas years ago.

I miss the large insulated top but I am trending to a 14" square sheet of 1/8" stainless if I can find a sheet cheap enough.


[Edited on 12-20-2010 by IrC]

aonomus - 19-12-2010 at 22:14

A more flexible cement comes to mind like rubber cement. Perhaps the distortion in the acrylic plate is causing cracking. Perhaps construction adhesive?

IrC - 19-12-2010 at 23:23

Sounds worth investigating. One thing is out gassing. Where would one find a chart showing how well various adhesives do in this area I wonder.

Before anyone says UTFSE I have. Seems this is not a parameter much published when it comes to different glues.

I should clarify, pages like this: http://techbriefs.firstlightera.com/EN/Microsites/1/Master+B... are easy to find. Which is why I chose epoxy the first time. What is hard to find are specs on out gassing for glues I can buy locally. The sheet of Plexiglas the first time came from a tank for etching circuit boards. The sheet in question now is new. What I am wondering is if the old sheet had some difference in the surface which allowed epoxy to grip the surface better than a new one. Outside of scratches over the years the two do not appear different.


[Edited on 12-20-2010 by IrC]

aonomus - 19-12-2010 at 23:30

Outgassing studies aren't typically performed for epoxies or other compounds if they aren't intended for highvac use. Aerospace and other applications that are offgassing sensitive probably run long term studies at various pressures and temperatures to try to determine the limits of their material, then advertise those as a selling point (ie: performance X at price point Y).

Out of curiosity, why neoprene specifically? Could other materials like a rubber sheet be used? Forgive me if I don't know much about high vacuum materials, I normally don't encounter them at all.

IrC - 19-12-2010 at 23:43

I don't know. I used what I could find or salvage cheap. The one place I asked for a price wanted $90 for a disc 9" Diam by 7/16" thick. Everywhere else I browse seems just as bad in terms of cost. I need to find a big sheet from somewhere they print magazines. Not sure it's composition but that stuff is tough as hell. Neoprene is all I could find cheap. Not as tough and smooth as the first build using an old sheet from a friend who ran a press for Arizona Outdoor magazine.


Contrabasso - 3-1-2011 at 15:20

Looking at a fridge pump as a PRESSURE pump, has anyone any real world experience. I have a task that needs 100psi in very little quantity. Quieter would be better so not an ordinary paint spray compressor please

IrC - 3-1-2011 at 16:55

Fridge pump will give 100 PSI no problem. What works very well at either end is a car AC pump on an electric motor. I mounted an extra AC pump on a truck with a pressure switch set to open at 120 PSI to deactivate the compressor magnetic clutch from the 13.8 volt system. Fed a tank under the floor mounted to the chassis, which had a 200 PSI blow off valve (as I always have a backup) leading to an air chuck on an air hose. Great flat fixing tool. Would have been a great vacuum pump if I needed it. In my mobile air setup I had a filter on the vacuum intake to protect the compressor.

Hey you reminded me A, I had a near the radiator mounted dryer from a car AC between the pump and filter. Had forgotten that as it was the 70's at the time. At least I remembered to do that at the time. No trouble starting it with the engine running but you have a good point about starting the fridge pump against high back pressure. Would not be an issue if he could find a refrigeration compressor in good shape built in the early 1960's.


[Edited on 1-4-2011 by IrC]

aonomus - 3-1-2011 at 17:00

You can use a reciprocating compressor from a small fridge as your compressor which would give 100psi easily.

I would recommend putting both an air filter and drier on the compressor intake to protect it from rusting or wear. Additionally the pump would be unable to start under pressure most likely, so you would only be able to charge up your air tank until it dropped below a certain level where the resistance provided by the air backpressure is low enough to be overcome by the motor.

peach - 4-1-2011 at 02:44

Quote: Originally posted by Contrabasso  
Looking at a fridge pump as a PRESSURE pump, has anyone any real world experience. I have a task that needs 100psi in very little quantity. Quieter would be better so not an ordinary paint spray compressor please


I have some news that'll make you wet your pants.

I attached the gauge from my oxygen regulator to the output of one (I'd hard soldered a suitable fitting on there) and it was reading 700-800psi.

Please be well aware of how dangerous this is. Mr Piranha manicure here was hiding behind a brick wall, inside the house.

There is no way I'd stand right beside a first attempt at it put together so messy, that amount of pressure needs more care - I was just checking it, not trying to use it.

I HAVE used them to power airbrushes. They work brilliantly for that.

And I know a number of guys have attached them to cylinder to go up to 100psi.

They are orders of magnitude quieter than a typical compressor, which you'll have to shout over.

I have opened a number of used laboratory vacuum pumps. So far, the pump head has looked like a bit of iron you'd find on a beach, as it's not submerged in the oil bath and, while it's sitting doing nothing, the oil that sprays around inside drips back off the head.

INSIDE the pump head, they're still super clean, because there's a film of oil wiped all over it.

The fridge pumps I've opened, even ones I've put water vapour and steam through, have shown no signs of rust. Inside the head it's self, as with the lab pumps, it's always been spotless. Must be something different about the metal they're casting them with.

But a filter, as anomalous suggests, might be a good idea since it can be as simple as a test tube with some drying agent in it.

I still have the gauge hanging off the side of that pump in the garage. If I can dig through the plumbing fittings, paint, sanding belts and countless other bits of junk I've been using these last few months, I will try to make a quick video for you.

I did make one before, but had to format the computer, and lost hundreds of photos and video clips.

[Edited on 4-1-2011 by peach]

aonomus - 4-1-2011 at 04:51

Well, I'd go a significant step further than a test tube with dessicant. I'd load a large clear tube with 2 plugs of color indicating drierite at each end with a large plug of drierite (plain) in the middle so you know when you have to regenerate. After the drier I would add a fine particle filter so that any dust can't get sucked into the filter. Also of note: weigh the 'dry' mass of the drying tube since a known quantity of drying agent can handle a certain weight in water its theoretical limit can be determined. The practical limit is probably a good deal less, but its still a reference point as to when you need to start looking out for water.

Back on the rotary vane compressor front, I've noticed that each time I've started the pump it gets harder and harder to do, though I suspect it is because I haven't changed the oil in a long, long time. I'll have to empty out the whole pump and flush it out with some oil to see whether the starting improves. I doubt the inside of the pump head is actually rusted, more likely some of the bearings are starting to get seized up with all sorts of organic crap floating in the oil.

1281371269 - 5-2-2011 at 09:09

I recently bought a fridge compressor from eBay (I know I could have got one for free, but this was £2.40 brand new). I plan to use it from time to time for filtrations and perhaps reduced pressure distillations, if it has the oomph.

I've done some research online, watched a number of of the videos in this thread and read through some posts, all of which has been very helpful. However, I'm having trouble with something 100x more basic than most of what has been discussed - how do I actually wire it up?

http://chisko.com/prodotto-146273/COMPRESSORE-perfor-R600a-G... - the most detailed information on the pump I can find (basically what it says is that it's a 1/10HP pump for use with R600a refrigerant)

Here's a picture of the pump:


Don't know why, but I find it extremely aesthetically pleasing. Probably the smooth black egg-like shape

Here's a picture of the electrical connections:


So my questions are:
Can I just wire it up to a 230v mains outlet? (The label on the side suggests that I can, but I want to double check)
If yes, where do I attach each wire?
If no, what other bits and bobs do I need to get it going?


A couple of other things:
The 'service' outlet - should I just ignore it?
Do I need a manometer?
How vital is an air bleed?

Thanks for the help,

Mossy.

[Edited on 5-2-2011 by Mossydie]

1281371269 - 5-2-2011 at 11:05

Just found this:
http://www.embraco.com.br/portugue/produtos/informativos_pdf...

If you scroll down to the bottom it has various electrical diagrams.

Help is really appreciated - I'm way out of my depth here.

entropy51 - 5-2-2011 at 13:36

Quote: Originally posted by Mossydie  
Help is really appreciated - I'm way out of my depth here.
I was able to use the very, very old compressor I have by just:

1. Connecting the house mains current to the two proper terminals and

2. Momentarily connecting a starting capacitor across the two proper terminals with a pushbutton switch. The switch is depressed until the unit starts (a second or two) and then released.

If your compressor is this simple you basically just have to identify the proper terminals and find a start capacitor of the proper rating (microfarads and voltage). The tables in that pdf should help with this. Good luck!

peach - 5-2-2011 at 15:08

USE A LOCAL CIRCUIT BREAKER!

{edit}I have also just noticed a mistake I am making in this post. That is not a starting relay, it's the overload switch


Awww..... it still has the caps on from the factory, the innocence! :P

£2.30 isn't bad at all. If you can get one that cheap, may as well save yourself the hassle of possibly get bitched at by the bin guys and ending up with a dead one.

I'll post some photos of the ones I have so you can compare yours with mine, it's always nice (to me) to know what's happening INSIDE a black box or WHY something works. In fact, I like it so much, I'll often break things in working it out, or otherwise retard my life (e.g. revising) in wanting to understand it rather than just memorise it.

The compressors tend to have lots of connections on them because all the wiring in the fridge, for the light, door switch, temperature control and so on is done from the side of the compressor; lots of the connections are simply repeats of other ones, another point to connect the mains powered bulb to for example. The guys wiring the fridges up at the factory have all the wiring terminated in push on spade connections, so they can jam them onto the connections as yet another fridge goes past.

I suspect the layout for this one is as follows;

Brown is live, the fused wire from the plug.

Blue is the neutral. Those visible strips of metal in the circles are all two pieces, but each piece is one strip, so all the connections on that strip will be for live or neutral respectively.

That alone should be enough to get the pump going, if you wire a fused plug to those two. The compressors are low wattage, so use a low value fuse like a 3 amp. That way, the fuse will burn out before the compressor if it ever gets stuck for some reason. It also means you won't roast yourself so badly if you get stuck to it, in a bad way.

This isn't necessary, but for the sake of understanding what's likely going on, I'll add it anyway - others might find it useful working out different layouts

The bit circled in green and yellow, I think may be the earthing points. Obviously, the can of the compressor is one big metal lump. There are also circuits inside the fridge that are at mains voltage when it's working normally, and damp, and metal tubing people can poke knives into when defrosting. You can check if this bit is the earthing block, as it will feature some form of direct metal to metal connection with the case of the compressor.

I have put two red arrows points to those spare push on terminals. I think those are likely connected to the strips beside them, but the connection is hidden under the plastic. If you have a multimeter, or can borrow one, try setting it to Ohms and touching one probe against the terminal and the other against the strip beside it. For example, use one probe on arrow 1, and the other on the bit circled in brown. If it reads a low value (probably zero), it's all the same piece of metal. But there are TWO separate pieces in total, one for the live and the other for neutral - with a 230Vac difference between them. If you put your finger between the bit circled in blue and the bit in brown, you'll get a nasty shock.

The bit in orange is pointing to the starting relay. This is basically THE ONLY electronics needed to power the pump up. The relay is inside that little black circle with the adjusting screw on it. Inside, it's two bits of sprung metal. The pump needs a push to get it running. There is an extra winding on the motor coil inside. When power is first applied, that coil runs to get the pump going. Then the relay switches it off. It happens so extremely quickly, the start coil only needs to give the little piston a flick - like starting a prop plane engine. Don't mess around with the adjusting screw or try to take the black circle apart, it'll probably die in the process, and finding replacements is tricky enough you may as well dump the compressor and get a new one. The relays are basically all the same thing for every compressor, and even feature similar pins, but they're moulded into different shapes and won't physically fit into the different mouldings on other brands.

You can actually pull this whole white assembly off, and the black circle, without breaking the compressor. Just underneath that black circle, there are three pins sticking out the side of the casing - they look like tac nails. They're the ends of the wires on the motor inside, and they're welded or brazed to the can from the inside, to make the seal gas tight. The starting relay, and this white bit full of other connections, just pushes onto those. There are three pins because two of them are for the motor and the third is for the extra starting winding, which the relay flicks on and then off when the compressor is plugged in.


The purple bit looks like a bridge connection for something to do with the relay. If it's one strip of metal with no connections on it, ignore it.

The ENTIRE area in teal is a serious shock hazard, as there are exposed mains connections and most of the compressor is metallic. You need to put the cover back on, insulate some other way or be extremely careful when moving it. Given how much exposed metal there is, and what you'll be using it for, it is best to insulate it, as you can easily spill or splash things on it. Also make sure the connections are either pushed on so hard they take a lot of effort to get back off, or solder them on. I have had some of these where the connections where loose enough they'd fall off. The main risk there isn't sparks and explosions, it's you thinking the power has gone off and poking around with it, only for it to zap you.

When I first took one out of a fridge myself, alone and in my early teens, I didn't bother a circuit breaker or putting the cover back on. The pump went silent, as normal, once it'd pulled a vacuum in something. I had left it going for hours and forgotten it was on, then picked it up. It wasn't until I had a firm gasp of it with both hands, that one of my fingers touched the exposed mains connection, and I took a serious hit of joo-joo juice through the chest (as my other hand was on the can). I wouldn't want someone else to repeat that.


GIMP, unlike photoshop, is free.


Here's an example of a pump minus the extra connections. The only thing left is the starting relay (contactor), the live and the neutral. There should really be an earth on there too. Note that the relay is exactly the same thing, and in the same place as yours, but a different shape. This is also the pump that the factory fittings fall off if I so much as turn the casing; they need crimping on better than that.


The actual pump it's self, which sits on springs inside the casing. The motor is fairly big, and VERY quiet, so you could score a decent motor from one of these for another project if you like. I believe it is a brushless induction motor. Brushless means that there are no points for sparks to come from. This is important as a lot of refrigerants are highly flammable gases, like pentane. Brushes also wear down, so not having them significantly increases the motor's need for maintenance to essentially zero. It will almost certainly run without the starting relay if it's not connected to the piston (which is where all the friction is). The motor's spindle has only one bearing surface, at the top, and I suspect it's simply a well bored, possibly honed, bit in the cast iron, not an actual ball bearing race. Despite this, the spindle spins with almost no force once the piston is removed. The spindle is hollow, and dips down into the oil sitting beneath the motor in the casing. As it spins, oil is pulled up through it's centre and bleeds out through the top to oil the bearing surface, cam and piston; kind of how it does in a car if that makes it easier to understand.

The clunking you hear when shaking a fridge pump is this bit wobbling around inside.


This is the top of the motor. The entire pump is made up of very few cast iron, or possibly steel, components. In fact, there is very little inside there bar iron / steel and the enammeled magnet wire. At the top of the spindle is a little eccentric cam. This drives the equally tiny piston back and forth; it's about the size of a Rolo (for the UK guys :D). The square block over the piston, with the cam on it, is where the oil comes up to lubricate it all. The oil doesn't spray out like a hose jet, it bleeds through.

The two dome shaped things towards the front are the points at which the compressed gas exits the piston chamber, via a length of thin copper tube brazed into the cap. I have been messing around with this one, that white PTFE tape is not usually there. Instead, the caps are sealed with little rings of what looks like resin soaked paper. I expect they are put on wet, and dry once tightened to seal the compressor up.

I am unsure why there are two domes. There has been two in every compressor I've opened, yet one of them is never actually connected to any tubing.

I can only assume there is a reason for it being there, because having the production line people screwing an extra cap on wastes time. And time is money. It may be used in different models, and this is a standard casting.


The gas returning from a fridge usually re-enters the pump head through a plastic scoop / nozzle on the front of the pump head. I've been gluing bits of copper tubing into the hole to try something with this one. The scoop is normally a piece of white plastic and looks like snorkel of some description; I suspect they're all made from polyethylene. It's worth noting that, when you use these as vacuum pumps, you will be connecting the vacuum hose to the connection where the gas usually comes back in. This is NEVER actually connected directly to the pump head it's self. The returning gas is usually used to help cool the motor, so it swirls around inside the casing before going back up the snorkel. This is not particularly important. You could argueably make the compressor even less prone to corrosion and explosions by making the connection directly, but I have run so many solvens through these I can't remember them all, and they're designed to have highly flammable things in them; things which are used as solvents in labs. It also doesn't matter so much if you plan to connect two in series, to increase the vacuum. It DOES matter if you plan to try putting two in series to create a high pressure compressor, as you will be pressurising the second compressors can to the outlet pressure of the first, which is over 500psi. BAD things may happen on doing that. With one compressor alone, it is a lot less dangerous as, if the compressor head pops, the flying bits will be caught by the metal casing, and the casing will be open to atmospheric pressure, so it can discharge pressure buildup. Also worth thinking about is that gas being compressed will be travelling over oil, which can ignite or explode in the presence of compressed oxygen.

Whilst the casings are thick steel, welded shut, their thickness may vary from model to model. Some pumps also feature dents in the casing for fitting a drip pan to the top, where condensation from inside the fridge collects and then evaporates back into the atmosphere over the warmth of the running pump. These varying thicknesses, none uniform shape and dents mean that the pressure holding capacity of each pump may be vastly different, adding another danger to running them in series for high pressure use.

I have not seen any signs of corrosion in these pumps, yet, that come ANYWHERE close to the levels I've seen inside used laboratory pumps. I suspect the lab pumps are suffering not just from moisture, but more likely the reactive gases being pulled through them. Either way, provided the corrosion is only on the outside of the pump head (which it universally is in my experience) it's not much of a problem. The outsides of the pump head can rust because the oil film drips back off them when the pump is switched off, whereas the chambers stay oiled. The outside is also more open to the atmosphere. And I suspect even people like Edwards are using the lowest grades of cast iron they can manage.

The 'magic' of the compressor happens just behind the plate that is bolted on at the front. There are thin strips of sprung metal that act as valves. When the piston moves forward, one closes and the other opens. When it moves back, vice versa. Without them, the compressor would do very little.

Again, the plate at the front appears to be bonded to the rest of the pump using some form of phenolic paper, which has been applied wet with glue. As it needs scraping off when the bolts are undone.

You can reseal the parts with vacuum grease if you take one to bits, as the paper seal will be ruined when it's forced open. There are actually very few points for the compressor to leak through.

One point someone has raised is that the valves are a likely candidate for what limits the compression ratio of the pump, that they don't seal perfectly. Indeed, there is no rubber seal in there, it's an oil film. I have tried replacing the oil with high vacuum grease, and it seemed to help.

So I am VERY interested to know what the pump might achieve if one added an extra, better quality, one way valve to the line on the outside. Perhaps this could give us our 1mBar pressure without having to open them up.

I will add it to the TO DO list. Just below, find a valve and afford a valve.


Here are the pins the motor makes it's connection to the outside world through. There is also an earth connection fixed directly to the casing at the same point on this one.


Here's another example. Remember that all three of those pins connect to the motor windings, none of the PINS are an earth.


This is the front of the pump with the plate and valves removed. You can see the remains of the washer I was talking about.


The smaller copper tube is the higher pressure outlet, and it is connected directly to the pump via one of those domes on the top, and brazed into place.

There is a wider bore copper tube there and there will always be two of these that don't connect to anything on the inside. This is so the factory can fill the pump with oil more easily. By having two wide tubes sticking into the side, there is no back pressure when they pump the oil in.

They then crimp and brazed one of them shut, as it's no longer needed - you will see it sticking out the side of pumps in the backs of fridges.

You can connect your vacuum line to either of these, as they both enter the pump in the same manner, through the casing and then nothing more. However, one of them will be connected to the rest of the fridge, and you'll need to cut through that to get the pump out, so you may as well use that one and leave the crimped one alone.

You can tell which line is which, our of the two connected, without opening the pump and before it is taken out, as the high pressure one will usually have an expansion bulb on it (which looks like a little CO2 vessel used in nitrous oxide and CO2 drinks fizzers).

Once it's out, you can tell just by switching the thing on and blocking one of them with your finger.

You can operate the pump with both the wider lines open to the atmosphere. You can drill endless holes in the casing if you like. But it WON'T produce a vacuum until all but one of them is blocked up again.

You can go even further, as I did above, and cut the casing open, provided you make a direct connect for the vacuum line to the pump head, as the casing is not longer providing the seal.

There are reasons for which you may want to cut the crimped tube open again. For example, to drain out the oil. There is no immediate need to do this, they work fine as they are.


This is the other side of the pins. They are brazed or welded to the casing, as all the connections are. The motor's leads connect here, and the relay sits on the other side.

There is another of those wider opening tubes, the line IS NOT connected to anything inside the pump and it is where the gas returns; the gas simply flows into the casing and up the snorkel on the pump head.

The amount of oil in there is roughly what you see in the photo, it's a about 150 to 250mls from memory, a puddle at the bottom.

Why drain the oil? If you, like I have, dump a lot of solvent through the pump, it may reduce the maximum vacuum it can achieve for a while, as the solvent will spend a long time evaporating off again. You can sort that by simply blocking the vacuum intake and leaving the pump running.

A more interesting possibility is, I have tried swapping the original oil for genuine vacuum pump oil, and seen the pressure decrease. It is likely the manufacturers are using higher vapour pressure oil because it's runnier, produces less resistance and flows into the gaps better, and because they don't need anything better.

As with the extra external valve, swapping the oil for genuine pump oil may be an easy modification that could drive these pumps down to the seriously handy level.

And again, I will attempt to investigate this with a more precise gauge. I have already tried it once. The only concern I have is that the pump does seem to run warmer, and sticking a computer fan over the top may become a good idea with thicker oils.

I have also tried cutting the cans open and coating the entire pump head in thick grease. It does work to reduce the pressure, but it is FAR too much effort and the grease needs continually putting back, by hand. So I rule that out as a useful, easy idea.


This is one of the dome caps, with the high pressure line still brazed on. You will sometimes find an expansion bulb / mist filter INSIDE the pump and connected to this line. I have shaken a few expansion bulbs and heard the rattling of what sounds like fine grains, which is why I suspect they are also functioning as mist filters in the newer models. And it may be an idea to leave the external expansion bulbs on the pump when you cut it out, for a spare exhaust filter in the deal.


You MUST use a breaker with this kind of thing. I know they usually seem to do sod all, but here you have large lumps of exposed metal, exposed mains connections, possibly loose connections, conductive salts and solutions around and you are likely not 100% sure of the wiring. The chances for a shock are very high.

Forgetting the shock problem, the breaker will also act to compensate for some of your mistakes. If you manage to wire the pump incorrectly, either this breaker or the mains breaker will flip when it detects a residual current or over current fault; which happens faaaaaar faster than a fuse can manage. You should only really consider fuses as a last line fire defence, as opposed to something that'll rapidly stop faults or shocks.

The response time of circuit breakers, and the mains ring they are feeding, is actually part of the Part P building code. The breaker has to be able to trip within a set time for a specific circuit or application, which corresponds to a specific quantity of energy being delivered to the person shorting it on the other end. They get picky enough about this that qualified electricians have to check the ring impedance (not simply it's resistance) to sign it off as safe.


[Edited on 6-2-2011 by peach]

 Pages:  1