woelen
Super Administrator

Posts: 7976
Registered: 20-8-2005
Location: Netherlands
Member Is Offline
Mood: interested
|
|
Displaying elements collection in a non-standard way
I now have a nearly complete set of element samples, some of which are really beautiful. I already have been thinking of making my own periodic table,
from wood, using high quality backlight LEDs with high color reproduction index (CRI 95+), so that the display really stands out in the evenings.
I, however, am thinking about a way to present the elements in a more creative way. It is important that the periodic table still can be recognized
and the order of the elements can be inferred from the display, but the display should provide room for additional samples:
- different allotropes of a single element (e.g. red and white P, grey tin and shiny tin, red and grey selenium)
- different ways of displaying a single element (e.g. chlorine gas, and a saturated solution of chlorine in CCl4, solid iodine and a beautiful deep
purple solution of I2 in CCl4)
- samples of different sizes. E.g. small samples of gold, osmium, and big beautiful crystalline samples of bismuth, arsenic.
Finally, I also want the display to contain a few selected beautiful looking compounds, which are representative for some elements.
Probably, this method of displaying forces me to leave the idea of little boxes, one box per element, but I really want the periodic table to be still
clearly visible in the total display. Otherwise it becomes a random collection of samples. For some samples, I could leave out borders, and e.g.
between N2 and O2 I could put a beautiful sample of NO2 as binary compound of N and O. I also have a great looking sample of SO2Cl2 and one of PBr3
and PBr5, all home made. Giving such samples a place, without making a mess of the display, needs more creative thinking.
I myself already have some ideas, with "floating element borders" and adding a third dimension, one layer for the elements and the other for compounds
(giving at the same time more space for mounting the illuminating LEDs), but more ideas always are welcome.
|
|
|
j_sum1
Administrator
Posts: 6218
Registered: 4-10-2014
Location: Unmoved
Member Is Offline
Mood: Organised
|
|
I also have been thinking about non-standard ways to show the elements.
I have always wanted my element collection to be something of a tactile experience -- that certainly is how I have used it.
What I want is for each sample to tell its own story about some essential property of the element. So, for lead I want a 15kg ingot of not
particularly pure metal so that people can appreciate its density -- and the fact that it is pretty cheap. For carbon I want people to see the
difference between synthetic and natural diamonds and to see and feel several different forms of graphite. I have a titanium rod which is rather
shiny, feels indestructable and, if you are useed to handling steel and aluminium, it just seems to be the wrong weight. I want people to feel the
density of bromine as it sloshes in the ampoule and notice that it does not wet the glass. And also that it tends to vapourise if you warm the
ampoule in your hand. I have a nice piece of molybdenum foil which has developed a dull yellowish oxide coating and makes a weird twang noise if you
flex it in your hand. Some of my samples are very small. Some are large. The differences between are part of the story of each sample.
With all of these different samples I have not yet come up with an excellent way of presenting the collection. I just don't think a flashy display
cabinet will work. Best results at the moment happen when passing around a dozen or so elements in a small group and talking about them. But I would
like at least some of the samples to be a bit more self-explanatory with good labels and captions. At the moment the collection is in a couple of
carry boxes and poorly labelled and not entirely satisfactory. I am looking for better ideas.
|
|
|
woelen
Super Administrator
Posts: 7976
Registered: 20-8-2005
Location: Netherlands
Member Is Offline
Mood: interested
|
|
Fun to read about your use of your collection. It is very different from how I will use mine, but also very nice. Letting people experience the weight
and feel of samples is very nice.
The collection I have is smaller, it is to be displayed in our living room. We have a wall, which may hold a display cabinet, nearly two meters wide
and no practical limits on height and depth.
The construction will be such, that it can be displayed, but it should be possible to take out element samples and feel their weight. I intend to buy
a large number of high quality glass beakers, in which I can put glass ampoules such that they are not simply lying flat on a surface, but can be
viewed fully, while standing at a certain angle. I will buy beakers of different size for different size element samples. Such beakers are available
at very good optical quality. The display will not be cheap (I think it will cost EUR 1000 or so, with all wood, LEDs and glass), but for something so
unique in my living room I think it is worth the money.
The outer frame will be a sturdy wooden frame, capable of holding two hinged pieces of glass, so that the cabinet has a glass cover, which protects it
from becoming ugly due to collection of dust, but at the same time allowing samples to be taken out by opening a glass door.
Inside, there will be fairly thin planks, which hold the beakers with the samples. The planks can be thin, the samples have low weights, at most a few
tens of grams per sample. The back/wall of the display cabinet may be painted with a periodic table and I may add vertical bars as well to separate
certain sections, but these still are open to me, depending on my creativity on displaying the samples and possible suggestions from other
sciencemadness members.
|
|
|
Ubya
International Hazard
Posts: 1232
Registered: 23-11-2017
Location: Rome-Italy
Member Is Offline
Mood: I'm a maddo scientisto!!!
|
|
Could be something like this.
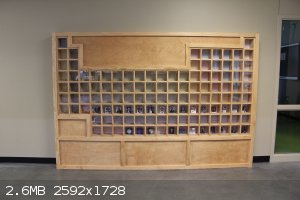
Each element has its cubicle, big enough to hold the main sample and a few other versions (allotropes, other shapes, objects made or that contain the
element, salts etc). Each cubicle has its own plexiglass window, I think it's cooler and safer (no big glass panels). The area below(look at the
image) could be open and hold bigger or more "interactive" samples, think of it as a page foot note (the lead cubicle could have a small pure sample
and the cabinet below the 15kg ingot)
---------------------------------------------------------------------
feel free to correct my grammar, or any mistakes i make
---------------------------------------------------------------------
|
|
|
Herr Haber
International Hazard
Posts: 1236
Registered: 29-1-2016
Member Is Offline
Mood: No Mood
|
|
I never planned to build a table like you and many others do. I love them, I just dont have the room.
BUT...
I try to get samples that can be compared.
The weight and feel effect is what people will remember: compare 100 grams of Sodium (big chunk) to 100 grams of Tungsten (tiny-ish).
Throw in 100 grams of Mercury because the sloshing / inertia will definitely be something people will remember.
One thing should be attached / on top of any display: a UV light !
(That's just me but) I'd use a lot of minerals for illustration in addition of the pure elements
|
|
|
RedDwarf
Hazard to Others
Posts: 161
Registered: 16-2-2019
Location: UK (North West)
Member Is Offline
Mood: Variable
|
|
I don't collect elements (yet!) but if I did and had a collection I wanted to display I'd think about building a table in wood (I do make furniture as
another of my hobbies) in the shape of Theodore Benfey's spiral periodic table. The labeling would face outwards so you'd view the collection by
moving around the table. Depending on the size of your samples and the space available this could be either a smallish coffee table or a large dining
table. I'd have a rotating lamp in the middle able to deliver at least natural light and uv. The individual samples would be set into glass pockets
(with glass lids that could be removed to access the samples).
|
|
|
RedDwarf
Hazard to Others
Posts: 161
Registered: 16-2-2019
Location: UK (North West)
Member Is Offline
Mood: Variable
|
|
Thinking further for compounds I'd go for a 3D triangular display with a traditional periodic table etched onto the 3 vertical glass walls. I'd
display the compounds in small glass spheres or boxes attached by wires/threads to the two or three elements they were formed of (more than 3 starts
to get even more tricky). This wouldn't be easy and you'd have to limit the number and selection of compounds to ensure that what you had was still
visible.
[Edited on 25-3-2019 by RedDwarf]
|
|
|
j_sum1
Administrator
Posts: 6218
Registered: 4-10-2014
Location: Unmoved
Member Is Offline
Mood: Organised
|
|
Theodore Benfey's spiral periodic table? That would be a mission to build, but it would be extremely cool.
|
|
|
woelen
Super Administrator
Posts: 7976
Registered: 20-8-2005
Location: Netherlands
Member Is Offline
Mood: interested
|
|
@RedDwarf: Your idea of wires, going from the different samples to the compounds definitely is worth considering. I can keep the wires very thin. Then
they do not interfere too much with the element display, but they still can be seen easily when you are close to the cabinet.
The number of compounds I want to display is limited, at most 15 or so.
[Edited on 25-3-19 by woelen]
|
|
|
Plunkett
Hazard to Self
Posts: 96
Registered: 16-4-2017
Location: The Richest Hill on Earth
Member Is Offline
Mood: No Mood
|
|
Here are some things I learned from building my display that I think you may find useful to you as you design your display (http://www.sciencemadness.org/talk/viewthread.php?tid=74775#). I hope this is not too much information.
LEDs
You talk about using backlight LEDs. I am not entirely sure what you mean by that, and it seems like you already know what you want but here are my
thoughts. You have two choices with LEDs: single LEDs or strips. Single LEDs were the better choice for me, however they may not be for you. They
are more work because you must solder 236 connections, but I felt like they had more options, were a better price, and were easier to replace if
something went wrong. I used 118 CREEXPE2-740-1 connected in series with a constant current power supply running them at 500 mA, or about 1.5 W per
LED. They put out ~150 lumens/LED which is more than enough, perhaps too much for a living room at night. Look at a dimmable power supply/dimmable
LEDs if that is an option.
Another thing to consider, high power LEDs get hot. Not nearly as hot as incandescent bulbs, but according to the mercury thermometer sample, the
interior of my display is around 33 °C. I did some experiments and my LEDs should not get hot enough to char the wood, however gallium is
perpetually liquid, and I imagine caesium would be too. The temperature can also cause causes issues with iodine and other substances that sublime
easily. I started out with an ampoule of loose iodine crystals and after two years all the iodine has sublimed and deposited into a crust on the top
surface of the ampoule. You can still see the crystal structure and it looks interesting to me, but it is something to be aware of. I have a photo
of the iodine on page 2 of my PT Display thread.
Regardless of which type of LEDs you buy, do some tests before you build the display. Build one box and play around with mounting the LEDs (move them
forward, push them back, mount them at an angle, etc.) to see what works best for your samples. I say this because I recessed my LEDs thinking it
would cut down on glare (it did not) and it caused a ~1 cm shadow ring around the top of the box. Learn from my mistakes.
Construction
If you are going to build it out of wood, I can think of four ways to do it. First, you can do half lap joints like in this video (https://www.youtube.com/watch?v=FSpzlkL-avo). This would work well for smaller boxes, but it requires you to have a dado blade for a table saw
and a lot of planning if you want two boxes to be joined like you mentioned for N and O. It also may be more difficult if you are using strip lights.
Second, you can glue multiple boxes in a periodic table shape like Nigel Coutts (http://thelearnersway.net/ideas/2014/11/13/xfxexri3j770ckm2mwdgd8j3m1dqu6). This is probably the most expensive options and you run into issues
with cumulative errors in the boxes, but it is also the least tool intensive solution. Third, you cut horizontal boards the full length of the rows
in your display and use short vertical boards in between the horizontal boards. This is a bit difficult to explain so just look at the picture below.
With this method, you could omit some of the vertical boards or drill holes through the boards to accommodate inter-elemental samples, just not so
many that it compromises the structure. I do not know how well this would work with thinner boards, but it worked well for me with 19 mm solid pine.
This might also work with solvent welded acrylic. Last, and this is just and idea, take a sheet of plywood the size of your display and evenly spaced
grooves along the length of the board. This will be the back of the display. Then, glue boards into these grooves and screw them in from behind to
make the rows of your display. After that, it is just trim work the make the periodic table grid. This gives the most flexibility with
inter-elemental samples, but I can already think of some issues you might run into in mounting this design on the wall. If any of these ideas appeal
to you, I can give you more details or make some crude drawings.
As far as the material of construction, I know solid wood works, but it can be expensive, and you run into issues with warping when the weather
changes. Plywood is an option and it may even be better than solid wood for the first and third construction methods I mentioned—if I were to do it
again, I would use nice plywood. I would consider MDF but be wary. MDF is cheap and takes paint well but it is not very structural and it dents
easily if you are constantly taking samples in and out. Again, make some test boxes.
[Edited on 26-3-2019 by Plunkett]
|
|
|
Plunkett
Hazard to Self
Posts: 96
Registered: 16-4-2017
Location: The Richest Hill on Earth
Member Is Offline
Mood: No Mood
|
|
Acrylic/Glass
I think acrylic and magnets is the way to go for the display you are describing. Nigel Coutts did this with his display, and it is a great balance
between accessibility and protection for a home display (see the link in my previous post above for photos). It does leave two unsightly magnets in
the corners of each box, but you easily could cover these up with the element's symbol, name, or atomic number. This is easiest done with a laser
cutter, but vinyl letters might work depending on what you have access too. If your display will be exposed to sunlight, say through a window, do
investigate how that may affect the clarity of the acrylic over time.
Compounds
I really like the small vials I had for my display. They came from nail polish glitter kits at the dollar store and tuck away perfectly along the
side of each box. You can label the bottoms with masking tape and a fine point sharpie, but chances are you can tell what the compounds are by what
box they are in. Of course, they only work for solids and non-volatile liquids and they might not be available in your area. Look at the first post
in my PT display thread for a photo of the vials (link above).
Miscellaneous
Samples will shift in your display if it is in any way mechanically coupled to a wall that is subject to regular vibrations like doors opening and
closing. It may not be much, but it adds up and over a year or two, your neatly placed labels will fall over, and anything not glued down will need
repositioning. It is not a big deal but consider it as you are positioning your samples. If you know a sample is not going to leave the display, hot
glue it down. If it is something you plan to remove semi-regularly, maybe use some double-sided tape.
These are just a few ideas; I may think of more in the upcoming days. Hopefully you find them useful.
[Edited on 26-3-2019 by Plunkett]
|
|
|
woelen
Super Administrator
Posts: 7976
Registered: 20-8-2005
Location: Netherlands
Member Is Offline
Mood: interested
|
|
Oh yes, your advice is very welcome to me. I never made a periodic table display before, so any experience from others is welcome.
I know of the heat problems of LEDs. In another project I am making a light box for photography purposes, using LED strips with CRI 95+ LEDs, daylight
white. These strips get quite hot. I stick them to hollow aluminium strips, which are not mounted directly on the wooden base, but with a small
distance of 3 mm to allow for better air flow and cooling. Still, the Al-strips feel quite hot to the touch.
The display is in a room, in which sunlight falls directly on the display in winter time, when the sun is close to the horizon. I have doubts with
using acryl for protection. It is light and can be worked easily, but it also tends to become cloudy over time. I investigate the option of using two
glass doors, with hinges at the side of the display cabinet. This makes the cabinet quite heavy. I think I will use thick wooden bars at the side,
which are connected to the wall with sturdy screws and bolts, sunken into the wooden bar, so that a thin overlay can be used to make the bolts
invisible.
I will paint the display case a pure white, so that the element samples have naturally looking colors when lit by neutral white light. The placement
of the LEDs indeed requires some experimentation, because I do not want star-like glare on ampoules and glass beakers.
Stability of the place of element samples also is a small issue. Where I live there are small earth quakes every now and then (magnitude 2 ... 2.5 at
most), but over time these may lead to moving around of the samples. I think I can solve that by using a small piece of double-sided tape.
|
|
|
diddi
National Hazard
Posts: 723
Registered: 23-9-2014
Location: Victoria, Australia
Member Is Offline
Mood: Fluorescent
|
|
As my sig has said for a while now, i am in the process of constructing a PT display also. i have a basic design worked out which enables the display
of elements, their related minerals, allotropes and salts. For elements where i just absolutely could not obtain or the cost was absurdly expensive i
have gone for some other way of representing that element. eg i have a Staticmaster 1C200 Polonium Record Brush in original box for Po, some hand
signed books from the personal library of Emilio Segre for Tc, various M Curie items including commemorative banknotes and first edition biography of
her by her daughter from 1937, and some original Chernobyl artifacts to represent some of the radioactives.
In terms of building materials i have elected to use 12mm tempered glass, stainless steel and ironbark so construct the display. i have a 40' shipping
container as the display space (which has to be shared with some other items) but this allows me to display in extended PT format.
i am planning on incorporating technology into the display which at this stage includes a 40" HD screen that shows more details about the element
selected such as microphotography, statistics, mineral pic, uses in industry, whatever is useful. and lighting i am hoping to run through the
dedicated laptop that controls the monitor so that the participant can somehow select to display different properties and the RGB LEDs can graphically
represent the values in light so that trends can be seen. eg electronegativity across the table can be shown by altering RGB values of SM LEDs to
range from red to yellow etc
any thoughts welcome 
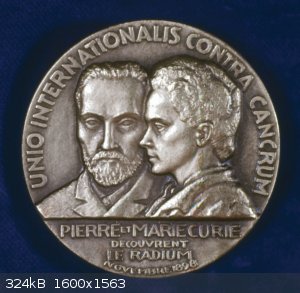
Pic: Curie medal presented during the 1930s (i believe). i have one in original box. ( pic from https://www.britannica.com/topic/medal )
[Edited on 26-3-2019 by diddi]
Beginning construction of periodic table display
|
|
|
Plunkett
Hazard to Self
Posts: 96
Registered: 16-4-2017
Location: The Richest Hill on Earth
Member Is Offline
Mood: No Mood
|
|
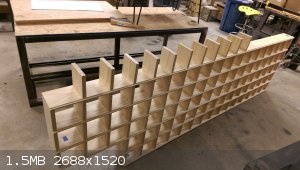
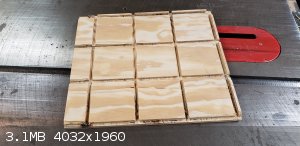
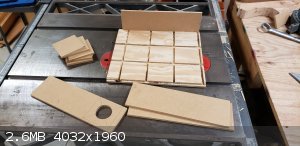
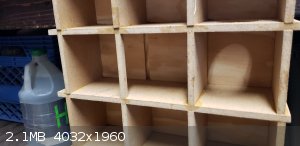
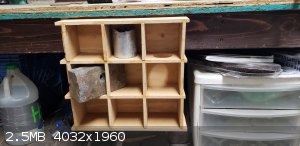
I made a quick prototype with scraps to test some ideas that I had. It is a combination of the third and fourth construction methods I listed in my
previous post. First, I cut a grid of grooves into a piece of plywood. Then, long pieces of MDF were glued into the rows of the grid and shorter
pieces of MDF in the columns of the grid between the longer pieces. I used ½” plywood and ¼” mdf and the boxes are 8 cm cubes. You might could
get away with MDF as the backing material, but I would recommend plywood. As seen in the photos below, you can remove the occasional vertical piece
or drill a hole in a horizontal piece to accommodate inter-element samples and the boxes are still strong enough to support a 3 kg block of lead and
800 g of zinc.
The plywood backer could be screwed into the wall and a cabinet built around it like you talked about. If you plan on using LED strip lights, you
could attach them to the long MDF boards before you glued them into the grid, and cut notches in the top of the shorter MDF boards to accommodate the
LED strip. This would require you to mask off the LED strips while painting the cabinet, but off the top of my head this is the easiest way I can
think of to include LED lights in this design.
This design still does not solve the issue of inter-elemental samples that are not immediately adjacent to each other.
|
|
|
Sulaiman
International Hazard
Posts: 3555
Registered: 8-2-2015
Location: 3rd rock from the sun
Member Is Offline
|
|
a possibility ?
Large screen HD or even 4k UHD displays are 'affordable' and could form the rear internal face of an element display,
a connected laptop/computer/microcontroller could illuminate the screen in interesting ways to match various elemental properties, relationships,
.....
Not cheap but you could start with a transparent (or non-existant) rear wall in anticipation of a large rear screen.
A transparent rear wall would allow the screen (or element display) to be removed and so make the screen available for other purposes (TV, video,
games etc.)
We all NEED a giant UHD screen for our element displays.
... No my darling - of course it's not related to a new cable box and channels 
P.S. I just tried the above on my wife ... amused but not convinced 
[Edited on 30-3-2019 by Sulaiman]
CAUTION : Hobby Chemist, not Professional or even Amateur
|
|
|
woelen
Super Administrator
Posts: 7976
Registered: 20-8-2005
Location: Netherlands
Member Is Offline
Mood: interested
|
|
I am thinking of using the middle part of the periodic table (the space above the first transition metal row) for inter element samples, but put more
to the front (layer 2 of the display, indicating that they are samples of compounds). I only will have a few of such samples (I have a great SO2Cl2
sample, and GeCl4, TiCl4 and SiBr4).
These compounds I add to show how different compounds can be, when compared to the elements. I will add a few more: NaCl, and a few colorful first-row
transition metal salt (or complex). The latter I can put in layer 2 of the transition metals.
|
|
|
j_sum1
Administrator
Posts: 6218
Registered: 4-10-2014
Location: Unmoved
Member Is Offline
Mood: Organised
|
|
I like the idea of using the inter-block space foe display of a few interesting compounds.
Might I suggest a lovely big crystal of NaCl if you decide to go that direction.
You could also include an intermetallic compound so that you have examples of covalent, ionic and metallic bonding.
|
|
|
diddi
National Hazard
Posts: 723
Registered: 23-9-2014
Location: Victoria, Australia
Member Is Offline
Mood: Fluorescent
|
|
interhalides!
the challenge of incorporating technology in a display for me is purely cost. i have lots of possible ideas and the technical expertise to implement
them, but i dont have a bucket of cash. oh well
Beginning construction of periodic table display
|
|
|
Herr Haber
International Hazard
Posts: 1236
Registered: 29-1-2016
Member Is Offline
Mood: No Mood
|
|
Think bigger !
https://m.9gag.com/gag/aR1Zw62
|
|
|
Twospoons
International Hazard
Posts: 1280
Registered: 26-7-2004
Location: Middle Earth
Member Is Offline
Mood: A trace of hope...
|
|
If you want to get more creative with your compound samples, maybe they could go around the outside of your periodic table, with buttons which light
up the element samples they are made of. So if you press the button on the SO2Cl2 sample then the S, O, and Cl samples of the table light up.
Helicopter: "helico" -> spiral, "pter" -> with wings
|
|
|
fusso
International Hazard
Posts: 1922
Registered: 23-6-2017
Location: 4 ∥ universes ahead of you
Member Is Offline
|
|
Quote: Originally posted by Twospoons  | | If you want to get more creative with your compound samples, maybe they could go around the outside of your periodic table, with buttons which light
up the element samples they are made of. So if you press the button on the SO2Cl2 sample then the S, O, and Cl samples of the table light up.
|
That would need some additional thinking for the wiring...
|
|
|
diddi
National Hazard
Posts: 723
Registered: 23-9-2014
Location: Victoria, Australia
Member Is Offline
Mood: Fluorescent
|
|
i can assist with wiring and control circuits
Beginning construction of periodic table display
|
|
|
Twospoons
International Hazard
Posts: 1280
Registered: 26-7-2004
Location: Middle Earth
Member Is Offline
Mood: A trace of hope...
|
|
Run all your LEDs off I2C linked I/O ports, and control them with an Arduino or similar. Too easy.
Helicopter: "helico" -> spiral, "pter" -> with wings
|
|
|
woelen
Super Administrator
Posts: 7976
Registered: 20-8-2005
Location: Netherlands
Member Is Offline
Mood: interested
|
|
| Quote: Originally posted by Twospoons | | If you want to get more creative with your compound samples, maybe they could go around the outside of your periodic table, with buttons which light
up the element samples they are made of. So if you press the button on the SO2Cl2 sample then the S, O, and Cl samples of the table light up.
|
This is indeed an interesting idea! I see no problem in the additional wiring. With some simple electronics the wiring most likely can be made more
compact. I will definitely think about that.
I also have interhalogen compounds: BrCl (golden yellow gas), ICl (brown solid, liquid on warm days, brown vapor), IBr (black shiny solid with
pink/rose vapor), ICl3 (bright orange/yellow solid). I'll probably put them between the halogens.
|
|
|


