WGTR
National Hazard

Posts: 971
Registered: 29-9-2013
Location: Online
Member Is Offline
Mood: Outline
|
|
QuicKiln - A miniature electric kiln for...
...experimenters with ADD, or those who otherwise don't like spending a lot of time
doing boring things.
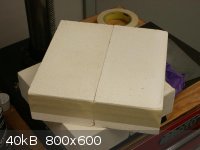
What to do with a pile of bricks? These aren't ordinary bricks, you know. They are
special 2600F firebricks, 9" long by 4.5" wide by 2.5" high. I bought them from a friendly
local pottery store. These have been knocked around in the trunk for a while, as you
can see from the chipped edges.

The two bricks that are going to make up the main body of the kiln are taped
together to make sure that one does not go anywhere without the other.
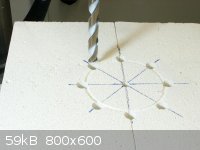
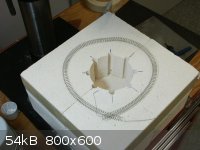
Just for fun, I decided to mark an "X" right at the center point of the two bricks, as
seen below.

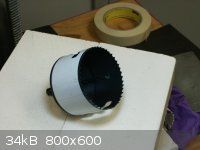
In the following picture, you will observe a hole saw, 3" in diameter, resting
comfortably in its natural habitat.
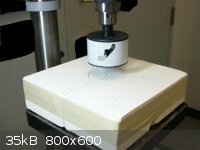
OK, getting down to business now, the hole saw was driven into the brick just enough
to leave a mark. The reasoning for this will be seen shortly. It should be noted that
this kind of firebrick is very soft, and can be carved with your fingernail.
For this job a 0.375" drill bit was used to drill eight holes straight through the brick.
The exact positioning of the holes is such that they overlap the 3" hole by about 1/16".
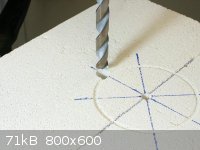
Perhaps this overlap can be better seen in the following picture. The idea is to
provide a channel for the heating elements to reside, without them flopping out too
easily into the main chamber (which we are about to cut out).
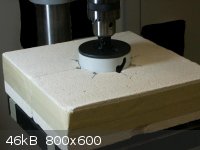
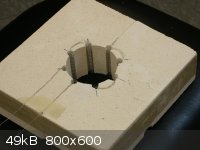
Switching bits to the hole saw, we've now cut a 3" diameter circle into the bricks.
The problem is that the bit will only go in about 2" deep, and we have a 2.5" thick
brick.

Eeehhh...no problem. Just chip out the offending bits of brick with a screwdriver.

Adjust the drill table so that the saw is already inserted part-way into the brick...
[Edited on 24-10-2013 by WGTR]
|
|
|
WGTR
National Hazard
Posts: 971
Registered: 29-9-2013
Location: Online
Member Is Offline
Mood: Outline
|
|
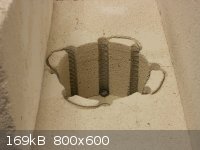
..and cut all the way down to the bottom (hopefully not into your drill table!).
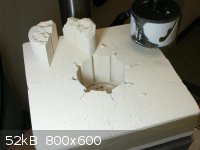
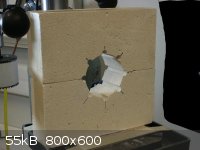
Here's what it looks like with all the holes drilled out:
Now for the fun part. From a place cleverly concealed in your shirt sleeve, simply pull
out this shiny-looking coil of wire:
For those of you who aren't good at that kind of thing, you can get the wire on eBay
from temco_industrial_power. It's 15' of Kanthal A-1 24 AWG resistance wire, which I
wound into a coil. You can wind it by hand, but I used a coil-winder. The overall
resistance of the coil was about 30 ohms. Mind the spool of wire while you work; if it
gets away from you, it makes a HUGE mess on the floor!
Use a piece of tape to hold down one end of the coil, and get started:

...and now maybe you're getting the idea how this works...
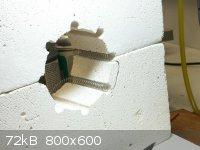
Here we can see that the heating element is properly positioned, and the lead-in
wires are recessed into a pair of small channels.
Now for the most difficult part of the whole project: Lifting those two bricks, and
putting them down on top of two other bricks. However long it takes you, just make
sure that the two sets of bricks overlap each other.

Here's a better look down into the chamber:
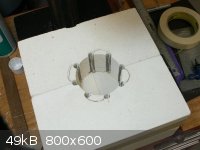
And this is what it looks like all stacked together:

My bricks are pretty worn, and rubbing them against each other several times helped
to seal them flat against each other.
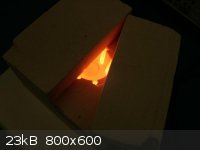
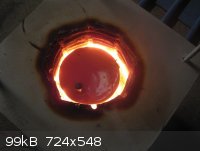
Now for the best part of all, here is the first firing. Here we have a small fireclay
(homemade) crucible sitting in the kiln, containing a small amount of Calcium
Carbonate. The idea was to see if we could make a bit of quicklime with this setup.
The temperature is not quite as "yellow" as it looks here. The color was more bright
orange/dark yellow on the heating elements, and solid orange everywhere else.
Overall I think it hit at least 1000C, maybe 1100C. This picture was taken after 30
minutes of run time (at 396 watts):
[Edited on 24-10-2013 by WGTR]
|
|
|
WGTR
National Hazard
Posts: 971
Registered: 29-9-2013
Location: Online
Member Is Offline
Mood: Outline
|
|
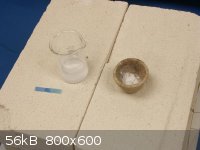
After things cooled down a bit, I chucked a bit of the calcined powder into water to
test it. If cheap pH paper is any guide, the water solution measured at a pH of 13,
indicating a caustic solution. The CaCO3 that was used was reagent grade powder,
but it's possible that there were trace contaminants in it (maybe alkali carbonates).
The heating element was operated at 110VDC @ 3.6A, providing 396W for the
previous test. It can be run just as well on 120VAC service, and the power in this
case bumps up to 480W. The main tradeoffs in this design were maximal kiln volume,
1100-1200C temp, and a 500W power limitation. It seems to work.
Anyway, here you have a "QuicKiln". It's bare-bones, and not very safe (it has
exposed 120V leads, for one thing). The lead-in wires need to be supported better.
At full operating temp, the heating element wire becomes soft, and very easy to
deform if the wires are pulled on while it's operating. At the same time, it only took
three hours to build it and fire the first sample of quicklime, so I can't complain.
[Edited on 24-10-2013 by WGTR]
|
|
|
Lambda-Eyde
National Hazard
Posts: 857
Registered: 20-11-2008
Location: Norway
Member Is Offline
Mood: Cleaved
|
|
Very nice work! I've been thinking of making something like this myself for quite a while. You should work on integrating a thermocouple somewhere in
there, it should be easy enough.
This just in: 95,5 % of the world population lives outside the USA
You should really listen to ABBAPlease drop by our IRC channel: #sciencemadness @ irc.efnet.org
|
|
|
WGTR
National Hazard
Posts: 971
Registered: 29-9-2013
Location: Online
Member Is Offline
Mood: Outline
|
|
I'm glad you liked it! I hope the design is of use to some people. Originally I was
going to try spiraling the heating element around the interior diameter of the kiln, but
I got the idea from a Youtube video to run the elements in the vertical axis. That
made the fabrication a lot easier. You could conceivably make a tube furnace the
same way.
I added a couple of extra bricks underneath the kiln to minimize heating of the
surface underneath it. In all, I have about $40 worth of firebrick in it. The resistance
wire came on a 100' spool, of which I've only used 15'. It was only $11 for the whole
spool. The hole saw was $20. I decided on a 3" hole diameter because that allows
3" of insulation around the inner chamber. Things stay fairly cool on the outside that
way. Also, I wanted to keep the design "low power", and 500W wouldn't have
handled anything larger than what I already have.
A controller/thermocouple addition is one of the next things on the agenda, once I
stop playing with it long enough to make some upgrades!
I'll probably weld up a frame to hold the bricks together (no more masking tape!),
and fire some ceramic insulators for the electrical connections.
If anybody has any questions, just ask. I'd like to encourage others to try something
like this. Now I don't have to sit there trying to heat up a test tube of something with
a propane torch.
Note: For whatever reason I can't edit my first post anymore, so I should mention
here that I found that I was actually using 2300F firebrick (Aardvark) instead of the
2600F stuff. This is an important distinction because the 2600F firebrick is more
thermally conductive if you use it. This adds thermal mass to the system, and limits
your max temperature in the kiln somewhat. Since I'm not really going over 1250C, I
used the lower temp stuff.
[Edited on 26-10-2013 by WGTR]
|
|
|
Lambda-Eyde
National Hazard
Posts: 857
Registered: 20-11-2008
Location: Norway
Member Is Offline
Mood: Cleaved
|
|
Yes, it is exactly the design that I like. I really love how you drilled out holes that conveniently made half-circles after using the hole saw. Did
you drill out the holes with stone/concrete drill bits on a drill press without hammering? How was it? I have some leftover bricks exactly like those
after I built a smithy several years ago which I can use. I'm thinking of stealing your idea for the design because it's so simple and elegant. Could
you elaborate on how you control the temperature? Have you considered adding PID control when you install the thermocouple? Sadly, I have next to no
knowledge in electronics, but I really want to implement PID control in a furnace, so I'd love to see a simple explanation for it.
One idea I had is to drill holes in the bricks and and add pegs (either loose or glued somehow to one of the bricks in order to make them stick more
together. Also, it allows for dismantling in case you want to modify or repair it. Welding a frame from angle steel sounds like a good idea. I might
make one that connects to some sort of stand which allows the furnace to be tilted at an arbitrary angle.
I have a 20 cm quartz test tube which is longing to be used, so I've pondered making a tube furnace like garage chemist and Magpie (check the threads
on the forum) for a long time, but getting a ceramic tube is hard and very costly. Also, their designs are considerably more complex. For a longer
furnace, however, I think that using two whole bricks per layer will be very costly. I wouldn't require much more than a one inch center hole, do you
have any thoughts on using one half brick per layer for such an application? How hot does your design get during lengthy operation?
This just in: 95,5 % of the world population lives outside the USA
You should really listen to ABBAPlease drop by our IRC channel: #sciencemadness @ irc.efnet.org
|
|
|
IrC
International Hazard
Posts: 2710
Registered: 7-3-2005
Location: Eureka
Member Is Offline
Mood: Discovering
|
|
The bricks he is describing are not like you think Lambda-Eyde. Sounds like you think they are more like bricks. These are not, while maybe a little
painful one could almost drill a hole in these with a finger. Meaning very soft material. Easily cut with a sharp knife. In other words easy to
fabricate but treat the bricks gently. They break easily.
While this design will work air gets into the insides too easily meaning expect often replacement of the coil if it runs at or above 1,000 F. If you
can see any glow outside your leaking air which will wreck the heating element. Coat the inside with ITC 100, then fill any gaps with ITC 200. After
it dries (best to dry at 160 F, kiln sealed up) coat the entire insides with ITC 100 again. After the Kanthal is wound into a coil, before you install
it into the bricks, give it a few coats of ITC 213, dry. I also gave the slots inside a few 213 coats before installing the wire. Then insert heating
coil. When done use a brush and again paint the coil with more ITC 213. After this treatment not only will the kiln reach much higher temperatures,
the wire will survive colder air contact far longer than bare.
http://www.budgetcastingsupply.com/ITC.php
In mine I used ITC 100 as a base coat, then 200 to fill any gaps, then 100. Treated the element with 213 as I described. After burning it in a while
and cooling (sealed - never ever let it cool exposed to air) I again did a heavy coating of 213 on the heating element. After each coat seal the kiln
and run it at a couple hundred degrees for an hour or so, then cool. Sealed. If your kiln is glowing or close only open it for the work you are doing
quickly, sealing it the entire time the temperature drops to just warm. If you adhere to this your kiln will live longer between element burn outs.
Save some 213 for future replacement jobs. While it sounds like a lot of extra work it is all very easy. My wire lives 5 times longer (I am usually
over 2,000 F just under cone 10).
The one thing I found out which surprised me was how much hotter it would run with less element power cycling from the ITC coating I described. I am
talking 500 degrees F or more hotter that it used to run with the element powered almost 100 percent of the time, yet you can hear it kicking in and
out more often meaning less kilowatt/hours for the same run. Logically therefore longer element life as well. I have a temperature gauge which goes to
2700 F with the probe installed inside, and a controller I can set to the desired temperature. I never let it run above around 2,100 F, at this
temperature the heating element has a fairly short life. Not a large kiln, inside is only around 10.5 inches square, walls double bricks thick.
I drilled through the kiln to insert a 2 foot long 1.5 inch diameter quartz tube when I need a tube furnace. Otherwise the holes are plugged with
pieces drilled from a brick using a 1.5 inch hole saw. Works great. My outer bricks are K30-45-25-HB, inner K25-45-25-00.
http://www.baileypottery.com/kilns/kilnmaterials.htm
"Science is the belief in the ignorance of the experts" Richard Feynman
|
|
|
Lambda-Eyde
National Hazard
Posts: 857
Registered: 20-11-2008
Location: Norway
Member Is Offline
Mood: Cleaved
|
|
Quote: Originally posted by IrC  | | The bricks he is describing are not like you think Lambda-Eyde. Sounds like you think they are more like bricks. These are not, while maybe a little
painful one could almost drill a hole in these with a finger. Meaning very soft material. Easily cut with a sharp knife. In other words easy to
fabricate but treat the bricks gently. They break easily. |
I know what these bricks are like, they are identical to the ones used in my smithy. But when I used them I didn't drill or cut anything; I used them whole as they were a perfect fit already.
Your other suggestions are interesting and bring up points I hadn't thought of, I will look into them and probably include them in my own design.
Thanks a lot!
This just in: 95,5 % of the world population lives outside the USA
You should really listen to ABBAPlease drop by our IRC channel: #sciencemadness @ irc.efnet.org
|
|
|
WGTR
National Hazard
Posts: 971
Registered: 29-9-2013
Location: Online
Member Is Offline
Mood: Outline
|
|
Yes, this firebrick is the soft, porous, and crumbly stuff. They weigh only about 2
pounds each. They presented no resistance to the efforts of an ordinary HSS drill
bit, as it went right through it in a matter of seconds. There was a lot of dust
produced, but that's not a problem if you use a vacuum while doing it. The links that
IrC posted are sources for this type of brick, although I bought it locally from a
pottery supply store. If regular high-density firebrick is used, you'll have problems
with thermal conductivity. It simply conducts too much heat, and it will get very hot
on the outside. It won't work for this design. The stuff that is rated for 2300F is good
enough for most of what I do, and is significantly lighter and less thermally conductive
than the tougher grades.
IrC, I like your idea for coating the kiln and the elements. The few places that I've
checked so far like to sell the material in relatively expensive quantities, though. For
me I think that buying this would be a sure thing if I was building a full-sized kiln. This
design is small, though; and it's only using $1.65 worth of Kanthal wire. At the same
time I think that your idea for sealing the brick will offer significant advantages.
I've got some leftover clay that's a mix of A.P Green, grog, and a bit of OM4. I'll try
adding some extra water to it and working it into some of the brick surface. It'll be
interesting to see if it stays attached when fired. If it doesn't then I'll just try some
without the OM4, as it tends to cause shrinkage issues.
Lambda-Eyde, the outside of the kiln stays cool for the first 30 min or so. After that,
it's possible to feel a slight warmth coming through the brick. This is with 400W going
into the kiln. After an hour or so the brick surface is cool enough to touch, but too
warm to leave your hand there for more than a few seconds. Right now I have about
4" of brick between the bottom of the kiln and the table top. The table stays cool
for 1 hour cycles, but it will be much better to mount the bricks in a secure fixture,
with allowance for air to flow underneath to provide cooling.
For a tube furnace, I'm thinking of building a quick version of one. Be careful drilling a
hole directly through the middle of a firebrick...the thermal stresses during operation
can cause the brick to crack, usually in a place where you don't want it too. Having
a separate brick for top and bottom allows for relatively free movement of the bricks
during expansion/contraction cycles. I would recommend using at least 2" of
firebrick for insulation. The mini kiln uses 3" around the sides, and I feel like this
works well for me.
I supplied power to the kiln with a 0-150V 4A variable DC power supply. This was just
to allow for adjustment during the first firing. I found that the heating element works
fine at 120V, meaning that it can be plugged directly into the wall without a
transformer. When I have a few hours of time, I'd like to plug it in and see just how
hot it gets.
A simple temperature controller can be just a box with a connection for a
thermocouple, a power cord, and a socket for your furnace to plug into. A digital
readout on the front allows you to set the temperature where you want it. With a
modular setup like that you can share the controller among several different furnaces
without problem. This is a quick example of what I'm talking about, although it's not a
good choice because of how expensive it is:
http://www.coleparmer.com/buy/product/103232-oakton-temp-900...
[Edited on 26-10-2013 by WGTR]
|
|
|
IrC
International Hazard
Posts: 2710
Registered: 7-3-2005
Location: Eureka
Member Is Offline
Mood: Discovering
|
|
Good point about drilling the bricks. I forgot to mention but where I drilled two sides to pass the quartz tube through was centered on the junction
of bricks so that half the hole was through each adjoining brick. Learned my lesson after the brick on each side cracked in two, the first time I had
centered the holes in a single brick on both walls.
Real hard to replace bricks after you have coated the insides and run the kiln a few times. Not the best route to a tube furnace but I wasn't ready to
buy all the materials to build a dedicated tube furnace. The gauge and controller being so expensive. However I believe it is more efficient to build
a dedicated tube furnace than to try to make a kiln do double duty as I did. The ITC is somewhat expensive but a container as seen in the link goes a
long way. Remember you are painting a coat.
I found O2 was eating my Kanthal rapidly, the 213 made a large difference. I believe the 213 is loaded with Zirconium Silicate or some similar
composition. Incredibly good mirror for heat whatever the formula. An HB64E was my first kiln. Sold me on the stainless framework idea, as well as the
4 legs to keep the bottom away from the floor. All I did was build a copy of my HB64E somewhat larger as it had proven itself to be an amazingly good
design.
A big square of stainless is under the kiln in case of the bottom ever burning through but I imagine it would take a big square of bricks under it to
really provide protection from the floor catching fire should a disaster ever occur. Do not overlook the possibility I knew a guy who lost a building
over just that failure in his glass shop. On mine the outer bricks are actually rated for higher temperature but it was the hardness I was looking
for. The inner bricks rated at 2,500 F which was plenty anyway, but they just seemed too soft to use as outer bricks.
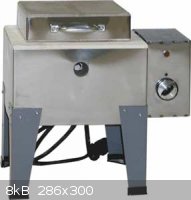
On my HB64E I mounted the gauge under the knob you see on the right side (controller box). This is a fantastic kiln for doing small scale experiments.
I used it to make all my glow powders and so far all my high TC superconductor materials as well.
"Science is the belief in the ignorance of the experts" Richard Feynman
|
|
|
WGTR
National Hazard
Posts: 971
Registered: 29-9-2013
Location: Online
Member Is Offline
Mood: Outline
|
|
That's a really clean setup you have there, IrC. What kind of power does it use when
the elements are active?
According to this link here:
http://amsterlaw.blogspot.com/2010/07/soda-kiln-wash-wadding...
"Recipe D is essentially the same recipe posted on Clayart by Tony Clennell as the
'working potter's ITC'."
This is a mix of:
30 parts alumina hydrate
30 parts zirconium silicate
30 parts kyanite
10 parts bentonite
Here's what I think, and it needs to be tested (hopefully today): I believe what's
needed is a good refractory compound, and a bit of "glue" to help hold it together.
The refractory should have low shrinkage on firing, and be rich in alumina to help
prevent free silica from being present, as it is "glass-forming". The kyanite above
can pretty much be swapped out with fireclay, kaolin, etc., and get workable results,
as long as the amount of alumina is adjusted in the mix. As refractory clays shrink on
firing, a lot of the clay should be present in the form of already-fired "grog". In the
above recipe, I think this is supplied by the zirconium silicate, which also provides
resistance to alkalies, acids, and is very "white" Fireclay grog could be used, but with
lower resistance to alkalies. A ball clay can be added in small amounts, as this
provides a bit of "flux" to provide density to the fired clay.
Anyway, I have fireclay, grog, alumina, OM4, and feldspar to play around with. I wish
I'd thought of the zirconium silicate earlier, as I was just in the pottery store this
morning. I'll have to wait 'til Monday to get some of that. I'll proceed with what I
have, though, and see how it works.
Oh, and I found a neat source of information for the composition of different chemical
compounds, as it relates to pottery:
http://www.matrix2000.co.nz/MaterialsWeb/default.htm
[Edited on 26-10-2013 by WGTR]
|
|
|
IrC
International Hazard
Posts: 2710
Registered: 7-3-2005
Location: Eureka
Member Is Offline
Mood: Discovering
|
|
Actually that is a stock image on my first kiln. I'll have to take a pic of it as it looks now. While still very shiny it has been rebuilt 3 times
with new bricks and new element(s) probably over a dozen times. So slightly duller in appearance than the image I posted from a google search. I don't
think it draws more than 8 or 9 amps @117 VAC running wide open. The beauty of the ITC work was now it cycles more meaning far greater efficiency. As
it comes new, not only does it use more power as the element never shuts off when your trying to get cone 10, they burn out quicker. Using the ITC
made a great difference to both problems. If you use your kiln a lot the ITC actually does earn more than cost over time between elements and KW/Hours
combined.
"Science is the belief in the ignorance of the experts" Richard Feynman
|
|
|
testimento
Hazard to Others
Posts: 351
Registered: 10-6-2013
Member Is Offline
Mood: No Mood
|
|
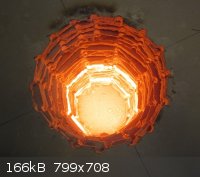
This is my electric heater, made from old wall. Maximum power 2000W, operating power 1000W. It can calcinate 1kg of calcium carbonate in 30 minutes
and melt 500g of sodium chloride on 15 minutes when pre-heated(residue heat from calcination).
|
|
|
WGTR
National Hazard
Posts: 971
Registered: 29-9-2013
Location: Online
Member Is Offline
Mood: Outline
|
|
Now there's some elegant simplicity for you! Neat! So is that
old calcium sulfate wallboard?
How is it holding up for you? It seems like it would dehydrate
and turn to powder, but maybe it doesn't. Even if it does,
though, it's still cheap considering what you can do with it.
Are you doing any temperature control on it?
|
|
|
testimento
Hazard to Others
Posts: 351
Registered: 10-6-2013
Member Is Offline
Mood: No Mood
|
|
I have 2kW dimmer fitted with nichrome wire on 2 layers, as seen on the pic. The wire is set on levels that are cut with making the hole 20mm larger
than the other platelets.
The board will actually smoke like devil for the first hour, when the cardboard cover burns off and water evaporates, and it becomes quite brittle,
but the consistency of the wall material doesnt change that much actually - it's brittle when it's wet, and it's brittle when it's calcined - the
major problem is that the cardoard that surrounds the gypsum material as a wall, and holds it up good is annihilated, and then it cannot withstand any
mechanical shocks.
Probably the device will disintegrate after several hours of operation, but well, the board cost me like 5 bucks and it's jut cut'n'go when the plates
has to be changed. It has now been operated for about 6 hours total, and it still looks pretty fine. After 2 hours, the smoking and vapors were gone,
and the oven stabilized and now it operates nicely.
Operational.

The thing.

The pot can hold 5 liters of stuff and it fits in like a glove. One has to be careful not to short the nichrome to the pot, which can happen later if
the gypsum disintegrates.
[Edited on 28-10-2013 by testimento]
[Edited on 28-10-2013 by testimento]
|
|
|
WGTR
National Hazard
Posts: 971
Registered: 29-9-2013
Location: Online
Member Is Offline
Mood: Outline
|
|
Updates on Kiln
Running on 120VAC @ 480W, the temperature was measured at:
1000C @ 15 minute mark
1150C @ 30 minute mark
1200C @ 45 minute mark
I turned off the power after 45 minutes. About 5 minutes after
power-off, the temperature was measured at 950C.
I used a cheapo type K thermocouple (rated for 300C) to
measure the temperature. I stripped the insulation off the
wires and spread them apart enough so they wouldn't touch,
and pushed the wire in through the top of the kiln, about 1" into
the chamber. Since the wires are so thin, I only left the
thermocouple in there long enough for the temperature to
stabilize, about 10 seconds maybe.
One thing I have noticed with the heating elements in a vertical
configuration like this, is that at full power they tend to sag.
The windings space out at the top of the coil, and compress
together toward the bottom. The easy way to fix this would be
to spiral the element around the chamber, so that the element
lies more vertical than horizontal. I still like the idea of vertical
element sections, though. On the next element (when the
current one burns out), I think I'll try "stapling" the coil to the
brick in a few places with some Kanthal wire, to help support it.
|
|
|
IrC
International Hazard
Posts: 2710
Registered: 7-3-2005
Location: Eureka
Member Is Offline
Mood: Discovering
|
|
http://usaknifemaker.com/forging-tools-supplies-c-172/forges...
The link for ITC I first posted now says due to very high price increases they no longer carry International Technical Ceramic (ITC) products. The
above link still has all three (100, 200, 213) but at around $270 total for three pints (a pint of each) it is expensive. When I bought a pint of each
of the three in 2005 IIRC the total was around $100 including shipping. Anyone know why this material has risen 300 percent in price? Actually more
like 400 percent on the 100 as it was only $28 a pint in 2005. Still well worth having if you consider how much hotter the kiln can get, with less
element on time meaning reduced power cost and longer element life since the 213 does a good job keeping oxygen from the Kanthal. I did measurements
using a pyrometer before and after the use of ITC and the difference was significant, outside surfaces on the kiln being much cooler.
I would be interested in knowing the formulas for the ITC variations, and if it would be far less costly to make your own. Or at the least a formula
similar which would be at least say 80 percent as good while being say 1/4 the cost.
I did a little searching and find Zirconium silicate for around $12/pound, and sodium silicate powder around $6/ounce. These are two ingredients I
know are in the ITC 213 (likely in all three). I am guessing magnesium silicate is also a component of the ITC 200 formula. Can anyone speculate what
else is used, I am trying to understand why the sudden large price jump. There must be at least one component which has really gone up in price
recently to account for this sudden increase. Since 213 is designed to coat metal at least one component must adhere to metal well and survive higher
than 2,000 F for many hours without significant degradation. Also the composition must be very reflective of IR, as is indicated by the higher inner
temperature of the kiln given the power input by the heating element. I can say from experience the element is off longer running at the same
temperature as the kiln did before the coatings. Also there is a noticeably reduced temperature on the outside surfaces of the kiln bricks. All of
these facts indicate to me that the formula does a very good job of acting as a mirror to thermal radiation.
Given the ability of the kiln bricks to conduct heat is poor by design (yet still conducts heat by some specific measure), only something acting as a
very reflective surface on the inside could lower the temperature on the outside surfaces. I can say this effect is very obvious meaning very
significant. However I am unsure where to find a table which could be used as a guide in selecting materials to use in producing our own formula.
Since ITC is now around 500 dollars a gallon it seems a worthwhile endeavor in coming up with our own recipes.
I found this site on making your own refractory materials:
http://www.backyardmetalcasting.com/refractories.html
The link below is a forum where the subject is discussed:
http://www.alloyavenue.com/vb/showthread.php?5-DIY-Refractor...
What I cannot seem to find is information related to refractory materials which act as a mirror at IR frequencies. I am sure the art has been studied
extensively, is this one of those fields where everything is proprietary and few publish information?
Remembering some discussions years ago on SCM I did a little searching and found a post by Cyrus back in 2004 in this thread: http://www.sciencemadness.org/talk/viewthread.php?tid=2931
------------------
Cyrus "Yes, ITC-100 seems like a near monopoly on rigidizers, and rigidizers are necessary.
Satanite is another product, but I haven't been able to find much on that except that it contains crystoballite and quartz.
IIRC ITC-100 is made of zircon/zirconia, (colloidal?)silica, alumina, sodium silicate, magnesium silicate, and water, but I have no exact proportion
data, just general ranges, (ie 5-15%) and have done a test on this, it's not perfect yet, but moderately ok so far.
Rosco, I like the idea of the silica gel spheres, but won't they tend to absorb a lot of water- I mean that's what they are made for.  . This may make mixing/casting difficult or it may need to be dried/fired very
slowly to let off all of the water. Also, I take it you plan on using calcium aluminate or a phosphate as a binder? Where can you get this stuff?" . This may make mixing/casting difficult or it may need to be dried/fired very
slowly to let off all of the water. Also, I take it you plan on using calcium aluminate or a phosphate as a binder? Where can you get this stuff?"
---------
Yet another thread by axehandle provides useful information:
http://www.sciencemadness.org/talk/viewthread.php?tid=2171#p...
So far in a couple days searching only the post by Cyrus mentions possible ingredients in any of the ITC products. The company must really want to
keep it a trade secret. I wish I knew where Cyrus found the ITC information. On the cost increase of ITC products I have found notes on ceramics with
high IR reflectance and several Lanthanide oxides are used. Wondering if this is why the sudden price jump occurred.
The very high heat reflecting ability of ITC-213 is what interests me the most. Looking at it after it has hardened the appearance is of ground
diamonds about the size of table salt crystals. Since I believe diamond would burn at these temperatures logically something similar in appearance
should be considered. I am thinking silicon carbide but am unsure of what it would look like if say one made a paint with it using similar sized
crystals and let it dry. Silvery grey surface speckled with diamond grains is the appearance of ITC-213 after it has been run at high temperatures for
a while.
[Edited on 11-4-2013 by IrC]
"Science is the belief in the ignorance of the experts" Richard Feynman
|
|
|
IrC
International Hazard
Posts: 2710
Registered: 7-3-2005
Location: Eureka
Member Is Offline
Mood: Discovering
|
|
Here are some interesting patents which may have useful information in my quest for less than $100/pint ITC-213. For that much money making it in an
amateur setting seems cost effective. Using my best educated guesses as to what may be in the formula. If I am wrong but manage to formulate something
as effective in the $8/pint price range then I'll still consider it time well spent.
Attachment: US1588473A.pdf (202kB)
This file has been downloaded 706 times
Attachment: US1695812A.pdf (100kB)
This file has been downloaded 646 times
Attachment: US2044817A.pdf (50kB)
This file has been downloaded 666 times
Attachment: US2335325A.pdf (490kB)
This file has been downloaded 684 times
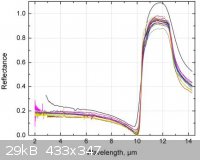
Looking at this graph for Silicon Carbide it appears to me I am correct in assuming this is the material giving the appearance of ground up diamond
crystals in a refractory material which makes the ITC-213 act like a mirror at IR frequencies. Add to the mixture oxides of various elements such as
Zr and I believe I am on the right track. However I still do not understand what component has risen in price so much that what I was paying around
$28/pint 8 years ago is now $95. Any ideas? Still have to do a search for a source of Silicon Carbide around the grain size of table salt. Any ideas
on this as well?
I was considering a mixture of Al2O3, ZrO2, Y2O3, and SiC for my first experiment. I have everything on hand except the SiC so I just bought 3 pounds
of it (40 to 60 grit) for $12.95 including shipping on fleabay. Will now have to wait for it to arrive. On the following page (minus the SiC) I did
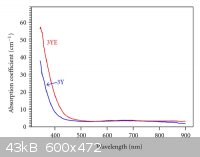
find a graph which also appears to indicate high reflectivity of IR for Yttria stabilized zirconia with Alumina dopant.
http://www.hindawi.com/journals/jnm/2012/269064/
Text from the image page: Dependence of the measured reflection of the yttria stabilized tetragonal zirconia without (3Y) and with alumina dopant
(3YE). The thickness of these two samples was 1 mm.
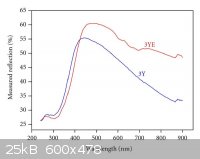
It appears adding the Alumina levels the reflectivity and lowers the frequency which seems good to me if the goal is a mirror like coating to IR on
the inside of the kiln walls. The unknown would be what crystal structure would result from heating these materials together and what effect on
reflectivity VS frequency this would have.
Correct me if I am wrong but what I take from this last graph is the fact that this material coating the kiln walls would do a poor job of conducting
heat into the bricks, in effect also a good thing if the goal is minimizing heat loss through the walls.
[Edited on 11-6-2013 by IrC]
"Science is the belief in the ignorance of the experts" Richard Feynman
|
|
|
watson.fawkes
International Hazard
Posts: 2793
Registered: 16-8-2008
Member Is Offline
Mood: No Mood
|
|
| Quote: Originally posted by IrC | | However I still do not understand what component has risen in price so much that what I was paying around $28/pint 8 years ago is now $95. Any ideas?
|
The product got popular, and they raised the price to what the market will bear.
Anybody with access to an ICP-MS machine want to run a sample?
|
|
|
Texium
|
Thread Moved
21-11-2023 at 13:40 |
|


