| Pages:
1
2
3 |
elementcollector1
International Hazard

Posts: 2684
Registered: 28-12-2011
Location: The Known Universe
Member Is Offline
Mood: Molten
|
|
Is the one to the far right 15%, or 11% zinc? The one next to the pure copper chunk looks rather like clean copper, but with copper-rich brass it gets
a bit hard to tell. Also, how long did it take you to melt them with propane?
Here's some initial color comparisons I did with brass, natural and purified gold. This was done with and without flash just so you can get a better
idea of how they 'look'.
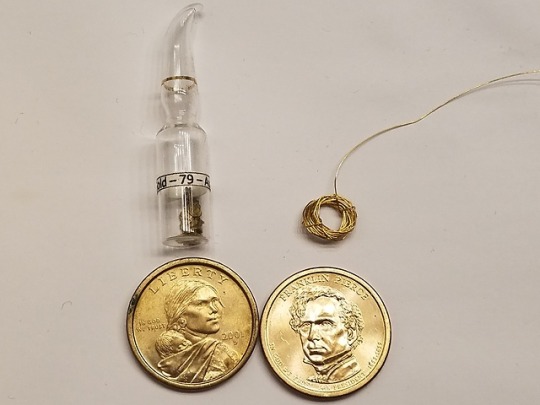
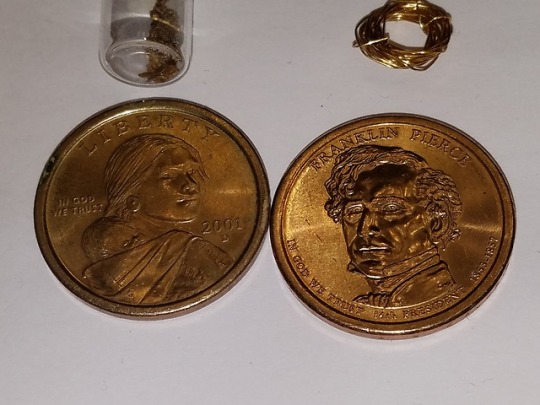
On the top right is a 24K gold wire, coiled so that the color becomes more apparent. Top left is natural placer gold I panned in Angel's Camp, CA.
Bottom are both manganese brass (12% Zn, 7% Mn, 4% Ni, 77% Cu), but the one on the right is fresher by a few years.
What's immediately apparent is that, at least with these samples, gold has a noticeably more yellow tint without flash (something an old gold panner
taught me is that gold looks roughly the same in any light - bright yellow. Brass and other fakes will take on a green or brown tint).
[Edited on 4/15/2018 by elementcollector1]
[Edited on 4/15/2018 by elementcollector1]
Elements Collected:52/87
Latest Acquired: Cl
Next in Line: Nd
|
|
|
MrHomeScientist
International Hazard
Posts: 1806
Registered: 24-10-2010
Location: Flerovium
Member Is Offline
Mood: No Mood
|
|
I had trouble getting a nice picture of the samples too. It's hard to capture the true colors. In that last picture the rightmost ingot is 15%. It's
in order of zinc additions, so pure copper on the left and highest zinc on the right - 0%, 6%, 11%, 15%.
Comparing to gold was a good idea, so I did the same! Mine is a big 'ol nugget from Crisson Gold Mine's "Nugget Bucket" that I panned through a while
back. That place is my favorite 'touristy' gold mine, and I've been there several times.
Anyway the first picture is without flash, second is with flash.
|
|
|
elementcollector1
International Hazard
Posts: 2684
Registered: 28-12-2011
Location: The Known Universe
Member Is Offline
Mood: Molten
|
|
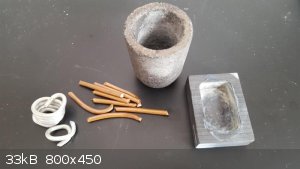
Unfortunately, it looks like I'll be taking the Edison approach to this. My butane microtorch provided enough heat to melt the zinc penny, and after a
good long while of torching it, enough heat to at least start its dissolution into the copper penny underneath it. Unfortunately, the way
things were going, I would have likely had several hours to go before I made any significant progress. I did, however, manage to make the following
observations:
-At the temperature of my butane torch, the borax flux slowly (but successfully) fluxed to cover the copper surface. It melted into a black, vitreous
glassy substance that had to be chiseled off. The copper surface underneath, despite being from a very old penny, was surprisingly clean - an
indication that it was also doing its job of segregating oxides. This doesn't account for the black color, however, as even borax that wasn't touching
the copper was turning black when melted.
-Dissolution, as noted earlier, was incredibly slow at these temperatures. The copper penny was only slightly warped when I decided to stop,
and nowhere near molten, even though it did glow a dull red. I suspect the temperature was around 600 C - the lower bound for metals glowing
cherry-red.
Well, it looks like it's time to make another makeshift furnace. I have a laundromat dryer heating coil, and I can probably construct a quick casing
out of carbon foam. Wish me luck!
Elements Collected:52/87
Latest Acquired: Cl
Next in Line: Nd
|
|
|
MrHomeScientist
International Hazard
Posts: 1806
Registered: 24-10-2010
Location: Flerovium
Member Is Offline
Mood: No Mood
|
|
I did some more calculations on my results. It gets a little complicated!
tl;dr - I was aiming for ingots with zinc content of 6%, 11%, and 15%, and my actual results are closer to 6%, 11%, and 17%.
====================
I wanted to get a more accurate measure of the percentages, so I weighed the 3 sample ingots as well as the final disc of solidified brass that fell
out of the crucible at the end.
Ingot #1: Starting with 300g Cu, I added the first zinc piece of 20g. Ignoring any boil-off losses, since I didn't observe any flames
or sputtering on this one, this yields 6% zinc content. I then poured out the first ingot, which weighed 58.5g.
Ingot #2: This left 261.5g in the crucible. The second zinc piece was 17.4g, which flared up quite a bit when added. Ignoring the
boiling losses for now, that would yield 278.9g in the crucible and a zinc content of 13%. The second ingot was poured from this, and weighed 56.4g.
Ingot #3: This left 222.5g in the crucible. The third zinc was 17.2g and this also flared up when added. Again ignoring this for a
moment, there should have been 239.7g in the crucible and a 23% zinc content. I poured off the third ingot, weighing in at 79.7g (overpoured a bit!).
Now to estimate boil-off losses. This final ingot pour should have left 160g of material in the crucible. When I recovered this and knocked off the
borax slag, it actually weighed 146.9. So 13.1g of material was lost, which I assume to be entirely zinc. Since I did not observe any boiling on
addition of the first zinc piece, I decided to split this evenly among ingots 2 and 3. Subtracting that loss from the total zinc content for those
ingots yields 11% Zn for Ingot #2, and 17% Zn for Ingot #3.
Math!
|
|
|
elementcollector1
International Hazard
Posts: 2684
Registered: 28-12-2011
Location: The Known Universe
Member Is Offline
Mood: Molten
|
|
And yet, the 17% still doesn't quite match the color of your gold nugget, which is clearly more yellow. Maybe even more is needed?
Elements Collected:52/87
Latest Acquired: Cl
Next in Line: Nd
|
|
|
DJF90
International Hazard
Posts: 2266
Registered: 15-12-2007
Location: At the bench
Member Is Offline
Mood: No Mood
|
|
Maybe you could use digest a sample of each ingot and do some quantitative analysis to get accurate numbers for Cu and Zn content?
|
|
|
MrHomeScientist
International Hazard
Posts: 1806
Registered: 24-10-2010
Location: Flerovium
Member Is Offline
Mood: No Mood
|
|
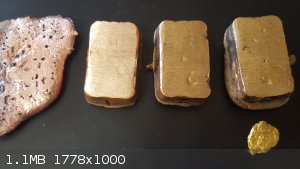
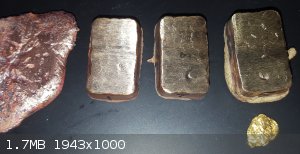
I finished off the brass series this weekend by adding two new ingots to the collection. Same procedure as before, starting with the final crucible
contents from the last series of experiments. This produced two new ingots before I ran out of alloy. Here they are by themselves, then as part of the
lineup with the rest of the ingots. From left to right: pure copper, ingots #1-5 in order, and a piece of pure gold below.
 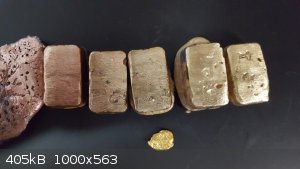
It's incredibly hard to get a decent picture of the color. #4 and #5 are very very similar, but #5 is slightly more yellow. It may be the closest to
real gold.
One thing I did notice is the first 3 ingots, over the week since I made them, all tarnished somewhat. I wire brushed everything again before taking
the above photos so the comparison is fair.
So now the math. First off I need to edit my previous percentages, because I was able to recover 5.6g of brass scraps from the crucible after pouring
ingot #3. Factoring that in, that changes the previous ingot's zinc contents to:
Ingot #1 - 6%
Ingot #2 - 12%
Ingot #3 - 20%
For today's run, my starting crucible charge was 152.5g of the final brass that produced ingot #3. To this I added the 16.5g Zn piece, then poured
ingot #4 which weighed 85.7g (seriously overpoured that one!). Then I added the 11g Zn piece to the crucible and poured ingot #5 (55.2g). The dregs in
the crucible weighed in at 32.4g. Boiling was pretty tame this time, perhaps because of the lower temperature (since brass's melting point is lower
than copper's). Theoretical final weight should have been 39.1g, so only about 3.3g boiled off during each zinc addition. Considering all of that, we
arrive at:
Ingot #4 - 36%
Ingot #5 - 72%
Something else interesting was that due to ingot #5's high zinc content, it was on fire as I poured it. So even if I hadn't ran out of alloy, I
probably would have stopped zinc addition there anyway.
If anyone wants to review my convoluted math, I'll attach my spreadsheet here too.
Attachment: Brass Experiments.xlsx (13kB)
This file has been downloaded 335 times
|
|
|
elementcollector1
International Hazard
Posts: 2684
Registered: 28-12-2011
Location: The Known Universe
Member Is Offline
Mood: Molten
|
|
Even at 72% Zn, there's a noticeable difference in color... maybe a tertiary element is needed? Tin, or some such? Strange that such a yellow alloy
would still be so far off.
When ingot #5 was on fire, did you use any flux?
Elements Collected:52/87
Latest Acquired: Cl
Next in Line: Nd
|
|
|
MrHomeScientist
International Hazard
Posts: 1806
Registered: 24-10-2010
Location: Flerovium
Member Is Offline
Mood: No Mood
|
|
I did; some borax before each zinc addition. Perhaps not enough?
[Edited on 4-23-2018 by MrHomeScientist]
|
|
|
MrHomeScientist
International Hazard
Posts: 1806
Registered: 24-10-2010
Location: Flerovium
Member Is Offline
Mood: No Mood
|
|
I found this neat graphic on this site: http://cascadecoil.com/2014/12/gold-silver-bronze-your-guide...
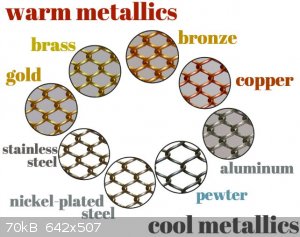
It's obviously circumstantial, but having the alloys pictured side by side seems to indicate that gold is somewhere between brass and bronze in color.
Could be a data point in favor of adding a bit of tin to my brass to adjust the color. The question is, how much?
I haven't read this all the way through yet, but this very long article looks to be full of useful tidbits: http://science-notebook.com/henley/hen-051-075.html
Some interesting excerpts:
| Quote: | | Leaf Brass. This alloy is also called Dutch gold, or imitation gold leaf. It is made of copper, 77.75 to 84.5 parts; zinc, 15.5 to 22.25. Its color is
pale or bright yellow or greenish, according to the proportions of the metals. It has an unusual degree of ductility. |
Page 68 has a whole section devoted to imitation gold (emphases mine, to call out each formula):
| Quote: | IMITATION GOLD.
I. One hundred parts, by weight, of copper of the purest quality; 14 of zinc or tin; 6 of magnesia; 3/6 of sal ammoniac, limestone, and cream of
tartar. The copper is first melted, then the magnesia, sal ammoniac, limestone, and cream of tartar in powder are added separately and gradually. The
whole mass is kept stirred for a half hour, the zinc or tin being dropped in piece by piece, the stirring being kept up till they melt. Finally the
crucible is covered and the mass is kept in fusion 35 minutes and, the same being removed, the metal is poured into molds, and is then ready for use.
The alloy thus made is said to be fine-grained, malleable, takes a high polish, and does not easily oxidize.
II. An invention, patented in Germany, covers a metallic alloy, to take the place of gold, which, even if exposed for some time to
the action of ammoniacal and acid vapors, does not oxidize or lose its gold color. It can be rolled and worked Tike gold and has the appearance of
genuine gold without containing the slightest admixture of that metal. The alloy consists of copper and antimony in the approximate ratio of 100 to 6,
and is produced by adding to molten copper, as soon as it has reached a certain degree of heat, the said percentage of antimony.
When the antimony has likewise melted and entered into intimate union with the copper, some charcoal ashes, magnesium, and lime spar are added to the
mass when the latter is still in the crucible.
III. Aluminum Gold. This alloy, called Nuremberg gold, is used for making cheap gold ware, and is excellent for this purpose, as its
color is exactly that of pure gold, and does not change in the air.
Articles made of Nuremberg gold need no gilding, and retain their color under the hardest usage; even the fracture of this alloy shows the pure gold
color. The composition is usually 90 parts of copper, 2.5 of gold, and 7.5 of aluminum.
IV. Imitation gold, capable of being worked and drawn into wire, consists of 950 parts copper, 45 aluminum, and 2 to 5 of silver.
V. Chrysochalk is similar in composition to Mannheim gold:
I II
Copper 90.5 58.68
Zinc 7.9 40.22
Lead 1.6 1.90
In color it resembles gold, but quickly loses its beauty if exposed to the air, on account of the oxidation of the copper. It can, however, be kept
bright for a long time by a coating of colorless varnish, which excludes the air and prevents oxidation. Chrysochalk is used for most of the ordinary
imitations of gold. Cheap watch chains and jewelry are manufactured from it, and it is widely used by the manufacturers of imitation bronze ornaments.
Mannheim Gold or Similor. Mannheim gold is composed of copper, zinc, and tin, in proportions about as follows:
I II
Copper 83.7 89.8
Zinc 9.3 9.9
Tin 7.0 0.6
It has a fine yellow color, and was formerly much used in making buttons and pressed articles resembling gold. Later alloys, however, surpass it in
color, and it has fallen somewhat into disuse.
One variety of Mannheim gold, so called, contains 1.40 parts of brass (composition 3 Cu 2 1 Zn) to 10 of copper and 0.1 of zinc.
Mosaic Gold. This is an alloy composed with slight deviations of 100 parts of copper and 50 to 55 of zinc. It has a beautiful color,
closely resembling that of gold, and is distinguished by a very fine grain, which makes it especially suitable for the manufacture of castings which
are afterwards to be gilded. The best method of obtaining a thoroughly homogeneous mixture of the two metals is first to put into the crucible
one-half of the zinc to be used, place the cover upon it, and fuse the mixture under a cover of borax at as low a temperature as possible. Have ready
the other half of the zinc, cut into small pieces and heated almost to melting, and when the contents of the crucible are liquid throw it in, a small
portion at a time, stirring constantly to effect as intimate a mixture of the metals as possible.
Oreiide or Oroide (French Gold). The so-called French gold, when polished, so closely resembles genuine gold in color that it can
scarcely be distinguished from it. Besides its beautiful color, it has the valuable properties of being very ductile and tenacious, so that it can
easily be stamped into any desired shape; it also takes a high polish. It is frequently used for the manufacture of spoons, forks, etc., but is
unsuitable for this purpose on account of the large amount of copper contained in it, rendering it injurious to health. The directions for preparing
this alloy vary greatly. The products of some Paris factories show the following composition:
I II III
Copper 90 80.5 86.21
Zinc 10 14.5 31.52
Tin 0.48
Iron 0.24
A special receipt for oreïde is the following:
IV. Melt 100 parts of copper and add, with constant stirring, 6 parts of magnesia, 3.6 of sal ammoniac, 1.8 of lime, and 9 of crude tartar. Stir
again thoroughly, and add 17 parts of granulated zinc, and after mixing it with the copper by vigorous stirring keep the alloy liquid for one hour.
Then carefully remove the scum and pour off the alloy.
Pinchbeck. This was first manufactured in England. Its dark gold color is the best imitation of gold alloyed with copper. Being very
ductile, it can easily be rolled out into thin plates, which can be given any desired shape by stamping. It does not readily oxidize, and thus
fulfills all the requirements for making cheap jewelry, which is its principal use.
Copper 88.8 93.6
Zinc 11.2 6.4
|
After that it goes into alloys that contain actual gold, which I'm not interested in. Even in this quote, Aluminum Gold and the one right underneath
it contain precious metals, so I'm ruling those out.
The use of nonmetal ingredients is very interesting. There's no explanation for them; are they fluxes? Something to encourage better alloying?
The description of Oroide was very promising, until I saw the composition. Are they seriously saying a 90:10 Cu:Zn is indistinguishable from gold?
(the tin and iron are only in mix III - it didn't copy well) Unless there's an extremely narrow range around 10% where color changes dramatically,
then changes right back, I'm calling BS on that one.
|
|
|
MrHomeScientist
International Hazard
Posts: 1806
Registered: 24-10-2010
Location: Flerovium
Member Is Offline
Mood: No Mood
|
|
Another promising option is aluminum bronze, a mixture of about 90% copper and 10% aluminum. There's several videos about making it,
but this one has an incredible looking end product. Here's a screen grab for posterity:
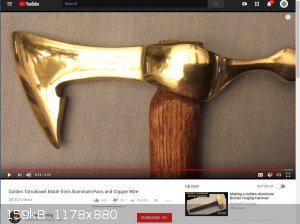
Look at that color!
Easy to make and I have the components aplenty. I'll definitely do a test this weekend.
The other creeping concern I'm beginning to have is how castable these various metals are. The coin I'd like to replicate in gold has some pretty fine
details, and I don't know how well they'll get picked up. Suppose I just need to try it and see.
|
|
|
Fulmen
International Hazard
Posts: 1693
Registered: 24-9-2005
Member Is Offline
Mood: Bored
|
|
Aluminium bronze has another benefit, it doesn't tarnish like brass.
We're not banging rocks together here. We know how to put a man back together.
|
|
|
MrHomeScientist
International Hazard
Posts: 1806
Registered: 24-10-2010
Location: Flerovium
Member Is Offline
Mood: No Mood
|
|
I posted this topic on a metalcasting forum I found, to tap into their experience. Check it out here: http://www.alloyavenue.com/vb/showthread.php?13638-Making-Br...
|
|
|
MrHomeScientist
International Hazard
Posts: 1806
Registered: 24-10-2010
Location: Flerovium
Member Is Offline
Mood: No Mood
|
|
I've had lots of great input from the Alloy Avenue guys, and lots of criticism of my propane furnace, lol. I'm finding out that it was somewhat poorly
designed. But hey, it still melts metal.
Anyway, my quest for a golden alloy has led me to aluminum bronze. Aluminum bronze is an alloy of copper and aluminum, and has a wonderful golden
color. It has high hardness and good corrosion and tarnish resistance. As with all alloys there are a range of aluminum bronzes, but I went with the
popular YouTube formula of 90% Cu to 10% Al.
I made a post in that thread that I thought I'd copy here for those that are still interested.
===================================
I made some aluminum bronze this evening using copper and aluminum wires for maximum purity, and WOW is it nice!
I weighed out 5.08g of Al wire and 20.36g Cu wire for the alloy. I used my small crucible and mini propane furnace for this one.
Here's the furnace setup:
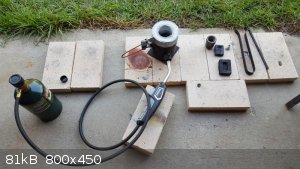
It's very nice for small batches. It just barely reaches copper melting temperature. Now that I know more what to look for, I see that this
one has coated kaowool (good) but the burner comes in at just about the middle of the furnace (bad).
Anyways I melted everything down, and the ingot was silver when it came out! I then realized I made a stupid math error and had actually made 20%
aluminum bronze (dang!), so I remelted this ingot and added in another 25.36g of copper wire to dilute it down to 10% aluminum. This came out looking
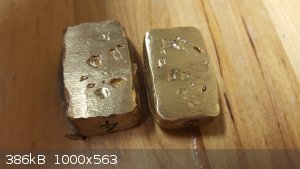
gorgeous:
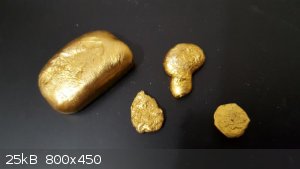
That's straight out of the mold, without any sanding or polishing. I think I've found my gold simulant!
It's so good, in fact, that one of those pieces in the photo....... is actually REAL GOLD! Can you tell which one?
|
|
|
elementcollector1
International Hazard
Posts: 2684
Registered: 28-12-2011
Location: The Known Universe
Member Is Offline
Mood: Molten
|
|
Is it, perhaps, the middle one that was in a previous picture of yours? 
But seriously, wow. Now that is fake gold. The melting point seems to be a bit higher than zinc brass equivalent, but aluminum's a
good deal less prone to burning than zinc is.
Is that mini furnace bought, or homemade?
Elements Collected:52/87
Latest Acquired: Cl
Next in Line: Nd
|
|
|
Fulmen
International Hazard
Posts: 1693
Registered: 24-9-2005
Member Is Offline
Mood: Bored
|
|
Damn! Looks like you nailed it this time.
We're not banging rocks together here. We know how to put a man back together.
|
|
|
MrHomeScientist
International Hazard
Posts: 1806
Registered: 24-10-2010
Location: Flerovium
Member Is Offline
Mood: No Mood
|
|
Quote: Originally posted by elementcollector1  | Is it, perhaps, the middle one that was in a previous picture of yours?
But seriously, wow. Now that is fake gold. The melting point seems to be a bit higher than zinc brass equivalent, but aluminum's a
good deal less prone to burning than zinc is.
Is that mini furnace bought, or homemade? |
Damn! I expected cheating by going to the other forum where I revealed it there, but missed possible cheating from this very thread! Yes indeed, it's
the one at bottom middle 
This stuff even has some weight to it, just a little less dense than copper, so it even feels pretty solid. I'm extremely excited about making more of
it, and casting it into shapes!
The mini furnace was bought on eBay a while back. It's very nice for small batches and heats up quickly (except for copper; that takes a while to
reach). It's fallen off my eBay purchase history, but I might be able to find the seller if there's interest. I think it was called the "mini micro"
propane furnace or something like that.
|
|
|
MrHomeScientist
International Hazard
Posts: 1806
Registered: 24-10-2010
Location: Flerovium
Member Is Offline
Mood: No Mood
|
|
I made a video on my alloying exploits: https://www.youtube.com/watch?v=2o_ooiboyok
Part of it is that unlisted video I shared before; I added an aluminum bronze melt to that footage. There are some seriously AWESOME clips from that:
mirror-like molten copper that seemed to be bubbling for some reason, and an incredible transition in metal color when it's quenched.
|
|
|
j_sum1
Administrator
Posts: 6218
Registered: 4-10-2014
Location: Unmoved
Member Is Offline
Mood: Organised
|
|
Thanks MHS. I have it bookmarked and am looking forward to watching it.
|
|
|
elementcollector1
International Hazard
Posts: 2684
Registered: 28-12-2011
Location: The Known Universe
Member Is Offline
Mood: Molten
|
|
Decided to give this a try of my own, with some interesting results...
For starters, I went with a ratio of 90/10 copper from welding electrodes and aluminum from small juice cans respectively. The crucible was filled
with argon prior to heating but not refilled at any point afterwards, and some oxygen undoubtedly got in.
As it was melting/pouring, I noticed a slag of aluminum oxide forming from one of the can scraps- I didn't think much of this, as it was my first run.
Pouring gave me a small button of liquid, as well as a spout that fell out of the crucible:
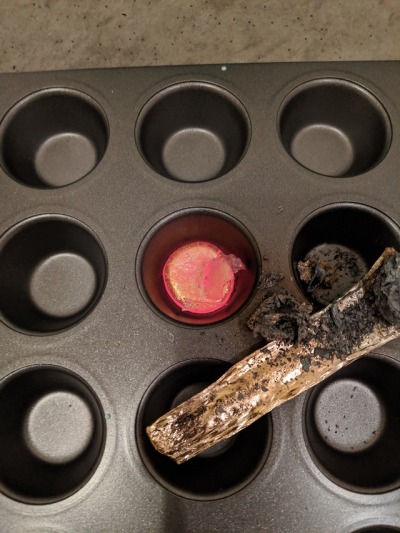
Upon quenching, this was what they looked like:
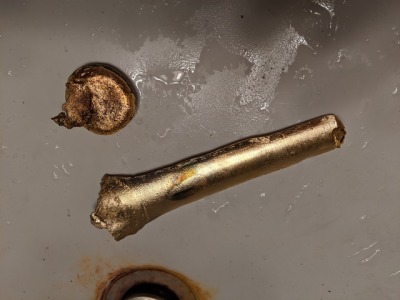
(The button isn't actually that much darker - that's just surface oxidation.)
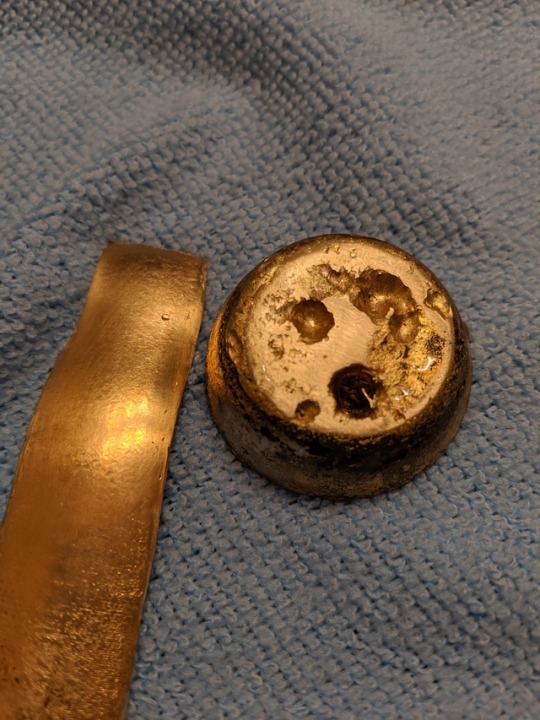
I thought they looked much whiter in coloration than MrHomeScientist's attempt, so I did some specific gravity analysis on two samples - the cast
button, and a sample removed from near the top of the pouring spout. These had an approximate specific gravity of 8.233 and 8.450 respectively, which
(assuming pure starting metals) corresponds to roughly 96.2% and 97.4% copper by weight.
This, above all else, baffles me - I'd believe losing that much aluminum, but how is the color still so white when it's that high in copper? The only
thing I can think of is that my starting metals had some strongly coloring impurities.
Going to try again with some pre-melted aluminum buttons - hopefully this will reduce surface area and help keep oxidation in check.
[Edited on 9/25/2019 by elementcollector1]
Elements Collected:52/87
Latest Acquired: Cl
Next in Line: Nd
|
|
|
elementcollector1
International Hazard
Posts: 2684
Registered: 28-12-2011
Location: The Known Universe
Member Is Offline
Mood: Molten
|
|
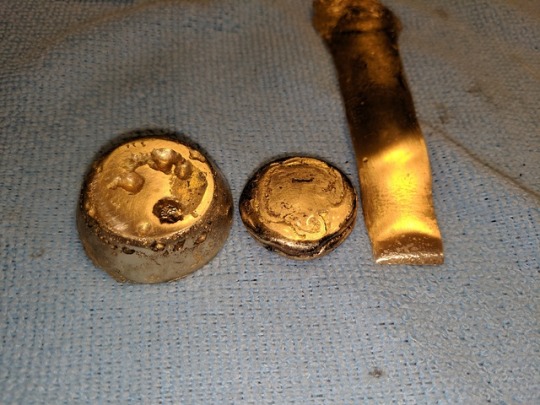
Run 2, this time with a pre-melted aluminum button and the same copper welding electrodes. Noticeably less smoke evolved during this run, but despite
filling the crucible with argon repeatedly, I spotted a blue flame briefly flare up at a few moments. The piece on the left is from Run 1, for
comparison (unfortunately, I didn't get a nice, uniform size between these two runs, so color comparison is a little harder).
I'm pretty sure I'm losing copper on these runs, for a few reasons - the first being the aforementioned blue flame, indicating air was reacting with
the copper and turning it to oxide. (Though wouldn't this in turn react with the molten aluminum to be reduced back to copper and produce aluminum
oxide slag?)
The second is that this is roughly the same color as the previous run, meaning their concentrations are going to be pretty similar (I'll edit this
post tomorrow with the numbers). Too white to really compare to MrHomeScientist's runs, despite starting at the same concentration.
The third reason, which is definitely indicative that I lost something, is that the final pour weighs considerably less than the initial
starting weight - 90 grams copper, 10 grams aluminum became 83 grams of aluminum bronze.
Is there a flux, or other such thing I should be using? I'm definitely encountering plenty of alumina-based slag, so oxygen is a factor here. I'm
concerned because this makes it difficult to accurately mix alloy compositions - should I be overcompensating for copper content?
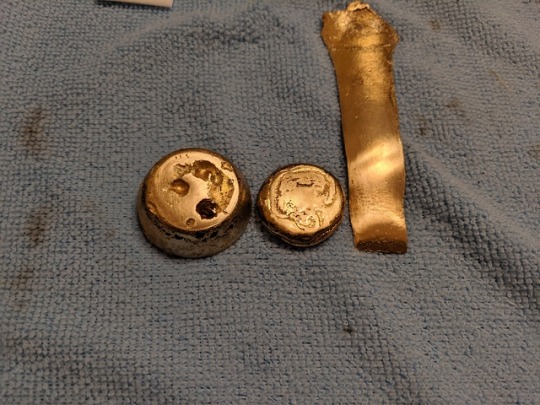
EDIT: I've since found part of the problem lies in photography - these look beautiful when taken under flash, less so in real life:
Without flash:
EDIT 2: Just got the composition results for the second run!
To my (half)-surprise, this ingot is much lower in copper than the previous attempt, at 92.3% by weight. This is much closer to the original
composition, which indicates my suspicion about my aluminum's surface area was correct, and much less was lost this time. Despite losing more copper
by weight (13.33g as opposed to 3.60g Al lost), this alloy is still enriched in copper from the starting concentration of 90%.
Surprisingly, the ingot with lower copper content takes on a yellower tinge. I'd thought that copper-rich aluminum bronze would shift towards orange,
but it appears to be making a quick stop at a paler white gold at around 96-97 wt% copper first, at least upon polishing.
Next runs will focus more on purity of starting metals, to see if this makes a difference in color. In addition, I think I'll turn down the melting
temperature from 1100 C, as while this ensures everything is liquid, it might also be responsible for losing copper as vapor.
[Edited on 9/26/2019 by elementcollector1]
Elements Collected:52/87
Latest Acquired: Cl
Next in Line: Nd
|
|
|
Sulaiman
International Hazard
Posts: 3554
Registered: 8-2-2015
Location: 3rd rock from the sun
Member Is Online
|
|
I found this thread, your video and the thread on the other forum interesting.
One question (my idle curiosity); have you tried sawing through the ingots to check if the colour is truly the alloy colour, or an oxide/surface
coating ?
Anecdotal: somewhere around 1971 I was on an induction/recruitment course at GKN which was at the time (they said) the world's largest producer of
brass screws.
I spent about a week in the factory, there the foundry melted scrap brass, copper and other metals to make the brass for their screws.
Despite their years of experience they could not predict the final composition of their brass alloys,
they would take a small ladle of the melt as a sample and send the resulting ingot to the lab,
in the lab they used a spark spectograph machine to assay the ingot,
then telephone down to the foundry what metals in what quantities to add to the melt before pouring.
So based on the above alone, I doubt that any of your alloy compositions are exact.
I have no matalurgy/foundry/casting experience myself.
Nice to see how quickly your foundry skills have progressed.
CAUTION : Hobby Chemist, not Professional or even Amateur
|
|
|
elementcollector1
International Hazard
Posts: 2684
Registered: 28-12-2011
Location: The Known Universe
Member Is Offline
Mood: Molten
|
|
| Quote: Originally posted by Sulaiman |
One question (my idle curiosity); have you tried sawing through the ingots to check if the colour is truly the alloy colour, or an oxide/surface
coating ?
|
I've broken a couple of my pieces for density calculations, and I can definitely say that the color goes all the way through and is uniform.
However, having rewatched the video again, I find myself very curious at the color change induced by quenching. I haven't done that, preferring to let
them air-cool, so I wonder if this is responsible for the color discrepancy in my samples - and if so, how? If it's an oxide layer it would be removed
by polishing, yet it clearly isn't in the same video. But you can clearly see the quench takes it from a paler gold similar to mine to a very rich
yellow-gold.
| Quote: Originally posted by Sulaiman |
Anecdotal: somewhere around 1971 I was on an induction/recruitment course at GKN which was at the time (they said) the world's largest producer of
brass screws.
I spent about a week in the factory, there the foundry melted scrap brass, copper and other metals to make the brass for their screws.
Despite their years of experience they could not predict the final composition of their brass alloys,
they would take a small ladle of the melt as a sample and send the resulting ingot to the lab,
in the lab they used a spark spectograph machine to assay the ingot,
then telephone down to the foundry what metals in what quantities to add to the melt before pouring.
So based on the above alone, I doubt that any of your alloy compositions are exact.
I have no matalurgy/foundry/casting experience myself.
Nice to see how quickly your foundry skills have progressed. |
Huh. Well, at least I'm not alone in wondering how to keep things more constant. I wonder how exact their composition needed to be for screws?
Elements Collected:52/87
Latest Acquired: Cl
Next in Line: Nd
|
|
|
Fulmen
International Hazard
Posts: 1693
Registered: 24-9-2005
Member Is Offline
Mood: Bored
|
|
For commercial production you need to know the exact composition. Even if your tolerances are loose you still need to know for sure.
Sadly this is where most amateur projects hit a dead end. Even simple projects quickly devolve into a multi-discipline challenge from hell.
We're not banging rocks together here. We know how to put a man back together.
|
|
|
Sulaiman
International Hazard
Posts: 3554
Registered: 8-2-2015
Location: 3rd rock from the sun
Member Is Online
|
|
| Quote: Originally posted by elementcollector1 | | ...However, having rewatched the video again, I find myself very curious at the color change induced by quenching. I haven't done that, preferring to
let them air-cool, so I wonder if this is responsible for the color discrepancy in my samples - and if so, how?... |
All I know is that quenching can 'lock' a crystal structure that normally only exists at high temperature,
so looking at the phase diagram presented earlier - I guess you will have to try quenching.
regarding actual composition and the post above,
just buy one of these  https://www.google.com/search?q=handheld+xrf&safe=active... https://www.google.com/search?q=handheld+xrf&safe=active...
CAUTION : Hobby Chemist, not Professional or even Amateur
|
|
|
| Pages:
1
2
3 |
|


