smuv
National Hazard

Posts: 842
Registered: 2-5-2007
Member Is Offline
Mood: Jingoistic
|
|
Heating Mantle repair/construction
Intro
My heating mantle failed a few weeks ago; I had a hard time finding a replacement, and everything that popped up on ebay was too expensive for my
taste. I decided instead to repair this mantle. Through the process I realized that making a heating mantle from scratch similar to glass-col's
specs can be done by those with the time and inclination.
I am going to separate this post into two sections; in the first section the failed 3L heating mantle will be taken apart/analyzed. The second
section will show how to repair/essentially make a mantle from scratch. As is, I havn't totally finished this project (and maybe won't for a while)
but I have taken it to the stage of "proof-of-point".
Glas-col's secret
The heating mantle I took apart was a 3L, 500w mantle. This mantle was a little different from other glas-col mantles in that, instead of having a
fiberglass cloth base it had a supported fiberglass wool base (when you open it up it looks just like house insulation).
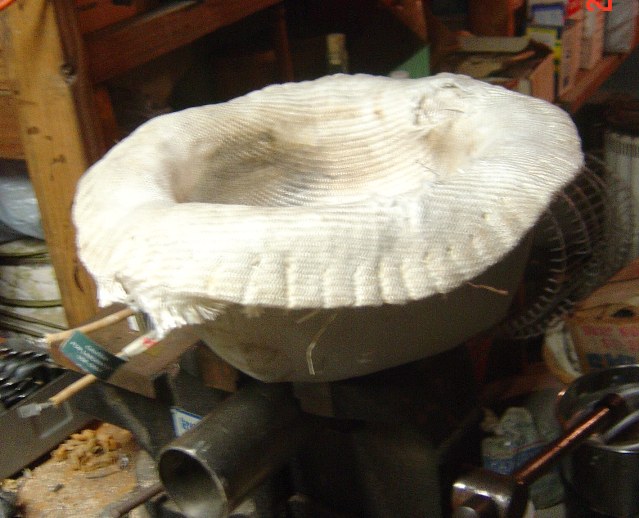
This picture shows the mantle, the stitches have been removed which connect the base portion to the fiberglass cloth portion. The thread used to
connect the two appears to be a fiberglass thread. The mantle is in such bad shape, b/c it was bought used for very little...
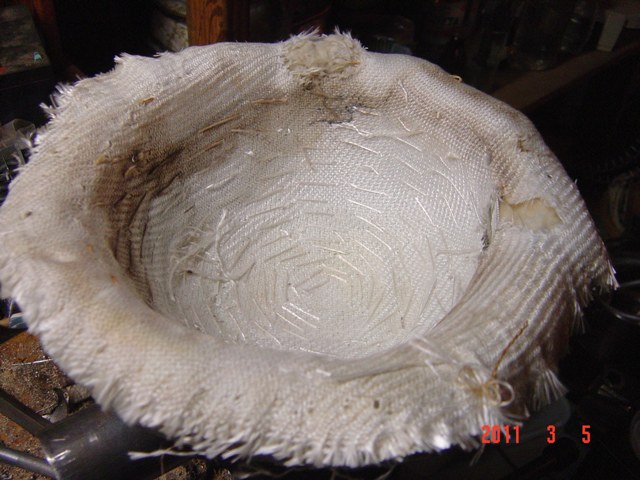
Removal of the top fiberglass cloth base, reveals another layer of fiberglass cloth. This cloth shows the stitches which are used to hold the
resistance wire to this layer of cloth. The purpose of the top layer of fiberglass cloth is probably two-fold: to protect these stitches and to some
extent provide more even heat distribution.
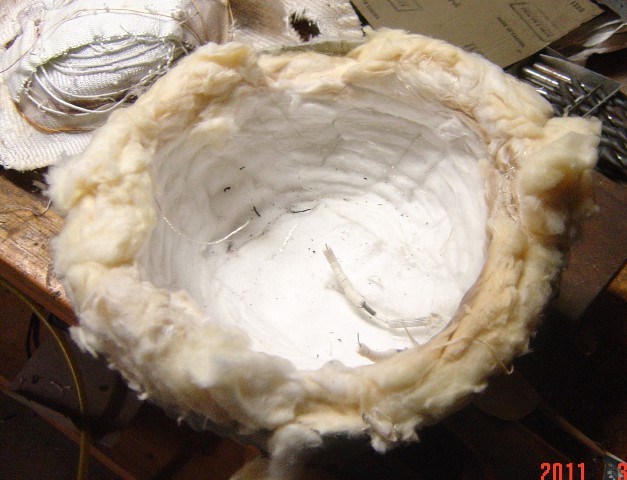
Removal of this second layer of cloth (and the resistance wire which is sewn to it) reveals, the supported fiberglass wool base. The connection of
mains to the resistance wire is made by a fiberglass insulated wire. Near the connection to the resistance coil, the glass insulation had been
removed and ceramic insulation beads had been threaded onto the wire.
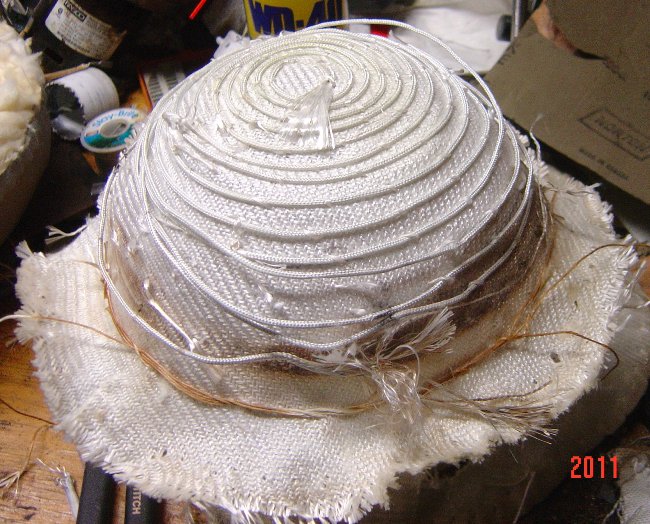
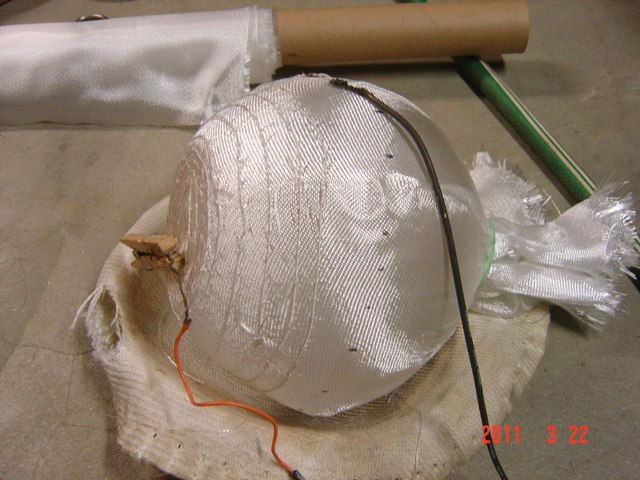
This is the 2nd fiberglass layer, it has been inverted to show the fiberglass coated resistance wire. The resistance wire is 25ga, and the total
length of the wire is about 15 feet. The fiberglass insulation of this wire is pretty fragile and can be flaked off easily with a fingernail. The
glass coated resistance wire is affixed to the fiberglass cloth with fiberglass thread. The resistance wire does not seem to be held very tightly to
the fiberglass cloth, it is pretty loosely bound. The resistace wire is connected to the mains via a crimp fitting, this connection is made in a
little fiberglass pocket, probably to further protect it.
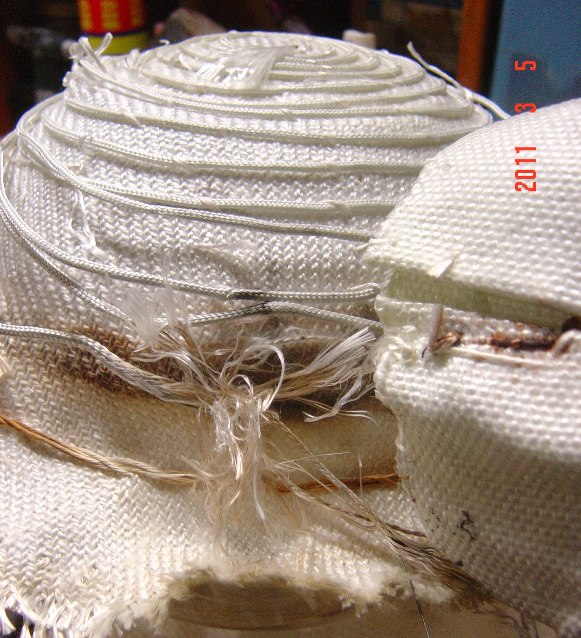
This picture shows part of this fiberglass pocket (on the right), as well as the root cause of failure of this mantle. The resistance wire in this
pocket was badly corroded and broken in one place. The probable cause of failure was the fact I spilled some brine/sodium tosylate solution onto the
mantle. Probably over a few uses this acted as a flux continuously removing the oxide coating from the nichrome which eventually lead to failure. In
some places the fiberglass insulation was broken from the resistance wire, despite this, the bare wire in these areas looked good and showed no signs
of excessive wear.
How I did it
I could have salvaged the failed mantle, but that would be no fun, and the ability to make a heating mantle to heat any vessel would be a neat trick
for the home chemist. All you really need to make a new mantle is glass coated resistance wire and fiberglass cloth. I purchased 50ft of 25ga
nichrome 60, silicone coated fiberglass resistance wire for ~$25 from pelican wire and some S2 Fiberglass (S2 fiberglass can take higher temperatures than cheaper E glass) from TAP Plastics.
One thing you may notice is that, I bought silicone coated glass resistance wire; this was b/c the plain glass coated wire was out of stock. The
silicone insulation was easily and cleanly burned off of the wire (by just connecting 120v mains current) to reveal the lower layer of fiberglass
insulation. A major difference b/t this wire and the stock is that this wire has a much thinner insulation, however, the insulation flakes off much
less easily (but will if you kink the wire); again this wire is the same gauge as the original (25awg) but looks much thinner due to the thinner
insulation.
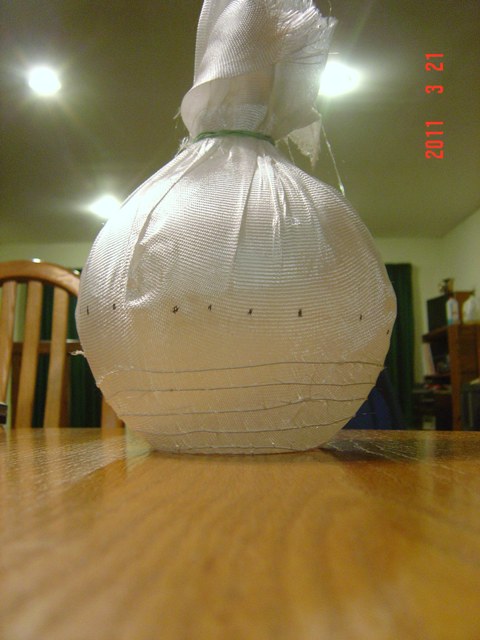
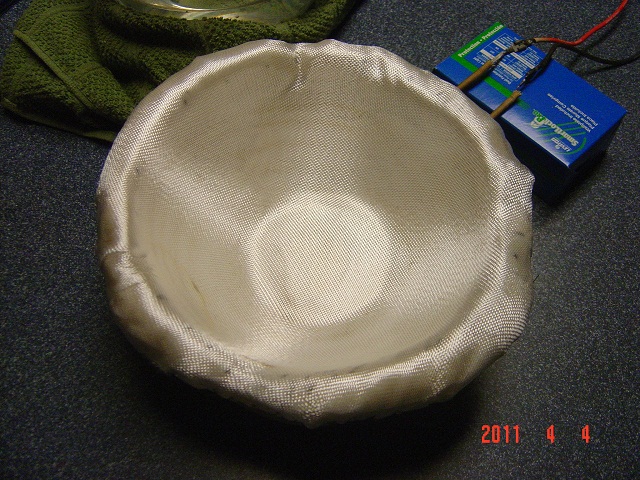
Essentially what I did, was I wrapped a 3L FB flask in the fiberglass cloth, tethered via a rubber band, and with much help from a friend, sewed 15ft
of the resistance wire to the cloth with fiberglass thread. The fiberglass thread was obtained by simply pulling out a row from a section of the
fiberglass cloth (this is pretty easy to do). I did not do the bulk of the sewing, but it is pretty easy, albeit time consuming.
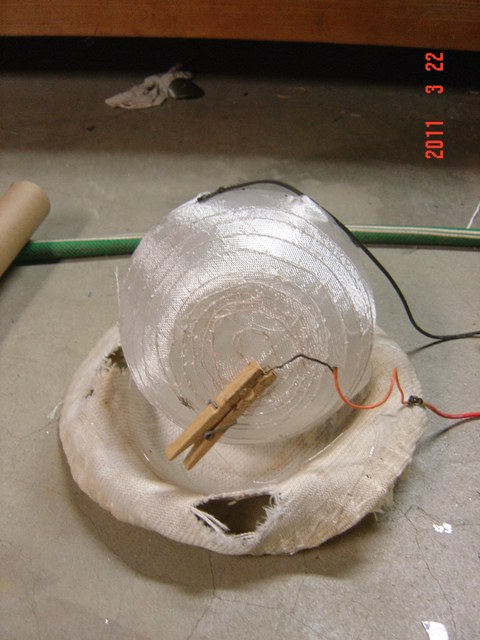
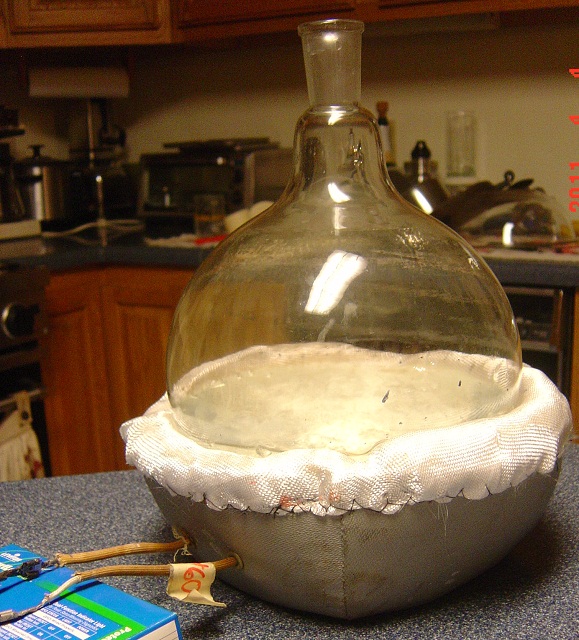
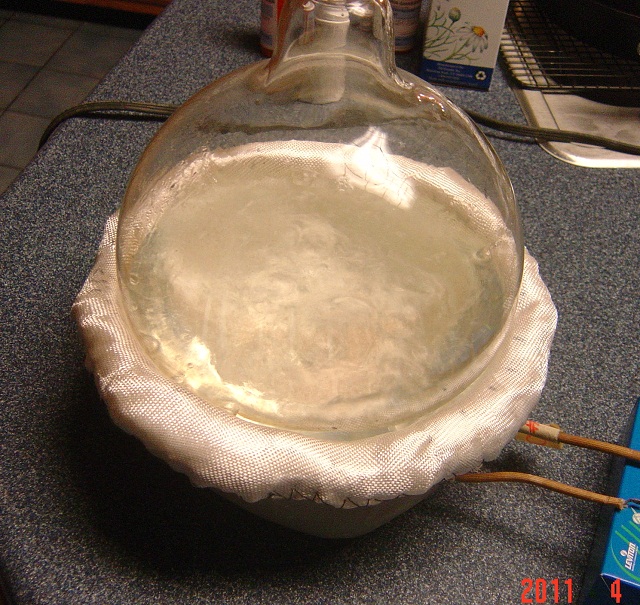
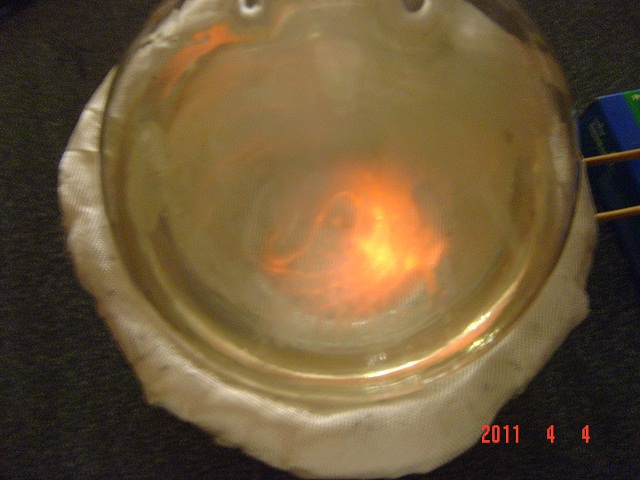
This picture shows the proof-of-concept picture, the resistance coil has been connected to the 120v mains. After a few seconds the coil reached
steady state (you can see the dull glow of the metal resistance wire through the glass insulation). The mantle was left on for a few minutes, with no
problems (except charring the cloth's pin).
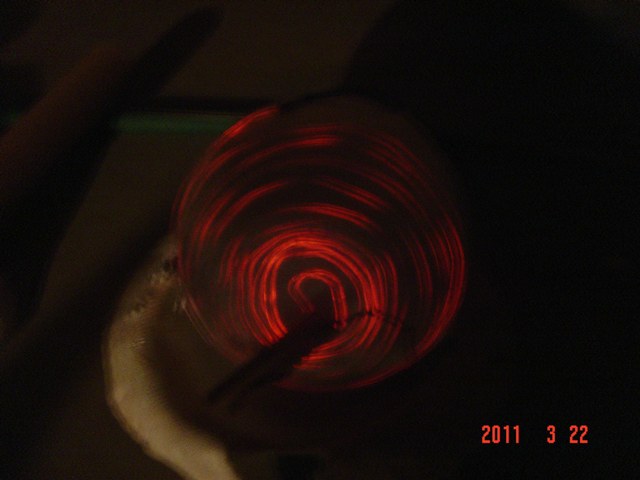
In the dark.
Another angle.

Close-up of the sewn in resistance wire, with some stitches marked with red dots. You will notice that we sewed in this much more tightly than the
original design...
Wrapping up
So this is pretty much where I have left this project, I don't know when I am going to be able to button everything up (things are getting a little
crazy right now). But at this point I am pretty excited, because applying these techniques to other vessels gives an efficient way to heat just about
anything. After this project, I will work on making a 4kw heater for a 15.5 gallon keg  . .
One thing that is a little unresolved, is that I don't know how necissary it is for the resistance wire to be glass coated. I noticed that the
fiberglass had flaked off of some areas of the glas-col mantle, and they were still in good shape. The question comes to mind, in what condition will
the resistance wire be cooler, uninsulated in stagnant air or glass insulated in stagnent air. I think most people would immediatly say, the former
case will have cooler wire temperatures, but one thing to keep in mind is how shitty of a heat conductor stagnent air is. Is it possible that
fiberglass, a so-so kinda bad heat conductor acts as a heatsink to some extent keep wire temperatures cooler? Remember glass has a >10x better
heat conductivity than ideal gases.
Anyways, I hope to follow this up in the future, but if I don't...this is a pretty good start.
Note: I should also cross-link to this thread. In this thread heating mantles were produced using refractories and in another case, by simply making an air bath (ugh, air baths
suck...bad memories).
After the fact, I discovered Magpie did some interesting work with the dissassembly/repair of smaller heating mantles.
[Edited on 3-22-2011 by smuv]
|
|
|
Arthur Dent
National Hazard
Posts: 553
Registered: 22-10-2010
Member Is Offline
Mood: entropic
|
|
Wow! That looks wonderful. It actually looks easy the way you documented it but I imagine it's very much time-consuming and involving, however, you
have shown it can be done by the home chemist! I have several flat-bottom 500 ml boiling flasks, and a custom-made mandle for those would be way cool!
So many projects and experiments, so little time... LOL!
Robert
--- Art is making something out of nothing and selling it. - Frank Zappa ---
|
|
|
Magpie
lab constructor
Posts: 5939
Registered: 1-11-2003
Location: USA
Member Is Offline
Mood: Chemistry: the subtle science.
|
|
Good work smuv. Here's some more mantle repair experience:
http://www.sciencemadness.org/talk/viewthread.php?tid=10964#...
The single most important condition for a successful synthesis is good mixing - Nicodem
|
|
|
smuv
National Hazard
Posts: 842
Registered: 2-5-2007
Member Is Offline
Mood: Jingoistic
|
|
@Robert: For something like a 500mL mantle, it would really be pretty quick. Things took longer for a 3L mantle. I know I might be the butt of a
lot of teasing....but I found sewing to actually be pretty relaxing  . Also, I
definitly went overkill, holding the wire very tightly to the fiberglass cloth, the commercial product used <1/3 the number of stitches that I did. . Also, I
definitly went overkill, holding the wire very tightly to the fiberglass cloth, the commercial product used <1/3 the number of stitches that I did.
@Magpie: I wish I had known about your thread, it would have been a good home for these posts . Its nice to see what mantles with the fiberglass cloth base look like inside. One question I have, in that mantle
that you took apart, was the resistance wire sewn to the fiberglass cloth, or was it just freely suspended b/t the cloth and the glass wool?
I am going to edit my original post to crosslink to your thread.
|
|
|
Magpie
lab constructor
Posts: 5939
Registered: 1-11-2003
Location: USA
Member Is Offline
Mood: Chemistry: the subtle science.
|
|
Quote: Originally posted by smuv  |
@Magpie: One question I have, in that mantle that you took apart, was the resistance wire sewn to the fiberglass cloth, or was it just freely
suspended b/t the cloth and the glass wool?
|
I can't remember for sure, but I think it was just loose.
The single most important condition for a successful synthesis is good mixing - Nicodem
|
|
|
smuv
National Hazard
Posts: 842
Registered: 2-5-2007
Member Is Offline
Mood: Jingoistic
|
|
Follow-Up
I Finally got around to completing this project. What I did was, I I sewed a little fiberglass patch near the end of the resistance wire spirals
Then, I used a crimp fitting to attach the resistance wire to the original plugs of the old element. The purpose of the fiberglass patch was to
provide an extra layer of electrical insulation to ensure no short circuits from the crimp fittings wearing away at the nearby resistance coil.
Next, the fiberglass/resistance wire piece was sewn into the base piece (of the dead mantle). I used thin copper wire (from a transformer, thickness
of a hair) which 2 strands of which were wound to make a thread. I then sewed in yet another layer of fiberglass on top of this, to provide more
diffuse heat and a more robust setup; I sewed this top layer in with ordinary cotton thread (I was fed up with sewing w/ copper wire, and fiberglass
thread was fraying too much when sewing through the plastic base). In retrospect, I would use cotton thread for both these areas, it doesn't get very
hot at the edges of the mantle.
I fired it up, it seems to work, i only ran it for ~20 minutes, at full blast. It heats, not much else to say. In darkness, you can see the element
glowing through the fiberglass in one area. So in hindsight I should have been better at keeping a uniform spacing between the resistance wire (to
avoid hot spots). I'll install a fuse on it to avoid catastrophic failure.
I am very happy with the way the project turned out, but the proof is in the long-term longevity of the mantle. Time will tell.
Pretty isn't it?
Side view, boiling water; hard to see though; those red spots on the seam are my blood 
More water boiling...
Glows a little in total darkness, but this pic is very decieving, it is a faint red glow. Also it is way overexposed, this in pitch darkness
Oh Btw, 4.1A at ~115v full out. So I made it a little weaker than I wanted, was shooting for 500w rms.
|
|
|
food
Hazard to Self
Posts: 86
Registered: 4-9-2010
Location: the West
Member Is Offline
Mood: mithering
|
|
Very interesting and useful posts. I do have a question. I'm not familiar with this glass coated resistance wire, or mantle internals. I'm curious as
to whether I'm having a bad effect on a mantle when I seat a flask with some pressure to better couple a magnetic stirrer. Not talking about really
crushing the mantle, but yeah, would you characterize that wire/insulation as delicate? Should I be avoiding the pressure?
|
|
|
smuv
National Hazard
Posts: 842
Registered: 2-5-2007
Member Is Offline
Mood: Jingoistic
|
|
The wire is delicate in that, if you scratch at it with your fingernail you can definitely damage the insulation. But, as far as pressing a flask
into your mantle kinda hard, I think you will be fine. 
|
|
|
food
Hazard to Self
Posts: 86
Registered: 4-9-2010
Location: the West
Member Is Offline
Mood: mithering
|
|
Thanks. I'd been wondering about this.
|
|
|
|


