| Pages:
1
..
4
5
6
7
8
..
18 |
froot
Hazard to Others

Posts: 347
Registered: 23-10-2003
Location: South Africa
Member Is Offline
Mood: refluxed
|
|
Here's a slight mod to Patu's method I tried with promising results. I've put in pics, hope you can access them. (PS. please can
somebody u2u me the procedure for placing a pic directly onto the post using the code in the FAQ or upload it to the board, thanx)
This may have been discussed before but I've found that current density plays a major role in results. I used a 5V 50A supply and the more
cathode I have in the molten NaOH, the less Na I get. It seems that the more voltage I need.
In the first pic youll see the setup I used. The cathode is a ceramic tube about 10mm ID with a piece of fence wire through it with the tip just
protruding from the business end. (2nd & 3rdpic).
This was inserted into the melt as deep as possible without touching the tin obviously. After 5mins I carefully removed the tube and gave it a shake
over some paraffin. Out popped a generous blob of sodium. (4th pic).

We salute the improvement of the human genome by honoring those who remove themselves from it.
Of necessity, this honor is generally bestowed posthumously. - www.darwinawards.com |
|
|
froot
Hazard to Others
Posts: 347
Registered: 23-10-2003
Location: South Africa
Member Is Offline
Mood: refluxed
|
|
pic2

We salute the improvement of the human genome by honoring those who remove themselves from it.
Of necessity, this honor is generally bestowed posthumously. - www.darwinawards.com |
|
|
froot
Hazard to Others
Posts: 347
Registered: 23-10-2003
Location: South Africa
Member Is Offline
Mood: refluxed
|
|
pic3

We salute the improvement of the human genome by honoring those who remove themselves from it.
Of necessity, this honor is generally bestowed posthumously. - www.darwinawards.com |
|
|
froot
Hazard to Others
Posts: 347
Registered: 23-10-2003
Location: South Africa
Member Is Offline
Mood: refluxed
|
|
pic 4
Sorry about the mess Vulture.

We salute the improvement of the human genome by honoring those who remove themselves from it.
Of necessity, this honor is generally bestowed posthumously. - www.darwinawards.com |
|
|
Tacho
National Hazard
Posts: 582
Registered: 5-12-2003
Member Is Offline
Mood: No Mood
|
|
Congratulations!
I'll PM you about pictures.
|
|
|
BromicAcid
International Hazard
Posts: 3227
Registered: 13-7-2003
Location: Wisconsin
Member Is Offline
Mood: Rock n' Roll
|
|
Today was running the Castner Cell day!
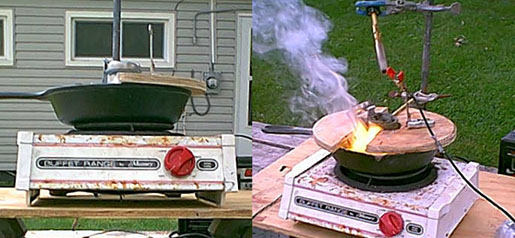
The design, a cast iron pot with a hole drilled in the bottom though which a steel pipe was put, it had a large nut on one side and the other had an
end cap that I cut in half, in between I used a silver washer. I put a nickel wire into this pipe and held it in place with some two part epoxy then
when it hardened I melted some NaOH separately and poured it into the hole. I drilled a hole though my electric range burner to accommodate the pan
sitting on it with the whole pipe going into it, in the picture above on the left you can see just the nickel wire coming out of the bottom of the
range. That is where I connected the wire for the cathode.
I had half of a lid on the top with an adjustable nickel anode. Also in the top left hand picture you can see my 'bell' that had a top held
on by a hinge.
Initial heating was attempted with a MAPP gas torch but it was not going fast enough plus the CO2 and H2O rising up from the combustion was seemingly
quickly absorbed by the NaOH so I just set it on the hot plate and heated on high heat.
Surprisingly the hot plate managed to melt some NaOH in the bottom and I plunged the anode into it and started electrolysis which in turn heated the
mix with resistance heating. Now nothing seemed to happen for a while, it did react with the coating on the pan though, it turned the NaOH slightly
red.
Eventually everything melted and the anode depth was adjusted so that it could run at 12V and not blow a fuse. The amps were over 15. But the bell
shorted out and Na was forming on the outside without my knowledge. That brings me to picture #2. Well, at least it was pretty.
For the rest of the experiment explosions occasionally blew the top off the bell. I got a small amount of Na recovered, ~2g but it does look like a
lot considering the low density, but it's nothing considering the 1.5 kg of NaOH used in the cell.
Then it started raining bad, see attachment. Rain falling into molten NaOH was NOT my idea of a fun time, but what the hey, I kept
going for over an hour.
But when I decided to stop I took the super hot pan and tried to pour it into a different pan. This was a pain because I forgot there was a pipe
running though the hot plate, and it was cast iron so the handle was ultra hot. When I finally finagled it out I poured into the pan which now had
significant rain water in it and NaOH exploded out! Molten NaOH spattered on my arms and shirt and table, the table promptly charred and attempted to
catch on fire.
Even though it was burning my hand I forced the cast iron pan back into the burner and gave up for a bit.
Much later when it stopped raining I cleaned up my pan, the cast iron, after 4 hours on the hot plate with molten NaOH in it appeared to have suffered
no massive effects, just some slight rusting.
But what I have done is not the important part, it's what I've learned.
Current density is everything, therefor both electrodes should be short and posses relatively little surface area.
Cast iron is resistant to NaOH to a suprising degree.
A torch is not a good item with which to heat large quantities of NaOH.
Constantly burning the H2 coming off with a constant running torch rather then allowing it to accumulate and ignite for sodium laying around is
a good idea.
Insulation around the cell is a good idea, as is a lid.
Wood chars easily from the heat of a Castner cell and can start fires.
What I would consider to be a good vessel now. A reducing adapter for pipes, preferably with the largest differential. Then a plug at the bottom.
Electrodes come in from the sides and almost touch in the center at the bottom of the vessel. In the center just below the surface across the top
should be a sheet of stainless steel. Na accumulates on one side, O2 goes off on the other. So much simpler then my design.
I tried to draw some of this up but I'm terrible at using computer drawing programs.
Overall the experience was not bad at all, until I realized that the extra hot NaOH would attack me so readily.

|
|
|
vulture
Forum Gatekeeper
Posts: 3330
Registered: 25-5-2002
Location: France
Member Is Offline
Mood: No Mood
|
|
I'd love to be your neighbor! 
One shouldn't accept or resort to the mutilation of science to appease the mentally impaired.
|
|
|
BromicAcid
International Hazard
Posts: 3227
Registered: 13-7-2003
Location: Wisconsin
Member Is Offline
Mood: Rock n' Roll
|
|
Thanks Vulture, and I bet my neighbor would not mind in the slightest swapping places with you! 
I'm doing better today. The NaOH fumes and burning Na really messed with my eyes, don't know why I wasn't wearing goggles.
They're all bloodshot now. Also where I got NaOH (l) on my arms.... It looks bad but it was only in small spatters, as I told my girlfriend
"It's like I got liquid delete key splashed on me."
Castner Cell V 3.0 is almost 75% completed (although it no longer looks like a Castner Cell) I've got high hopes for it to continue my trend:
V 1.0 Cost about $90 and produced 0 g of Na
V 2.0 Cost about $30 and produced about 3 g Na
V 3.0 has a projected cost of $10 and should therefore produce >3g Na, right?
Actually this one is shaping up to be a good one. But what I really need is a diaphragm, which is hard to come across, the best material that I have
come across is woven graphite thread which you can buy in large sheets for welding protection. But it's expensive and I don't need a large
sheet, I guess I can do without...
I've made some hand drawings of my past cell and this one and I'm taking pictures of this one taken apart. Will post tomorrow or the next
day.
|
|
|
rift valley
Hazard to Others
Posts: 103
Registered: 24-7-2004
Location: NH
Member Is Offline
Mood: semiconducting
|
|
Can't wait to see V 3.0! What are you using as a power source a car battery?
|
|
|
BromicAcid
International Hazard
Posts: 3227
Registered: 13-7-2003
Location: Wisconsin
Member Is Offline
Mood: Rock n' Roll
|
|
Sodium Cell V 3.0
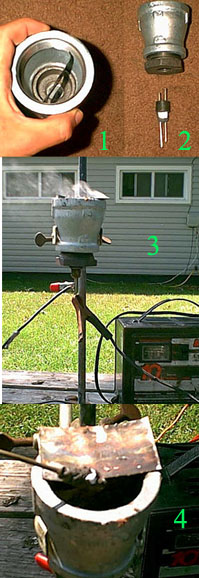
My setup for this is picture in frames 1 and 2, it is made from pipe fittings. In English measurements I have a 2 in. to 1 1/2 in. reducing adapter
screwed into a 1 1/2 in. to 1/2 in. brushing. This makes the body of the cell. A 1/2 in. plug was bought to fit into the brushing and two holes were
drilled at the extreme sides of the plug to accommodate two nickel electrodes.
One electrode was inserted to expose 1.6 cm into the melt and the other inserted to expose 1.2 cm to the melt, this resulted in a calculated current
density of 3.51 A/cm2 for the larger electrode and 5.0 A/cm2 for the smaller electrode assuming amperature of 15 which is the Max my battery charger
could get to. However the maximum current during the experiment was around 10 A therefore these numbers must be adjusted. The electrodes were spaced
roughly 1 cm apart.
They were held in place and the plug was filled with a two part moldable putty advertised as a steel welding compound. It holds up reasonably to the
temperatures and extreme conditions associated with this experiment plus it is non-condutive. As you can see in picture two this whole plug was able
to be separated (although the electrodes are fixed if the current is too low NaCl can be added in a small amount, this greatly increases the
conductivity of the cell, however it supposedly increases cell corrosion on a comparable level, the latter I have not noticed).
In picture one you see the divider I have in the cell. This was a tight fitting piece of sheet nickel that did not extend between the electrodes,
stopping just short of them. This was so as the sodium rose to the surface it would stay away from the oxygen rising right next to it. It worked
very well for this purpose and the two sides of the cell showed different corrosion afterward as a result of it.
Initially 15 - 20 ml of pre-molten hydroxide was poured into the cell and the current started immediately. However before I could get more NaOH
melted (I chose not to heat the cell directly, relying on resistance heating to do the job) the sodium production, which began very rapidly blew all
the NaOH out from between the electrodes and solidified the melt after rendering the condutive component ineffective.
It was my mistake that I attempted to add more molten NaOH to this directly as it did not melt the NaOH coating on the electrodes and therefore I was
left with a centimeter of NaOH solid over my electrodes. In an emergency pinch I put some water into the mix and put two new electrodes in from the
top, from here I used resistance heating to melt my way to the electrodes ( I also added a few pellets of KOH, this shows a definite increase in
melting speed from eccentric formation but overall potassium yield is low), which took quite some time, but finally I was able to hook the imbedded
electrodes back up and begin again.
The top of the melt kept solidifying and I had to break though the crust to get to the sodium below. In picture 4 you can see my stirring rod lifted
from the melt, shiny blobs of sodium clinging to it. All in all I had a small collection of sodium, about 1 gram, however much more was created but
did not get collected for various reasons.
This cell wins my certification for what could be the best medium production cell I have encountered. The most major problem being the electrodes
were too close together, this resulted in the sodium forming occasionally shorting out the cell, and localized overheating which eventually nearly
lead to the metalloid compound that thwarts some cells. Therefore I would increase the size of the bottom brushing and in turn increase the distance
between the electrodes by nearly one centimeter.
Also some outside heating should be available, an electric coil would be ideal, that lacking insulation would do the trick. Better division of the
compartments is not necessary but a lid, as shown in the picture is, not to keep gasses out but to eliminate spray from the electrode gasses rising to
the surface.
I might experiment with sodium production more but I believe this is the pentacle of my abilities, it is cheap, easy to produce, and you could buy and
endcap for the other side to cap it up when not in use for a constant sodium production apparatus.
P.S. Rift, my power source is a car battery charger.
|
|
|
Tacho
National Hazard
Posts: 582
Registered: 5-12-2003
Member Is Offline
Mood: No Mood
|
|
Funny...
This is a great work and nobody is posting any answers to it! Few months ago people just couldn't get enough of sodium...
I have been terrible busy lately and can't make long posts, but I'm very impressed Bromic, this is THE easy way of making electrochemical
sodium!
I would like to know what is that septum made of and what prevents oxidation of sodium once it floats. You probably explained it in your posts, and I
will read them more carefully when I have more time.
That work deserves to be better documented! Could you make more pictures available?
Anyway, congratulations!
|
|
|
chemoleo
Biochemicus Energeticus
Posts: 3005
Registered: 23-7-2003
Location: England Germany
Member Is Offline
Mood: crystalline
|
|
Bromic, is it possible you draw a simple diagram of the cell? I somehow have trouble figuring where the putty, and the different steel parts are.
Also - the top of the cell - is it covered? If so, by what?
And please remind me - how does your system avoid making this grey NaOH/Na mixture? I.e. how come solid Na can be taken off under the NaOH crust? Mmh
I think I asked something similar once - but I fail to remember the answer.
Anyway, great job!
So in essence, the whole job could be made to run continuously if a weak outside heating source was applied?
Never Stop to Begin, and Never Begin to Stop...
Tolerance is good. But not with the intolerant! (Wilhelm Busch)
|
|
|
vulture
Forum Gatekeeper
Posts: 3330
Registered: 25-5-2002
Location: France
Member Is Offline
Mood: No Mood
|
|
| Quote: |
This is a great work and nobody is posting any answers to it! Few months ago people just couldn't get enough of sodium...
|
1) We're jealous.
2) We wouldn't want to spoil such a masterpiece with our insignificant replies.
3) Sodium - Heat - Flames - Apparatus - You can't possibly pump up the drool factor anymore!
I'd like to see a drawing of the cell too, because this is something I tend to pursue in the coming weeks once I get my nickel crucible.
One shouldn't accept or resort to the mutilation of science to appease the mentally impaired.
|
|
|
BromicAcid
International Hazard
Posts: 3227
Registered: 13-7-2003
Location: Wisconsin
Member Is Offline
Mood: Rock n' Roll
|
|
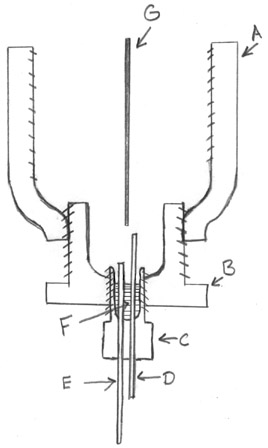
I tried to draw this as well as I could, but I'm still not too good at drawing, hopefully, this combined with the pictures of the real thing
above should give a thorough idea of what this thing looks like. [Note: NOT TO SCALE]
This is a reducing adapter, it reduces one pipe size to another, the top opening which is the opening to the cell is 2 in. and it reduces to 1.5
inches at the bottom opening. It is threaded at the top and bottom. On the inside it just slopes down gradually after an inch or two. It is
stainless steel.
This is called a brushing. It does the same thing as the reducing adapter but less gradually. It basically acts as a total plug but with an
opening of the desired size. This brushing fit the 1.5 inch opening in the reducing adapter (A) and left an opening in the bottom of .5 inches. for
the plug (C) to fit into. This is threaded to screw into the bottom of the reducing adapter, and the hole in it is threaded as well for the plug.
This is the plug. It fits the hole in the brushing. What it is normally is simply a plug, there is no way for liquid to escape and it is for
sealing off extra outlets in pipework and such. But in this one I drilled two holes to accommodate the electrodes, you can see this removed with the
electrodes inserted in it, in the post that I did above.
This was the anode, made of nickel. Both the cathode and anode were made from wire of the same length and not cut down. The anode went into
the mix deeper because current density on the anode is less important, plus I wanted to make sure there was enough conductive area inside to allow for
that much current transfer.
This was the cathode. Small amount was exposed to the inside of the cell to achieve a high current density (5.0 Amp/cm2) which is significantly
higher then the current density mentioned by Organikum at the beginning of this thread. Notice how I had the portion of the anode and cathode at the
bottom of the cell different lengths sticking out, this was so I could differentiate between them once the cell was running because it all looks the
same from above.
This is where the putty went, it came up to be even with the bottom of the brushing adapter. It stopped current from traveling between the
electrodes too low and insulated them from shorting out with the inside of the cell. As I said before this was some kind of 'cold weld' mix
that came in a roll, you cut off a piece and manipulated it till it was of a homogenous consistency then applied it and it hardened rapidly. Not
recommended for this environment but it held up.
Part G is a piece of nickel plate. It was jammed into the cell to divide it in half. Notice how the electrodes are on either side of it, and
the divider does not dip between them. This was just so sodium formed, rising up would not encounter much oxygen doing the same because less then 1
cm past the electrodes the rising elements were divided.
All the parts where put together without any sort of sealant, just used a pipe wrench. The divider need not be nickel, the electrodes don't have
to be nickel either. The electrodes do not have to in that manner, the basic design is there.
This was not the perfected cell as I said before, but it has the ability to be nearly perfect for a middle sodium production level. The loop method
actually seems nicer for lower quantity sodium. What my problem was, was the spacing of the electrodes, they did not seem to enter the molten salt
far enough as my current didn't rise much above 10 amp, and they were too close, the solution stayed very molten in the bottom but the top was
solid, which brings me to my second problem, external heating must be applied to the top.
If the electrodes are too close you can get a hot spot that can cause the metalloid to form, too far away and electrolysis becomes difficult. In my
setup here they were very close, too close as my final conclusion. But other then that it worked really well.
The lid for the cell can be anything, I just set it on there to prevent the spray of molten hydroxide that comes up during electrolysis, and partially
to keep the hydrogen coating over my molten sodium. All I used was a sheet of metal that did not even cover the top entirely. But it would be nice
to have a plug for the top too since it is already threaded, easy storage and easy to render 'safe' should an emergency arise, just remember
to turn off the electrolysis first.
I never got a good method to get the molten Na out though, I used a little scoop I made like a ladle but it was not good, brought over hydroxide,
probably introduced impurities, hard to get the Na out. I personally wanted to try an eye dropper in preheated mineral oil, before taking sodium out
sucking up some mineral oil to heat the dropper and pushing it back out, then using the dropper to suck up the sodium.
I put the electrodes at the bottom for two reasons, A) I couldn't find a good diaphragm to separated them that was not metal and I didn't
want risk shorting the cell out. When the electrodes were at the bottom I could put the separation right above and it worked. B) When the electrodes
come from the bottom there is lots of working room above the mix, you are not trying to avoid bumping electrodes and such.
| Quote: | | So in essence, the whole job could be made to run continuously if a weak outside heating source was applied? |
That was my goal to all of this. Simple sodium generation when necessary for however long is necessary from common materials. As with any Castner
cell though the problem of long running is the side reactions producing sodium oxide which slows and eventually stops the cell. I believe this could
be avoided if when the cell starts to loose electrolyte you just replace it with NaOH. Commercial NaOH contains excess H2O usually which has to be
electrolyzed out first and boiled out, if the cell were turned off and NaOH added with H2O as a contaminate, you will hydrolyze your sodium oxides
formed and therefore refresh the ability of your cell to run.
| Quote: | | And please remind me - how does your system avoid making this grey NaOH/Na mixture? I.e. how come solid Na can be taken off under the NaOHcrust?
|
Now that I've made the grey mixture I have a better grasp of it. If your electrodes are too close, localized high heating, therefore grey
mixture forms, and it spreads and eliminates the constructive conductivity of the cell. As I've said, the electrode spacing is the most
important part especially since the electrodes are immobile. Too close and you get overheating, sodium coming between the electrodes and shorting
them out, and possible NaOH/Na mix formation. Too far and the actual work performed drops and the electrolysis is sluggish. The Na formed under the
electrolyte, rose to the top, and collected under the hardened crust, when I broke the crust the liquid Na collected on my stirring rod (a nickel
wire) and I took the picture.
Steels of all sorts have decent resistance to NaOH, copper is attacked rapidly by slightly wet NaOH when heated, haven't tried it in anhydrous.
NaOH fresh from the molten mix on a stirring rod reacts quite violently with water (no surprise). If you have a stirring rod of sorts get some pliers
to break off the NaOH that makes unwieldily coatings on it though usage.
I will answer more questions as they come
|
|
|
chemoleo
Biochemicus Energeticus
Posts: 3005
Registered: 23-7-2003
Location: England Germany
Member Is Offline
Mood: crystalline
|
|
Great job!
Great job on the diagram, I think this is what we all needed!
I do have a few questions though
For one thing, how do you avoid the electrodes from shortcutting through the plug C? I guess plug C is made of metal right? In that case presumably
the holes through which the electrodes are threaded are greater than the diameter of the electrodes, and the insulation is provided by the
'putty'? In that case, what is this mysterial putty made of that it resists molten 310 deg C hot NaOH (and is an insulator too, at those
temps?)?
Regarding the grey NaOH/Na mix - this is the SOLUTION to a great problem! Everytime I tried making Na, I had this particular problem. How certain are
you that the temperature is the cause of this problem? I.e. you wouldnt possibly be able to take the temperature between the electrodes? If
temperature is such a crucial factor to this - then I wonder how they got it done in the original Castner Tiegel description.
The only way I can see the whole temperature issue to work out (without major investment in equipment) is to provide for decent insulation. I was
thinking along the lines of resting the whole cell in a Al2O3/SiO2 putty, with a few Kanthal wires inside. The Al2O3/SiO2 would then serve as an 1)
insulating material, 2) which is heat resistant and shows no great thermal expansion coefficients 3) also an electrical heating mantle. I guess then
power could be applied to the heating wires within, and the optimum power would have to be determined simply by trial and error. But once established
- Na production would run at the max!
Also, I was thinking about the separation of the electrodes. O2 and H2 interfere with the reaction, so there needs to be a decent separation between
cathode and anode, as you have done with Ni-plate G. Great idea btw. I wonder where u get all that nickel from. Anyway - is there a chance to shape
this into some Y shape - i.e. to ensure even greater separation of the gases? Or - even better - to have a relatively small exit hole (i.e. 2 cm
diameter) for each electrode, so that 1) heat loss would be avoided, and this problem of crust formation and 2) to increase separation of the gases
forming at the electrodes? Of course, then this would have to be a removable device, else the Na couldnt be taken off.
Generally I am not such a great fan of the idea of taking off Na every few minutes/tens of minutes. Dont you think it would be neater to have the Na
accumulate to a certain extent (i.e. 10s of grams worth), then to take it out, add more NaOH, and continue? I mean - what I don't like about this
is that it reminds me too much of the loop method - where one gets a scoop of Na every few minutes which weighs a small fraction of a gram. Surely
this can be improved?
Anyway - great job once again - you are on the path to eternal Na-fication!
[Edited on 26-8-2004 by chemoleo]
Never Stop to Begin, and Never Begin to Stop...
Tolerance is good. But not with the intolerant! (Wilhelm Busch)
|
|
|
BromicAcid
International Hazard
Posts: 3227
Registered: 13-7-2003
Location: Wisconsin
Member Is Offline
Mood: Rock n' Roll
|
|
| Quote: | | In that case, what is this mysterial putty made of that it resists molten 310 deg C hot NaOH (and is an insulator too, at those temps?)?
|
Steel Epoxy Putty by Devcon, 'Leak Stopper' It is two parts, it looks like a roll of clay and there is an inner color and an outer color,
you kneed the two until uniform consistency then press into place. It insulates the electrodes from one another very well, but it's resistance
is not so great, it gets pitted and such but it is replaceable. The package says that it works to 200 F but it works well beyond that for my purpose,
it gets brittle at this temp but because it is a solid plug not subjet to mechanical strain it holds up beyond this. It advertises itself as
chemically resitant. Another thing I experimented with was fireplace moarter, it comes in a caulk tube for a caulk gun, problem is you have to apply
it in thin segments because heating is necessary between to cure it. Also it dissolves even more so in the molten hydroxide, I guess the sodium
silicate, the main ingredient is soluble in the hydroxide melt.
| Quote: | | How certain are you that the temperature is the cause of this problem? I.e. you wouldnt possibly be able to take the temperature between the
electrodes? If temperature is such a crucial factor to this - then I wonder how they got it done in the original Castner Tiegel description.
|
The original Castner cells were designed much bigger with a larger gap between the electrodes and different spacing, i.e., multiple anodes and such.
In this version it is hard to maintain the current density if the electrodes are spaced far apart with conventional equipment, therefor they have to
be close and you get hot spots. In the industrial cell with the electrodes spaced the way they were the heat could dissipate the temperature of the
cell could be assumed to be roughly equal everywhere. However on our scale this is not one of our luxuries.
| Quote: | | Anyway - is there a chance to shape this into some Y shape - i.e. to ensure even greater separation of the gases? |
What do you mean shape it into a Y, how?
| Quote: | | Generally I am not such a great fan of the idea of taking off Na every few minutes/tens of minutes. Dont you think it would be neater to have the Na
accumulate to a certain extent (i.e. 10s of grams worth), then to take it out, add more NaOH, and continue? |
Well, if the partition separating the two halves does a good job at the top the Na can accumulate on the one side there. It would be protected under
the hydrogen atmosphere identical to how it is in a Castner cell, then you could let it run for 30 minutes or so and ladle it out. That is once you
get the electrode spacing correct, mine were too close, I bought a new end plug today to reset the electrodes, same distance into the melt, but
another centimeter or two apart, this should also afford better separation of gasses.
I think that I will set the whole upper half of the cell in plaster today or tomorrow, good idea, nice insulator, put some heating elements in there
if I can find any, if not, well, I'll work around it.
Edit: Took the whole cell, wrapped it in a heating coil for an electric stove with a variable control switch, imbedded it in plaster of Paris.
[Edited on 8/27/2004 by BromicAcid]
|
|
|
rift valley
Hazard to Others
Posts: 103
Registered: 24-7-2004
Location: NH
Member Is Offline
Mood: semiconducting
|
|
| Quote: | Originally posted by chemoleo
For one thing, how do you avoid the electrodes from shortcutting through the plug C? I guess plug C is made of metal right? In that case presumably
the holes through which the electrodes are threaded are greater than the diameter of the electrodes, and the insulation is provided by the
'putty'? |
I am also curious, as i am making a cell off of your design I already have all of the parts. So how do you keep the electrodes from shorting out when
you pass them through a metal cap?
|
|
|
Cyrus
Hazard to Others
Posts: 397
Registered: 24-4-2004
Location: Ancient Persia
Member Is Offline
Mood: No Mood
|
|
How about using the alumina crucible method you (BromicAcid) suggested to me to make a plug. Also, if sodium silicate (from the dap stuff) is
soluble in NaOH, why not just let the NaOH get saturated with sacrificial NaSiO3, and then add the plug. More work I know, and it probably will ruin
the reaction, but I CAN'T STAND expendable parts (or planned obsolesence. )
I'll test the alumina ceramic's resistance to NaOH today or soon.
|
|
|
BromicAcid
International Hazard
Posts: 3227
Registered: 13-7-2003
Location: Wisconsin
Member Is Offline
Mood: Rock n' Roll
|
|
The holes drilled in the cap are significantly larger then the diameter of the electrodes. I packed the steel epoxy mix around them and filled the
depression in the plug, this insulated it.
Another possible way that I was considering is a play off of the original method. Imagine my current cell except in place of the brushing and the
smaller plug there was just one large plug at the end. Into this was drilled two holes to accommodate the smallest diameter pipe one could find.
They would be drilled across from one another then the electrodes inserted into them. Then before running molten NaOH would be poured into the pipes
to insulated them further down as it cooled.
That is similar to how the cathode is insulated from shorting out in the original Castner cell. You couldn't put the two electrodes next to one
another in the same pipe and insulate with NaOH because as the electrolysis progressed it would heat and melt its way straight to the bottom of the
electrodes.
|
|
|
vulture
Forum Gatekeeper
Posts: 3330
Registered: 25-5-2002
Location: France
Member Is Offline
Mood: No Mood
|
|
Unless you're alumina is pure korund, eg the sintered and extremely unreactive version of Al2O3, it's going to dissolve in NaOH over time.
One shouldn't accept or resort to the mutilation of science to appease the mentally impaired.
|
|
|
vulture
Forum Gatekeeper
Posts: 3330
Registered: 25-5-2002
Location: France
Member Is Offline
Mood: No Mood
|
|
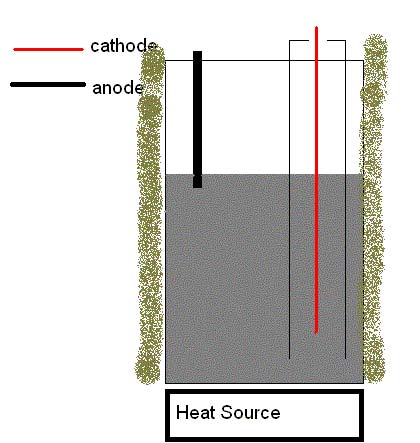
Tonight I've been flicking together a cell myself.
The pictures should speak for themselves.
The idea is to collect the sodium formed at the cathode inside the pipe to reduce loss. There is a problem however; the pipe is made of galvanized
steel. Now I know this isn't ideal and that it's probably going to
shortcut the cell when the molten sodium collects in it, but at the moment I have nothing better at my disposal.
I'm planning to use thick copper wire both as anode and cathode material.
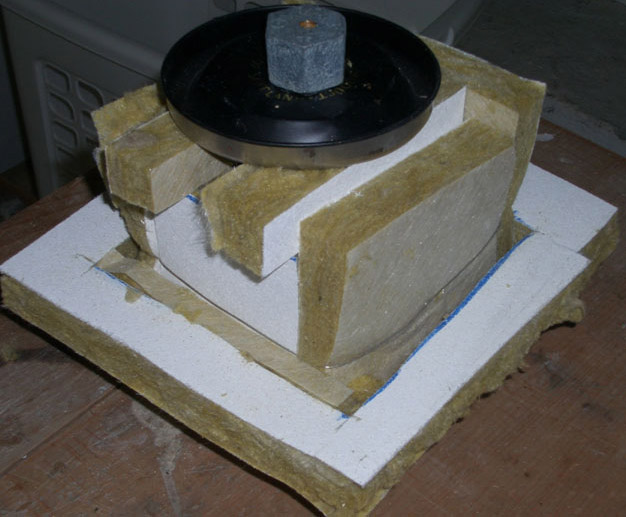
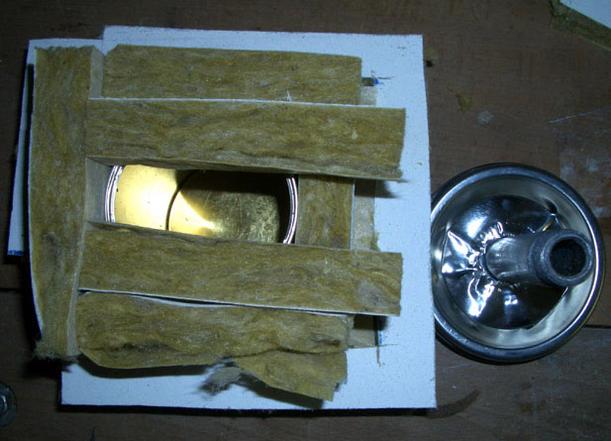
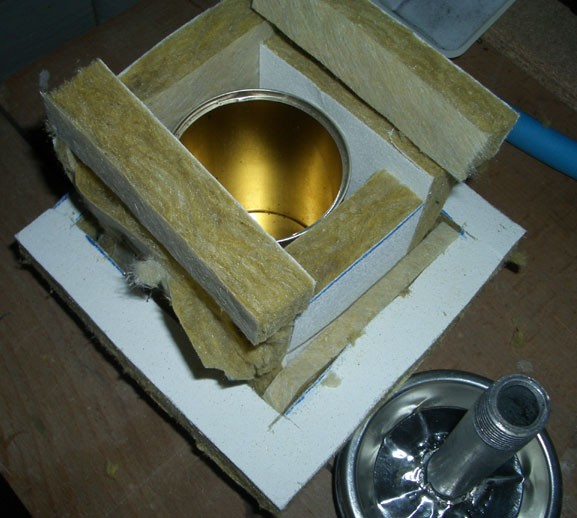
The outside ring of insulation is mainly to keep (possible) combustion heat from reaching the electrodes and such.
I'm going to test it without the electrodes but with the pipe as soon as the weather clears up (blasted belgian weather!!!) to see if it can
actually melt NaOH and how the pipe will react.
EDIT: The vessel is a tobacco can. It's very similar material as a soupcan. We'll see if it holds up.
EDIT2: Bugger. The resistance between the inner and outer wall of the pipe is 0,4 Ohms at roomtemp. I wonder if passivation in HNO3 could solve this.
I'll be using an old ATX power supply that delivers 18A @ 5V.
[Edited on 28-8-2004 by vulture]
One shouldn't accept or resort to the mutilation of science to appease the mentally impaired.
|
|
|
vulture
Forum Gatekeeper
Posts: 3330
Registered: 25-5-2002
Location: France
Member Is Offline
Mood: No Mood
|
|
I've put the apparatus on an electrical hotplate (500W) without the electrodes, just to see if I can reach the required temperature. Currently
the temperature on the outside of the can, approx halfway the apparatus is 305C. I still have a few other problems to solve, like inserting the
electrodes, because the NaOH formed a rather hard crust.
I've exchanged the cathode holder by a piece of insulating material.
The main conclusion of this test is: insulation is everything
I got stuck somewhere around 250C with the setup like it was in the previous pics.
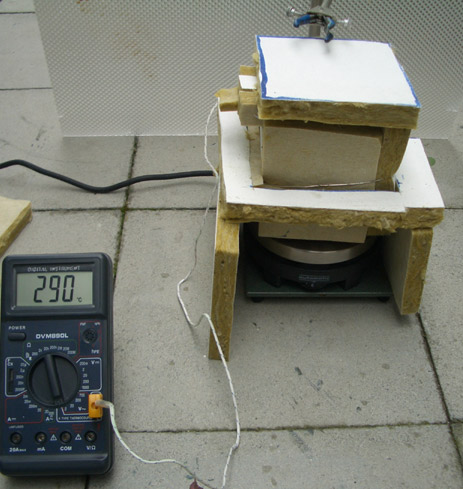
EDIT: Scrap that, temperature is currently 324C... There are
some transparent spots developing in the NaOH too...
EDIT3: Ok, sofar the weather is holding out.
The NaOH melted to a black mass, possibly because of contamination from the can.
Let's see how the steel pipe holds up in there...
[Edited on 29-8-2004 by vulture]
One shouldn't accept or resort to the mutilation of science to appease the mentally impaired.
|
|
|
BromicAcid
International Hazard
Posts: 3227
Registered: 13-7-2003
Location: Wisconsin
Member Is Offline
Mood: Rock n' Roll
|
|
You know that putty that I keep going on about... turns out then when the NaOH is hot and a lot of the surface area of it is exposed... well...
let's just say it's not so resistant any more.
Just a warning.
Although I found out that a stove heating coil for a hot plate with the resister switch in place circled around my previous vessel will keep it liquid
on its own. Plaster of pairs steams a lot when it is used to keep the vessel insulated but it eventually stops and works great.
|
|
|
vulture
Forum Gatekeeper
Posts: 3330
Registered: 25-5-2002
Location: France
Member Is Offline
Mood: No Mood
|
|
Some testing yesterday with the steel pipe in the setup was rather dissapointing, the pipe seems to cause huge heatloss, I couldn't get above
266C. Alas, I borrowed my fathers hot air gun and activated it at 530C .
Twenty seconds...hehe...
The only problem I have now is that I keep shortcutting my electrodes either way through the can or by touching the pipe. And the ATX power supply has
a rather sensitive shortcut sensor, cuts off immediatly.
Does CuO dissolve in hot NaOH? I have copper pipe which would be ideal, if I oxidize the outside to CuO I could prevent nasty shortcuts and sodium
forming on the outside.
One shouldn't accept or resort to the mutilation of science to appease the mentally impaired.
|
|
|
vulture
Forum Gatekeeper
Posts: 3330
Registered: 25-5-2002
Location: France
Member Is Offline
Mood: No Mood
|
|
Some further observations...
I've been using a copper pipe now instead of the galvanized steel one. It is oxidized by the heat but immediatly reduced back to pure Cu when
electrolysis starts.
Furthermore, the electrodes should be seperated atleast 2cm if the current rises above 2A. My run when they were to close resulted in something that
could best be described as a piece of artillery...
BANG[pause]BANG[pause]BANG[pause] etc which was quite nerve wrecking.
Despite the electrolysis was barely enough to keep the NaOH molten I still end up with the grey stuff.
[Edited on 3-9-2004 by vulture]
One shouldn't accept or resort to the mutilation of science to appease the mentally impaired.
|
|
|
| Pages:
1
..
4
5
6
7
8
..
18 |


