| Pages:
1
2 |
papaya
National Hazard

Posts: 615
Registered: 4-4-2013
Member Is Offline
Mood: reactive
|
|
Quote: Originally posted by Hockeydemon  | Okay so I ran an experiment earlier today, and it ended up being a bit of a failure. My electrolyte solution was 165g copper sulfate, 45g sulfuric
acid, .1g sodium chloride diluted to a 1L solution.
I then sprayed a rock with conductive graphite paint, and let it dry. The anode was 18 gauge copper wire. I unfortunately only had copper wire for the
cathode as well, but this was insulated so only copper wrapped around the rock was exposed to the solution. I ran this at 12v/2amp for a few minutes,
and got bored so I bumped it up to 12v/40amp. This drastically increased the progress, but the only thing that was happening it the Cu(II) ions
deposited on the exposed copper cathode. The reason why is obvious, but I was not really impressed with how it deposited either. It was a mushy copper
dust that kind of just kept falling onto the same spot. There was no real depositing onto the rock at all, except maybe a grain of rice size spot
under where the copper cathode wire was wrapped around.
I then abandoned the rock, and copper cathode entirely. I grabbed ribbon of staples for a staple gun (only readily available metal thing I found lying
around). I used this as the cathode, and stuck with a 12v/2amp charge for awhile, and let it do it's thing. The copper deposited onto the ribbon of
staples, but in essentially the same manner. It was easy to just wipe the brown/red copper dust that essentially coagulated onto the metal ribbon.
I did not add a leveling agent because I have not had a chance to get one.
Any suggestions based on the above?
|
What NaCL is doing there? Not an expert, but have heard chlorides ruin the process. Also it seems CuSO4 conc. is still small and you can add some
ethanol (vodka) into your solution instead of other hard to get organics(it'll prevent copper from oxidizing, whitener). Don't ask if I tried myself
- no..
|
|
|
violet sin
International Hazard
Posts: 1475
Registered: 2-9-2012
Location: Daydreaming of uraninite...
Member Is Offline
Mood: Good
|
|
Papaya- the chloride was mentioned in the patent I linked a ways up thread. Check it but they Recommended a full formula in it. And I believe
explained the reason as I half as expounded also.
Hockeydemon- you ever think of setting a pedestal in the sol. To bring the plated item up to surface height? Perhaps if the item was barely
submerged, covered in the graphite paint, and had the copper current carrier just touching the wetted surface, your plateing would be restricted to
the graphitized surface? You could always buff the point of contact for a better finished piece. With a sand dollar seem like this approach would
fit the geometry well no? Only foreseeable draw back- if bubbles or other convection activities didn't move the solution enough the copper would be
depleted in that given strata and might lead to dendritic downward growth.
I say that because I had copper and sulfuric acid but no copper sulphate one time, and used height desparity of the electrodes and the density of the
copper sulphate sol. to limit plate out.
|
|
|
Hockeydemon
Hazard to Others
Posts: 218
Registered: 25-2-2013
Member Is Offline
Mood: No Mood
|
|
I like your idea Violet Sin - I'm going to set it up so I can just set the negative clamp right on the rock with only the rock submerged. I will also
be more patient, and run 12v/2amp for a long period of time to see what happens. I'll give it a go sometime tomorrow probably.
I might make up a few various electrolyte solutions, and scale it down to 250-500mL to see which gives better results.
Would it be inadvisable to wire it all up to as a single system? For example: 3 beakers with various electrolyte solutions in a row with a straight
piece of copper wire for the anode sitting atop all 3 beakers with another piece of copper wire going into the electrolyte solutions attached to the
straight one at each beaker? Same for the cathode?
alligator clip->(+)---|---|---|
alligator clip-> (-)---|---|---|
..................................U..U..U
The (|) being the copper submersed into the beaker (U), and the (--) being the wire running from the power source.
Would there be any issue with the amp/volt being less at the third beaker vs the first beaker? I mean at least in regards to possible product
difference. I would keep the system as short as possible (the distance of 3-4 beakers).
[Edited on 19-6-2013 by Hockeydemon]
|
|
|
Fantasma4500
International Hazard
Posts: 1677
Registered: 12-12-2012
Location: Dysrope (aka europe)
Member Is Offline
Mood: dangerously practical
|
|
i have discovered that i was capable of covering my steel spatula (probably 316, 410 or 420 steel) in copper by getting it in contact with CuCl2 with
HCl in it
sometimes it appears nothing has happened and when fine sandpaper is run across it you can see shiny pink copper surface, this is however not very
good for chemistry as copper reacts easily with many things
|
|
|
phlogiston
International Hazard
Posts: 1376
Registered: 26-4-2008
Location: Neon Thorium Erbium Lanthanum Neodymium Sulphur
Member Is Offline
Mood: pyrophoric
|
|
| Quote: Originally posted by Hockeydemon |
Would it be inadvisable to wire it all up to as a single system? For example: 3 beakers with various electrolyte solutions in a row with a straight
piece of copper wire for the anode sitting atop all 3 beakers with another piece of copper wire going into the electrolyte solutions attached to the
straight one at each beaker? Same for the cathode?
alligator clip->(+)---|---|---|
alligator clip-> (-)---|---|---|
..................................U..U..U
The (|) being the copper submersed into the beaker (U), and the (--) being the wire running from the power source.
Would there be any issue with the amp/volt being less at the third beaker vs the first beaker? I mean at least in regards to possible product
difference. I would keep the system as short as possible (the distance of 3-4 beakers).
|
Your description essentially says you will connect the beakers in parallel.
In that case, the voltage across the three beakers will be the same, but the current through each beaker will be different (mainly depending on
electrolyte composition, distance anode/cathode and submerged surface area).
Unless you use a very thin copper wire or one of the cells draws a huge current the voltage across all three cells will be 12V.
Cheap (5 euro) multimeters are available that can measure currents to 10A with sufficient accuracy for this purpose. Get one, it'll come in handy in
all kinds of projects in the future.
[Edited on 19-6-2013 by phlogiston]
-----
"If a rocket goes up, who cares where it comes down, that's not my concern said Wernher von Braun" - Tom Lehrer |
|
|
violet sin
International Hazard
Posts: 1475
Registered: 2-9-2012
Location: Daydreaming of uraninite...
Member Is Offline
Mood: Good
|
|
while getting back into chem I was experimenting with copper and making it's colorful salts/solutions, I did a lot of electrochem. in one case I was
doing the epsom salt electrolysis for Cu(OH)2. being unhappy with the slow yield I tried doing multiple containers in series and parallel but had
little knowledge of how it was affecting my outcome. I mean I saw the effects but didn't really understand why. since then I have read a lot more in
both chem & electronics. looking back I realize multiple batches in series just had too much resistance to push through with out the electrodes
being quite close. that often lead to short path dendrites bridging the electrodes n trying to boil my bath. also if one messes up( too far apart)
the others don't get juice( or too much if shorted). in parallel they kinda have an additive effect of a larger single electrode but its not that
simple on a per bath basis as stated directly above by phlogiston. it can be a nice way to fine tune surface area/amperage ratio if you have several
small items to plate and a fixed current/voltage PSU though. instead of buying an expensive tunable bench-top power supply.
I'm not saying I think you are lower skill level than I so don't take it that way. I just meant I tried a lot before I got a solid feel for it.
(still working on the FULL understanding). not much beats hands on. I understand you are trying to finish a project and are probably on a schedule
so that exp may have to wait. what size are the sand-dollars you were aiming to finish? and are they the standard white kind with the 5 pointed star
kinda thing on 'em? if so I have a few kicking around the house so I could give it a go also n compare notes. I am planning on plating the red top
side of an abalone shell soon anyhow. gonna mask off the interior rainbow portion.
also I have heard that in a home project setting a low current and patients were the key to nice shiny items. when I was a kid my father gold plated
something ( think it was ham radio related ) and it took nearly a week(at least 5 days). but in the end it had a really nice finish. came in a kit
with a small power cord that had the black box type stepdown transformer DC output at the wall plug in. it only put out a few hundred miliamps IIRC,
don't remember the voltage. but then again I got nice shiny Ni plated on graphite electrodes with the same power supply I was doing Cu sol no
problem. copper came off as a sponge most the time as I was interested in getting it IN solution, not out.
|
|
|
Hockeydemon
Hazard to Others
Posts: 218
Registered: 25-2-2013
Member Is Offline
Mood: No Mood
|
|
I went ahead and threw up a video of what I'm working with on YouTube. I didn't make up 3 electrolyte solutions - just one. I tried keeping the
cathode's copper wire outside of the solution, and only submerging the graphite rock.
I got a small ring of copper to deposit on the rock. The ring formed where the rock came out of solution. I let it sit in there for some time, but I
am skeptical that the circuit was even complete when the rock was submerged. I say this because I cranked the thing amps up to 200 (because I doubted
the circuit was complete), and nothing happened in the solution. This should have produced dramatic degradation of the copper anode, and significant
heating of the solution.
I'll play around with it more though.
http://youtu.be/NhRBUWqfbZ0
I still want to know how to get the copper to plate regular things though. Such as the Allen wrench I tried to plate in the video. I left that on a
2amp trickle charge for 10-15mins, and you can see the results.
|
|
|
Hockeydemon
Hazard to Others
Posts: 218
Registered: 25-2-2013
Member Is Offline
Mood: No Mood
|
|
| Quote: Originally posted by violet sin |
I'm not saying I think you are lower skill level than I so don't take it that way. I just meant I tried a lot before I got a solid feel for it.
(still working on the FULL understanding). not much beats hands on. I understand you are trying to finish a project and are probably on a schedule
so that exp may have to wait. what size are the sand-dollars you were aiming to finish? and are they the standard white kind with the 5 pointed star
kinda thing on 'em? if so I have a few kicking around the house so I could give it a go also n compare notes. I am planning on plating the red top
side of an abalone shell soon anyhow. gonna mask off the interior rainbow portion.
also I have heard that in a home project setting a low current and patients were the key to nice shiny items. when I was a kid my father gold plated
something ( think it was ham radio related ) and it took nearly a week(at least 5 days). but in the end it had a really nice finish. came in a kit
with a small power cord that had the black box type stepdown transformer DC output at the wall plug in. it only put out a few hundred miliamps IIRC,
don't remember the voltage. but then again I got nice shiny Ni plated on graphite electrodes with the same power supply I was doing Cu sol no
problem. copper came off as a sponge most the time as I was interested in getting it IN solution, not out. |
I am definitely a lower skill level haha - no offense taken. I know it will take some toying around with to get results that I am happy with. I'm not
really on any deadline for the project - I'm on summer vacation. I went to the beach and grabbed a bunch of sand dollars for a few girls I knew, and
then had the idea to electroplate them. So I asked for them all back, and told them I hope to return them better than they were originally. There is
no real rush - the only thing is my financial limitations.
They're ~14-20sq" sand dollars - just your average run of the mill PNW sand dollar (roughly the size of a cookie). I might abandon my large car
battery charger, and try using a black DC plugin that I have laying around, and attach some alligator clips to it.
|
|
|
violet sin
International Hazard
Posts: 1475
Registered: 2-9-2012
Location: Daydreaming of uraninite...
Member Is Offline
Mood: Good
|
|
hey so I did a little experiment as promised. I didn't really invest too much time doing this, and I used a broken abalone shell instead of a sand
dollar. but as you can see in places it plated very nicely, and in others it sloughed off but a coating was left to work with. some places were
resistant to plating all together because of the increasing surface area of new copper vs. graphite. partialy b/c I didn't have a great container to
do this with, nor did I add a larger surface area copper sheet to match shell plating in surface area. distance between the cathode and anode were
poorly moderated as I had to hold the bath at an angel to keep the cathode out of sol.
I used 21.00g CuSO4*4H2O, 6.00g H2SO4 (copper contaminated badly), ~3ml algecide, 4 drops of dish soap and ~100ml DH2O. (forgot to add salt at the
last second)
the power supply for this was 10v 500ma direct current output stepdown type power cord for a radio or something random.
the shell was coated inside and out with clear fingernail polish. a second coating was applied and while the top was tacky freshly mortar ground
graphite was tapped on by finger. it was door lubricant that had a few chunky bits so the mortar and pestal for good measure. this was in no way
well done nor even coating.

the lower middle section has bad lighting but is bright.
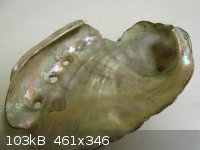
this is the inside with sloughing resist of fingernail polish. but no copper deposited here even though I had the anode holding the shell above sol
surface from under there.
the tupperware was tilted to reveal part of the shell as I suggested up thread. copper current carrier kept above solution. I had to reposition the
shell a few times to try and coax the copper to that side. but I did note that while doing this it was still plating in the opposite side of shell
from both electrodes oddly and some times brightly.( when it was plating brightly elsewhere)

the lower right'ish side here took it quite poorly. it was covered in a decently thick copper sponge. and above that it didn't even sponge over.
but you couldn't see it in the other pic b/c of glare.
all in all when I got the spacing right and had the surface of the sol the proper distance from the cathode you could visibly watch shiny copper
plating on the graphite. a rich shiny coat in mere minutes. as I moved the electrodes around it would affect the plating and throw spongy layer on
the shiny and visa versa. so this could easily be applied to your shells if it was done as follows...
A) in a better bath container with a sufficient volume of plating solution and size to space out electrodes.
B) under proper control of distance between electrodes as well as surface area matching of plating coat and anode.
C) and if the shell was prepped satisfactorily even with a more resistant resist. (plated portion doesn't fall off, just masked non graphite side)
hope this helps. I would also suggest holding the shells out of sol by alligator clip or similar on the end of the cathode current carrier, only
submerging the intended area. but keep at least 50% of the shell under sol. not just ramming a couple pieces of copper in a power cable and trying to
manipulate the tub in one hand and both electrodes with the other hand...
-Violet Sin-
|
|
|
Random
International Hazard
Posts: 1018
Registered: 7-5-2010
Location: In ur closet
Member Is Offline
Mood: Energetic
|
|
| Quote: Originally posted by Hockeydemon | | Quote: Originally posted by DrSchnufflez | | You could even seal the dollar then plate it with a chemically deposited amount of silver. Nurdrage has a video on this. I can't remember the name of
the reaction but it chemically deposits a fine layer of silver onto anything immersed in it. |
This is interesting to me, but as a separate experiment. It would be pretty cool to deposit a bunch of silver onto some things. I wouldn't want to
waste the silver by covering it up with copper though.
Can someone explain what is happening when you do this? It's similar to Tollen's reagent, but I'm not sure what is happening, or why there is sugar?
AgNO3 + NaOH + NH3 +C12H22O11 + heat?
What is causing the Ag+ ions to deposit on things? I am fearful that the lacquer will not stand up to the sodium hydroxide - though I only base this
on the fact that it is an acid resistant lacquer & not caustic.
|
I think it was silver mirror reaction video
|
|
|
Hockeydemon
Hazard to Others
Posts: 218
Registered: 25-2-2013
Member Is Offline
Mood: No Mood
|
|
Hey Violet sorry for the delayed response! Your instructions, and pictures are awesome! I've tinkered a little bit more with everything, and I've
gotten better results, but no where near what is in your pictures. I'll post a video here within the next couple days to show what I'm getting.
For whatever reason I'm only getting the copper to plate right on the surface of the water? For example I submerge a quarter of the sand dollar
standing vertically, and only a ring of copper forms right were the sand dollar first comes in contact with the solution. It doesn't plate at all to
the part of the sand dollar that is fully submerged.
I'm going to try to find a different power source again because I think that is a large part of the issue. Maybe I'll try some 9v batteries this time.
I've been scrounging around the house looking for some small DC converter, but I just moved so much of the misc junk I had I tossed.
Anyways tyvm for the help you've provided thus far.
|
|
|
| Pages:
1
2 |


