volkchemie
Harmless

Posts: 10
Registered: 3-10-2016
Member Is Offline
Mood: No Mood
|
|
Cheap Fumehood Construction
Introduction
Having desired a fumehood for awhile but limited funds, I've taken some time to come up with a fairly cheap design that doesn't require
ordering/cutting glass and metal working but does require you to be somewhat familiar with woodworking and using some tools.
The fumehood will be 40"x 20" x 25" (Length, Width, Height)
If you desire a bigger fumehood, substitute my blueprint with your own (Keep in mind of the weight of the top board with increasing size)
First off, let me crush some expectations. This is a cheap fumehood that is not fireproof or explosion proof. This fumehood is mainly designed for
venting noxious fumes and limited splash protection depending on the composition of the sash material; in my case vinyl. (This does not include the
cost of renting/owning the tools. The cost estimated is with the assumption that the tools are already in one's possession or can be borrowed - read
note at the end of material cost for what may be required)
Now onto the cost
--------------------------
Material Cost
$10.97 (x1) Vinyl Table Protector
$12.95 (x1) 7/16 - 4x8 Oriented Strand Board (OSB)
$8.84 (x1) 5/8 - 24"-48" Particle Board
$2.29 (x2) Hose Clamp
$7.37 (x1) Flexible Vinyl Pipe 5"-10'
$4.99 (x2) Air Intake Cap
$8.98 (x1) 6x1 1/4 Wood Screw 100ct
$4.14 (x1) 6x7/16 Frame Screw 100ct
$6.85 (x1) 1/2" X 10' Magnetic Tape
FREE (x1) Broken Air conditioning Unit (We will be salvaging the AC motor and it's squirrel cage fan)
Total = $67.38 CAD
(Optional Electronics)
$1.97 (x2) LED Lightbulb
$1.18 (x5) 15A toggle switch
$0.59 (x1) Toggle switch cover
$1.09 (x2) Dual Toggle Switch Cover
$1.59 (x3) 15A Receptacle
$0.99 (x1) Receptacle Cover
$2.09 (x1) Dual Receptacle Cover
$1.69 (x2) Keyless Lamp Holder
Optional = $11.19 CAD
Combined Cost = $78.57
*Note: The above price does not include tools such as a circular saw, latex paint, screw driver, drill, and dremel that was used in the construction,
*
Construction
Warning, it is crucial to read through all the notes before starting.
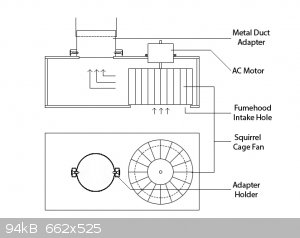
1) Fumehood Frame
This is the blueprint for the basic frame
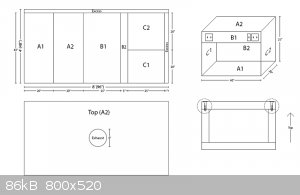
A1 = 40" x 20"
A2 = 40" x 20"
B1 = 40" x 25"
B2 = 40" x 5"
C1 = 20" x 25"
C2 = 20" x 25"
(Following the above blueprint minimizes excess and maximizes fumehood size based on one 4'x8' OSB)
Notes:
- This blueprint is to be cut on a 4'x8' Oriented Strand Board (1st Picture Top Left). Label the pieces to not get confused.
- Do not use OSB's below 7/16" thickness as it will be difficult to screw together
- Tolerance (Precision) of the cuts is fairly important but does not have to be perfect. Imperfections will show up as gaps between walls which can be
corrected with caulk or even duct tape (Don't bother trying to make it completely airtight as the flow of the fan overcomes possible fume escape
though minor gaps and some air flow is necessary to get the noxious fumes exhausted.)
- If the precision is too poor, the frame will be off kilter and may not rest flat on a desk.
- Make sure to assemble the board according to the 1st picture bottom right figure. This is important as the load bearing
should be by the wood only and not by the screws. The screws on the top board are mainly to keep the top board in place. (Failure to do this might
result in a collapse and injury!)
- I used about 5 - 6x1 1/4 Wood Screw per side. Pilot holes are necessary to prevent splitting of the OSB board. Use a thicker OSB board or thinner
screws to prevent having to pre-drill pilot holes.
- The exhaust hole and the switch/socket holes were cut out with a multipurpose dremel cutting bit. A jigsaw or other tools can be used.
- Using a rubber mat or other cover for the floor of the fumehood will help with the clean up in case of spills and increase the longevity of the
bottom.
- Painting isn't really necessary but (latex paint) does provide limited moisture protection inside the fumehood.
- If you do plan on painting and desire optional's such as electrical lights and switches, cut out the space for the necessary components before
painting.
- Don't bother spray painting with a can as this will take ages. (Personal experience, it's futile)
2) AC Fan Extraction and Wiring
Because the AC motors (induction motors) require a starter capacitor, make sure to take note of the general schematic of the motor and starter cap
assembly.
Ensure that the power is disconnected and begin dissembling the air conditioning unit to salvage the AC motor and it's starter capacitor (most often a
aluminum cylinder)
Most cheap window air conditioners will use the following schematic
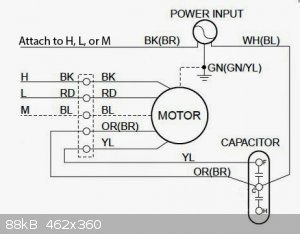
H = High, L = Low, M = Medium, F = Fan, C = Common, H(HERM) = Compressor
This procedure requires you to work with the mains. If you are not familiar with electricity and wiring, consult a
professional.
Depending on the air conditioner you take apart, there will either be a black (live) input or three speeds (High, Medium, Low). Wire the single black
live or ONE of the three different speed input with 120v live and the common (C) attaches to the neutral of your power input.
Note:
- Not all air conditioners are the same so make sure you look at the schematic that's usually drawn on the motor itself before continuing.
- Dispose of the air conditioning unit properly (It is illegal to vent most refrigerants to the atmosphere)
3) Fan Box
If you already have an exhaust system that fits nicely onto the hole on top of the fumehood, skip this section.
This is the blueprint for the "fan box". Note that there are no measurements as different air conditioners will have differently sized squirrel cage
fan and motor.

Notes:
- Precision, precision, precision! Precision is important for the Fan Box for several reasons.
- Reason 1: The inside of this box will be under increased pressure with the fumehood exhaust. This means that improperly sealed boxes will leak
noxious fumes right back into the room. Use caulk, hot glue, or other sealant to create a tight seal once the box is assembled.
- Reason 2: Uneven box caused by poor precision reduces the space between the squirrel cage fan and the box. This reduces fan efficiency and overall
flow.
- Place the squirrel cage fan into the fan box facing the correct way (cage opening facing towards the hole of the fumehood exhaust) before closing it
up. (My design doesn't allow for easy access to the interior when the box is finished).
- Replant the squirrel cage fan into the shaft of the motor and enough shims to the feet of the motor (plates that extend from the body for screwing
into frames) until the cage barely touches the bottom of the box.
- If the AC motor + squirrel cage fan came with a clamp for locking the fan tightly onto the motor shaft, use it as it will help prevent the cage from
loosening and touching the bottom of the panel.
- To reduce noise from the motor, try adding shock absorbing materials such as a sheet of rubber (rubber bands can work too!) in between the feet of
the motor and the screw.
- Seal any residual opening between the motor and the fan box with any sealant.
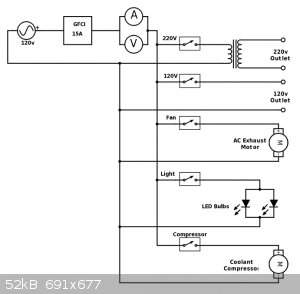
4) Fumehood Wiring
This section is optional but the usefulness of having built in lights, sockets and the low costs of these components makes it an attractive feature
for the fumehood.
Again, keep in mind that you will be working with mains power so understand the dangers associated with this.
This is a schematic of how I wired my fumehood. Because of the variability of what one desires, it is up to your own creativity to include whatever
you want.
Note:
- Always keep in mind of the gauge size to accommodate for the amount of power you plan on using with each device.
- Make sure to ground everything that can be grounded.
- Using a fuse or even better, a ground fault interrupter (GFCI) will help reduce the risk of electrical shock.
- Hide all bare connections with a wire-nut or heat-shrink
- Double check the polarity of all connections. (You don't want to be blowing the breakers by having a short in the system - potential fire hazard)
5) Fumehood Sash
Due to the complexity of using glass or the expense of solid plastic sash, this design will use a cheap replaceable and flexible sash.
Any material that is somewhat thick, transparent, and flexible can be used in this sash design. I will be using a vinyl table protector.
Using adhesive backed magnetic tape, this will form a rudimentary seal between the sash and the fumehood. A weight such as a wooden bar that spans is
slightly longer then the length of the fumehood attached to the bottom will give the sash support and ability to be rolled.
Note:
- Remember to match the magnetic polarity of the sash to the reverse polarity of the strip on the fumehood. Failure to do this will result in the
strips aligning only half the width of the strip.
- If the magnetic strip does not stick well to the edges of the fumehood, use thin tape to help it attach. (Using thick tape will reduce the strength
of the magnetic tape and thus seal).
- Add several framing screws to the sides of the fumehood in pairs (making sure the height matches each pair) and a wood screw on the wooden bar. This
will serve as a way to keep the sash raised or lowered.
- If the sash is lowered too much, the fan at max strength, there is enough pressure to cause the magnetic seal to loose traction/slip and cause the
whole sash to cave slightly into the fumehood. Complete caving of the sash should be prevented by the wooden sash support.
- If the sash is burned, dirty, dissolved, it should be easy to remove and replace the sash.
6) Optional Equipment
Due to my dislike of using ice for condensers, aspirators, and other cooling needs; a water chilling apparatus seemed more appealing.
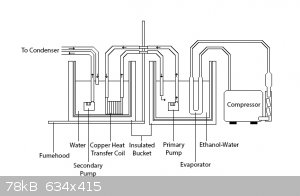
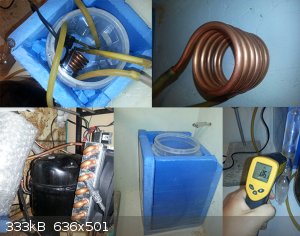
In my setup, two insulated reservoir exists. One inside the fumehood filled with water and as many water pumps I need to feed what experiment I decide
to do. Another reservoir outside the fumehood holds an ethanol-water mix that is directly cooled by the evaporation loop of an ice maker. (The total
heat dissipation of ice maker is weak enough that the ethanol may be unnecessary - ~41 watt assuming efficiency of 40%)
Conclusion
Although this fumehood has some limitations and design problems, the relatively low cost and the importance of ventilation in chemistry sometimes
require such improvisation.
I hope that this guide is helpful for those wanting to make a differently type of fumehood somewhat cheaply.
I am not responsible for any accidents and injuries related to the following the instructions provided. I have to the best of my abilities
explained potential safety problems and guidelines for building this particular fumehood safety. For any corrections, problems, or improvements,
please let me know in this thread or U2U.
-Volk
-------------------
Fumehood specification
Dimensions: 40"x 20" x 25"
Airflow: ~284 cfm (~134L/s) @ fully open sash
Exhaust Fan Wattage: 58W @ 120v
Noise: ~39dB @ Ambient (under exhaust on bottom of fumehood)
Noise: ~72dB @ 120v (under exhaust on bottom of fumehood)
Noise: ~66dB @ 60v (under exhaust on bottom of fumehood)
Noise: ~60db @ 48v (under exhaust on bottom of fumehood)
Noise: ~57db w/o Fan (under exhaust on bottom of fumehood)
Estimated time of completion: ~40-50 hours of work
Estimated injury: 3
Estimated death: 0
|
|
|
wg48
National Hazard
Posts: 821
Registered: 21-11-2015
Member Is Offline
Mood: No Mood
|
|
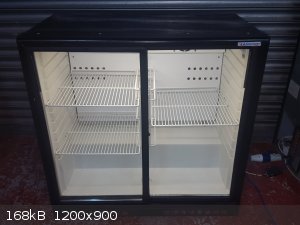
Great write up.
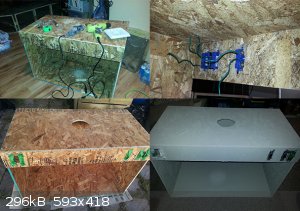
One option for the enclosure is to re purpose a ready built enclosure. A scrapped bottle cooler with sliding doors seems ideal. Like the one shown
below. It will need to be operated on its side so the mechanism for closing the sliding door will need to be modified in addition to adding the
services and air extraction. It comes with florescent lighting and two axial fans (probably not powerful enough but a starting point).
Smaller domestic bottle cooler can also be picked up many have glass doors but they tend to have hinged ones. A dishwasher may be nice with its
stainless steel interior (no glass door though) or at least as a source of stainless steel sheet.
[Edited on 30-10-2016 by wg48]
|
|
|
CharlieA
National Hazard
Posts: 645
Registered: 11-8-2015
Location: Missouri, USA
Member Is Offline
Mood: No Mood
|
|
I'm inspired! I'm adding this to my never-ending "to do" list. Thanks for the very detailed post.
|
|
|
aga
Forum Drunkard
Posts: 7030
Registered: 25-3-2014
Member Is Offline
|
|
Very cool fumehood designs !
The main drawback of my first 'fume hood' was the lack of height.
With columns and addition funnels, the setup can get pretty tall really quickly.
|
|
|
volkchemie
Harmless
Posts: 10
Registered: 3-10-2016
Member Is Offline
Mood: No Mood
|
|
Quote: Originally posted by wg48  | Great write up.
One option for the enclosure is to re purpose a ready built enclosure. A scrapped bottle cooler with sliding doors seems ideal. Like the one shown
below. It will need to be operated on its side so the mechanism for closing the sliding door will need to be modified in addition to adding the
services and air extraction. It comes with florescent lighting and two axial fans (probably not powerful enough but a starting point).
Smaller domestic bottle cooler can also be picked up many have glass doors but they tend to have hinged ones. A dishwasher may be nice with its
stainless steel interior (no glass door though) or at least as a source of stainless steel sheet.
[Edited on 30-10-2016 by wg48] |
Huh, I never though about using a bottle cooler is such a way but the pre-built sliding door made to work on it's side is an interesting concept. I'd
assume all you'd need to do for the door is to have steps for each height and a way to anchor it to each step.
| Quote: Originally posted by aga | Very cool fumehood designs !
The main drawback of my first 'fume hood' was the lack of height.
With columns and addition funnels, the setup can get pretty tall really quickly. |
As this is my first fumehood as well, I've been having height problem as well. The total internal height in my fumehood worked out to be 63cm.
This fumehood won't accommodate a 300mm vigreux column with a 500mL round bottom flask in addition to a heating mantle. It can also just barely fit my
Soxhlet extractor with a 150ml flat bottom flask and the heating mantle.
For future plans, I'm hoping to create a raised slope on the posterior side of the roof for increased height for larger setups.
|
|
|
MrHomeScientist
International Hazard
Posts: 1806
Registered: 24-10-2010
Location: Flerovium
Member Is Offline
Mood: No Mood
|
|
Great project! Very detailed writeup.
My first question is always: Where do the fumes go?
Did you have to punch a hole in your roof?
|
|
|
volkchemie
Harmless
Posts: 10
Registered: 3-10-2016
Member Is Offline
Mood: No Mood
|
|
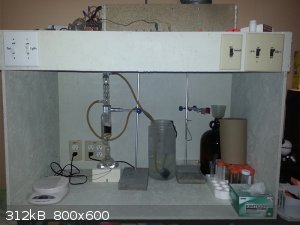
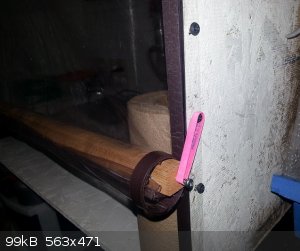
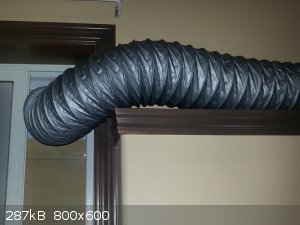
In this setup, the flexible duct sit on of a ledge that leads to a window. The ducting is anchored by the action of the window pressing up against the
air intake cap (see picture). The rest of the window is covered with a rudimentary wood panel. It's not a perfect fit but it does the job well enough.
Just keep in mind that the room that the fumehood is located in has a way for air to circulate freely in other then though the window. If the room is
poorly ventilated, the fumes might recirculate right back from the exhaust to the small openings by the window (The decrease in pressure inside the
room from the fumehood running without adequate ventilation into a room).
For those without a sliding window, one could create a pane that covers the whole window and screw on the intake cap.
|
|
|
|


