DoctorOfPhilosophy
Hazard to Others
  
Posts: 130
Registered: 12-6-2012
Location: Ontario, Canada
Member Is Offline
Mood: enthralled
|
|
Homemade stands
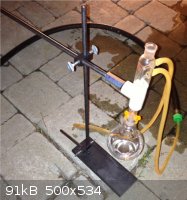
I'm a bit of a penny-pincher so instead of buying seemingly overpriced stands I decided to make my own. This is about as basic as it gets.
Tools used:
Vice
Angle grinder
Belt sander
Tap & die set
Drill press and drill bits
Materials:
WD-40
Steel cut offs
Steel rod (square and round)
Thumb screws
Coupler nuts, and bolts
PVC cap
PVC 'T'
Teflon tape
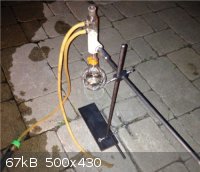
I made three stands like the ones pictured below. The bases are cut offs and the rest is 1cm steel rod. I cut the threads by hand, which required an
extraordinary amount of force and WD-40. The rod kept slipping in the vice, leaving it rough and gouged out in one part. The bossheads are sections of
square steel rod cut into little "billets" with an angle grinder and sanded smooth. Thumb screws (which were incredibly hard to find, I finally found
really expensive ones at Brafasco) pinch the rods into the bosshead. I drilled small holes in the bossheads first and then large ones partially
overlapping the small holes. This way the resulting hole has a "snowman" cross section. When the thumb screws are tightened, the rods are forced into
the groove left by the smaller holes so there is no "play" in the rod.
I couldn't make an effective 3-finger clamp so instead I hold the reflux condenser in a PVC 'T'. It doesn't fall through because it is tapered toward
the top. The end of the rod is threaded and inserted into the shiny hexagonal coupler nut. On the other side, a bolt pinched a PVC cap to the coupler
nut. The PVC 'T' is friction fit onto the PVC cap, with vinyl tape for brushing. Despite the flimsy sounding arrangement, this is incredibly sturdy
and can't crack like PVC cement might.
To prevent the reflux condenser from melting onto the 'T' in case of overheating, I wrap the contact area with teflon tape before inserting.
The rubber hoses connect to a garden hose via a neon-green adapter. I spend $9 on a bronze adapter, only to find this green one in a $1 bag of water
balloons at Dollerama. That's a shame. At least the bronze one doesn't leak.
For other glassware I'm still using borrowed clamps but I'm set on making my own DIY substitutes.
The heating mantle (not shown) is a DIY creation made from a scavenged heating spiral from an electric range connected to a PID controller consisting
of an Atmel micro controller, thermistor, and 10A relay.
 
|
|
|
Dr.Bob
International Hazard
    
Posts: 2721
Registered: 26-1-2011
Location: USA - NC
Member Is Offline
Mood: No Mood
|
|
Nice job. I have make some simple stands like that in the past as well. I like using a piece of 2" x 8" or 2" x 10" wood with a 1/2" steel rod
just forced into a slightly smaller (~7/16") hole. Wider is nice if possible, as narrow ones can tip to the side easily.
I would also suggest clamping the flask, and the using it to hold the condenser, plus maybe an extra (slightly looser) clamp on the condenser. I
have found it to be a bad idea to trust a Keck clamp to hold anything important that is not also held in place by gravity. If the flask is held up
and the condenser is on it, it will be held in place partly by gravity, so the clip is much less likely to fail. I have tried holding up flasks with
only keck clips and they sometimes fall. That can ruin your day. For small flasks, or ones with grease under vacuum, they rarely fail, but larger
flasks can be pretty heavy, and if you make any pressure in the reaction, it can pop right off the condenser.
|
|
|
chemcam
Hazard to Others
  
Posts: 423
Registered: 18-2-2013
Location: Atlantis
Member Is Offline
Mood: I will be gone until mid-september, on a work contract.
|
|
Custom Stands
It's funny you should bring this topic up today, as I was going to beings that I literally just made 4 stands myself. What I did was drill a hole in
the center of the bottom plate, put the rod through and welded it on the bottom. If you weld on top of the plate sometimes the rod will bend from the
heat. I then grind the weld spot on the bottom to it's perfectly flat. I paint the stands with glossy vinyl black to withstand chemical vapors and
heat, about 5 coats, then a clear coat.


*EDIT*
The taller stands that I made, the 30" ones, I thread the rod and base so I can take them apart. The ones in the pictures are 18" tall.
[Edited on 4-23-2013 by chemcam]
|
|
|
DoctorOfPhilosophy
Hazard to Others
  
Posts: 130
Registered: 12-6-2012
Location: Ontario, Canada
Member Is Offline
Mood: enthralled
|
|
The flask would be sitting in the heating mantle so there's no pressure really on the Keck clip. But with some of the other things I plan to do I need
to think of some homebrew substitute to plastic Keck clips, they're an impractical way of holding things together (especially 3D printed ones!) but I
can't seem to find an elegant way to hold flasks and non-tapered condensers. In the past I've used pipe clamps but I can't find ones that come apart
quickly and easily - which is what a three finger clamp does well.
Nice stands chemcam! I don't have much storage space so I like having disassemblable ones, maybe a pressure fit like what Dr.Bob describes would be
good for people with my problem but no tap&die set.
|
|
|
Organikum
resurrected
    
Posts: 2337
Registered: 12-10-2002
Location: Europe
Member Is Offline
Mood: frustrated
|
|
So true, so true.
Not to forget that they tend to disintegrate in contact with standard laboratory solvents, the vapors are enough.
Keck clamps are invented to boost the sale of glassware which breaks as they dont do their job.
There are SS clamps but they are horrible expensive.
No, not the wire clamps, they are the same as Kecks.
I suppose the spring system was and is still superior. I have also found a reference to rubber clamps which also secure vacuum, basically a rubber
tube fitting over the connection. This would be a great, cheap and relieable solution, thats probably the reason it is not sold anymore. Not enough
profit.
/ORG
[Edited on 24-4-2013 by Organikum]
|
|
|
zed
International Hazard
    
Posts: 2281
Registered: 6-9-2008
Location: Great State of Jefferson, City of Portland
Member Is Offline
Mood: Semi-repentant Sith Lord
|
|
Yup! Stands have become outrageously expensive. At least, in the major supplier's lab catalogs. Years ago, this was not the case. Clamps are now
expensive too, and as a bonus.....They don't work very well.
Still, in the U.S., prices aren't terrible on E-bay.
[Edited on 24-4-2013 by zed]
|
|
|
chemcam
Hazard to Others
  
Posts: 423
Registered: 18-2-2013
Location: Atlantis
Member Is Offline
Mood: I will be gone until mid-september, on a work contract.
|
|
Even with eBay I still find it much cheaper and better quality to build my own equipment. For the stands I bought two 36" steel rods for $3 each then
cut them in half. The steel plates I had extra from when I built my drop test rig and blast shield. I'm in the process of designing clamps but I will
post the plans and pics when I finish. Also I built a very powerful and nice looking magnetic strirring unit from scraps, soon I will incorporate a
hot plate into it and post those plans as well. My other hobby besides chemistry is obviously metal working and building things. 
[Edited on 4-24-2013 by chemcam]
|
|
|
CaliusOptimus
Hazard to Self
 
Posts: 96
Registered: 10-6-2011
Member Is Offline
Mood: Subjectively Objective
|
|
http://www.sciencemadness.org/talk/viewthread.php?tid=22963
|
|
|
binaryclock
Hazard to Others
  
Posts: 121
Registered: 9-4-2013
Location: Canada
Member Is Offline
Mood: Organic
|
|
Great ideas.. thanks!
Current Project: Playing with my new Laboy advanced distillery kit!
|
|
|
cyanureeves
National Hazard
   
Posts: 744
Registered: 29-8-2010
Location: Mars
Member Is Offline
Mood: No Mood
|
|
twice i have used those upright pole lamps that are put together in 2ft. long segments that have a heavy base.actually i still use one of those pole
lamps to hold the condensor and of course i pulled out the cord and bulb socket.
[Edited on 4-28-2013 by cyanureeves]
|
|
|
mayko
International Hazard
    
Posts: 1218
Registered: 17-1-2013
Location: Carrboro, NC
Member Is Offline
Mood: anomalous (Euclid class)
|
|
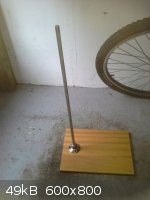
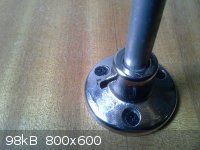
Here's that a stand I just threw together. I didn't have any appropriate metal handy, so the base is made from scrap wood. A fire hazard, I know, but
I'll try to keep the thermite reactions off of it in the meantime. The hardware is courtesy of Dr. Bob (thanks, might need more :3 )
 
|
|
|
binaryclock
Hazard to Others
  
Posts: 121
Registered: 9-4-2013
Location: Canada
Member Is Offline
Mood: Organic
|
|
I too made some stands from just some hardwood I had left over from doing some hardwood floors, and some 3/8 threaded rod that cost me a whopping $3
per rod (3 foot.) The hardwood is Jatoba which is so dense, it is naturally resistant to fire. I know chemicals are a different beast, but still
it's not pine or some other softwood or weak hardwood like birch. Jabota has almost the fire resistant value that steel does.. pretty close at least.
I've tried to burn this stuff it just singes.. pretty cool. It was a fast and quick project, I didn't do any fancy joints or make them look cool..
just glued and clamped up two pieces of hardwood, cut them to size, cut some feet and glued/clamped them on. After that I drilled a hole, put the
threaded rod through and a nut and washer on each side. Works pretty well for about $3.50 a stand (I had the hardwood already so I'm considering that
no cost.) But I'm sure we all know someone with a bit of hardwood left over.
The threaded rod works well, but sometimes the clamps get hung up on the threads when adjusting them up or down. If you have a dye set, I'd suggest
getting metal rod that isn't threaded and threading the ends with a dye and lots and lots of cutting oil.


[Edited on 21-5-2013 by binaryclock]
Current Project: Playing with my new Laboy advanced distillery kit!
|
|
|
Hexavalent
International Hazard
    
Posts: 1564
Registered: 29-12-2011
Location: Wales, UK
Member Is Offline
Mood: Pericyclic
|
|
chemcam, there is one flaw in your design that I hate in clamp stands: because the rod is in the middle of the base, positioning hotplates near the
assemblies so that they're level - not one half of the plate on the stand base, and the other off it - whilst allowing for the clamps to reach the
centre of the hotplate - is a nightmare. This may be hard to follow, but you may discover what I mean. Having them in the middle also makes them more
prone to tipping IME; having them towards one end, and having the clamp over the base side, is a much more stable configuration.
Also, having the rods themselves painted has never worked out for me, as moving the clamps up and down it chips and scratches off the paint, leaving
them looking unsightly.
[Edited on 21-5-2013 by Hexavalent]
"Success is going from failure to failure without loss of enthusiasm." Winston Churchill
|
|
|
mr.crow
National Hazard
   
Posts: 884
Registered: 9-9-2009
Location: Canada
Member Is Offline
Mood: 0xFF
|
|
Wow that's a really pimp stand!
I made one with plywood and a 2x4. Drill a hole in the 2x4 and cram in a steel rod from home depot
If you get two stands you can use attach a 3rd steel rod going across with angle clamps. Then you get a solid scaffold structure and a convenient spot
to clamp a condenser
Double, double toil and trouble; Fire burn, and caldron bubble
|
|
|
I Like Dots
Hazard to Self
 
Posts: 69
Registered: 10-4-2013
Member Is Offline
Mood: frisky
|
|
Did someone say 'Custom' stand?? Got impatient and McGyvered myself a stand.
Its... uhh... whats the word... 'modular'.

Looks precarious, but it was actually very sturdy!
|
|
|
binaryclock
Hazard to Others
  
Posts: 121
Registered: 9-4-2013
Location: Canada
Member Is Offline
Mood: Organic
|
|
LOL MacGyver is right! I couldn't want to distill anything volatile or toxic with that stand, but at least it worked  Love the vodka bottle too! Love the vodka bottle too!
Current Project: Playing with my new Laboy advanced distillery kit!
|
|
|
confused
Hazard to Others
  
Posts: 244
Registered: 17-3-2013
Location: Singapore
Member Is Offline
Mood: tired
|
|
its very...modular
but where does the heat source go?
|
|
|
cyanureeves
National Hazard
   
Posts: 744
Registered: 29-8-2010
Location: Mars
Member Is Offline
Mood: No Mood
|
|
i think the flask is being heated by a heat lamp bulb and wrapped with the light bulb package cover.there is a bottle of vodka next to the heat source
and the tri-pod is actually holding up the thermometer adaptor,condensor,and the 90 deg. adaptor.
|
|
|
binaryclock
Hazard to Others
  
Posts: 121
Registered: 9-4-2013
Location: Canada
Member Is Offline
Mood: Organic
|
|
Quote: Originally posted by cyanureeves  | | i think the flask is being heated by a heat lamp bulb and wrapped with the light bulb package cover.there is a bottle of vodka next to the heat source
and the tri-pod is actually holding up the thermometer adaptor,condensor,and the 90 deg. adaptor. |

Current Project: Playing with my new Laboy advanced distillery kit!
|
|
|
jimwig
Hazard to Others
  
Posts: 215
Registered: 17-5-2003
Location: the sunny south
Member Is Offline
Mood: No Mood
|
|
diy
thanks for r and d.
those clamps for glassware have been dogging me for a long while and i find myself constantly (all the hours hhahah)
to find a doable method.
keep posting your experience with the aforementioned stuff.
craZy jiM wGGns
--packrat, professional bum. -- once just tired
now REtired.
|
|
|
jimwig
Hazard to Others
  
Posts: 215
Registered: 17-5-2003
Location: the sunny south
Member Is Offline
Mood: No Mood
|
|
diy
thanks for r and d.
those clamps for glassware have been dogging me for a long while and i find myself constantly (all the hours hhahah)
to find a doable method.
keep posting your experience with the aforementioned stuff.
craZy jiM wGGns
--packrat, professional bum. -- once just tired
now REtired.
|
|
|
ParadoxChem126
Hazard to Others
  
Posts: 104
Registered: 5-4-2013
Location: USA
Member Is Offline
Mood: No Mood
|
|
I think people have made stands by drilling holes in concrete bricks and sticking in a metal rod. They probably seal it with epoxy or something of the
sort.
|
|
|